Nmap is a network mapping tool. It provides a range of powerful scanning options. Many network administrators use Nmap to scan open ports & services on a network, guessing the operating system on the targeted machine, monitoring hosts, and discovering different services with their version information. In this article, you will see how Nmap on windows works.
Nmap is free and open-source software that was created by Gordon Lyon. Nmap is utilized to find out hosts and services on a network by transmitting some packages over the targeted network. Nmap was once limited only to Linux operating systems, but now it is available for Windows and macOS too.
Note: If you want to use Nmap on Windows without the need of installing bare-metal Linux or a virtual machine utilizing the power of WSL 2, we have an entire tutorial series covering how to do that.
Table of Contents
- Why should you use Nmap
- Nmap Installation Process
- Nmap features
- Zenmap for Windows
- Different scan types in Nmap
- Scanning TCP/UDP ports with Nmap on windows
- Other common Nmap commands
- Conclusion
👀 This Tutorial has some related Articles!
👉 Part 1 – Nmap Basics
👉 Part 2 – Nmap Host Discovery
👉 Part 3 – Advanced Nmap Commands
👉 Part 4 – Nmap NSE Scripts
👉 Part 5 – Nmap on Windows
Why should you use Nmap
Nmap is a network mapping tool with a ton of other useful features. Many security researchers and pentester use this open-source tool. Nmap is also a favorite tool for both black and white hat hackers.
A hacker with good knowledge can create images of your network topology. Scanning your network can help you to make yourself more secure and spot the flaws in your system. You can check for any unauthorized devices that are connected to your network, you can find ports that are meant to be closed but are open for some reason, and to point out the users that are running any unauthorized services on your network.
Nmap Installation Process
Installing Nmap on Windows is extremely easy. You have to follow some short steps to use this powerful tool.
- Go to the following web address nmap.org/download.html and download the latest stable version
- Once the setup is downloaded from their website, now you have to browse to the downloaded “.exe” setup file. Right-click on the file and run it as an administrator.
- Now the installation process will start, read the license agreement thoroughly and only accept the license agreement if you agree, by clicking the “I agree” button.
- Now choose the components that you want to install with Nmap but choosing them all is recommended. Click on the “Next” button.
- The installation location for Nmap will be C:\Program Files (x86)\Nmap, but you can change the Installation folder to wherever you want. Now click on the “Install” button.
- Now the actual installation process will start, and all files will be extracted. Once it is done, your Nmap is ready to use now.
Nmap features
This powerful tool carries many features that can be used by a hacker to get a lot of information about their targeted machine.
- Identify open ports.
- Network Inventory.
- Map a network.
- Exploiting and finding a vulnerability.
- Host uptime monitoring.
- Network security audit.
- Detecting OS.
- Detect service and version.
Network Mapping – It can be beneficial for you to check the devices present on a network including all the routers, servers, and switches, and to verify how they are connected physically. Nmap on Windows has the capability to show a whole map of the network.
Detecting OS – Nmap can also be used for OS footprinting. You can check the operating system running on your targeted device, including the vendor name and the version of the system. It can also give you an estimate for the ‘devices’ up-time.
Security Auditing – After footprinting the OS and knowing the applications running on the system, network managers now discover the vulnerability that can lead to specific flaws.
Discovering services – By using Nmap you can do more than just find hosts on the network, you can also check their behavior and whether they are acting as web servers or mail servers and information regarding the version of the software they are using.
Zenmap for Windows
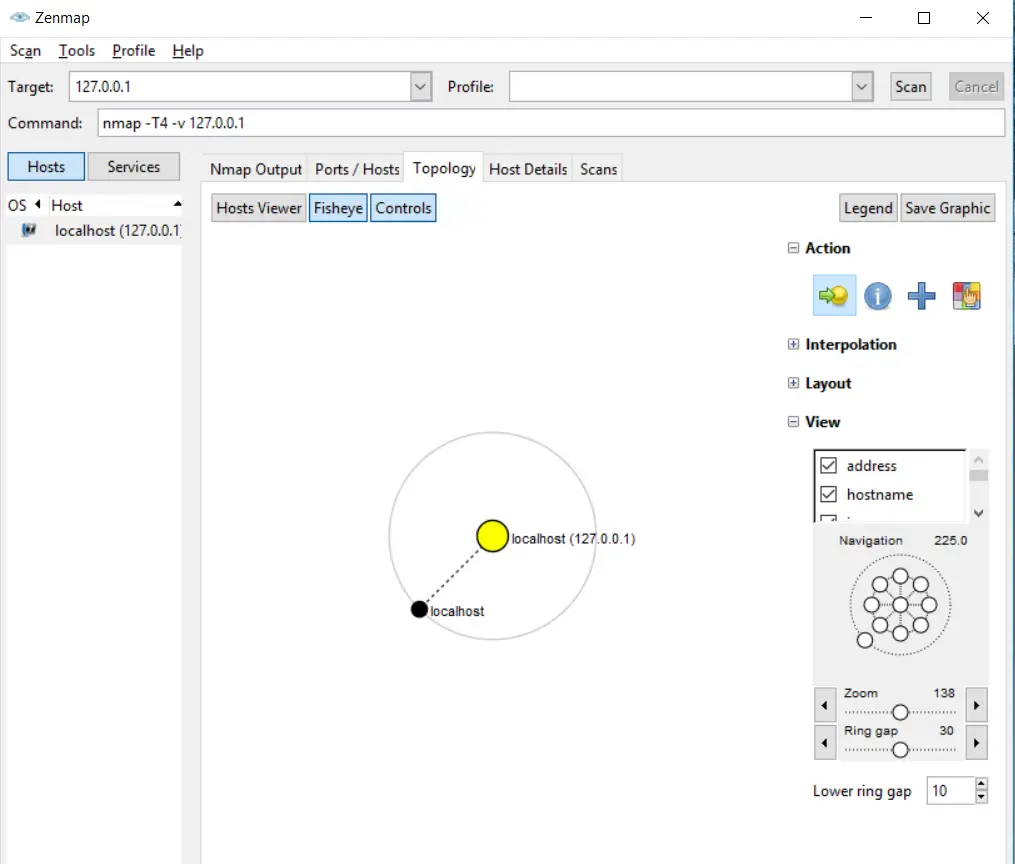
Zenmap offers you a graphical user interface for all the tasks you would normally perform in Nmap by using the command line. Zenmap offers you some extraordinary features that you do not see in the classic Nmap, for example, a network topology map.
You are provided with more options in this GUI version. You can save your scan results with the Nmap format (.nmap) or in the XML (.xml) format.
This incredible GUI of Nmap is available for Windows, and it is very beneficial for users who do not want to play with the CLI interface of Nmap.
Different scan types in Nmap
There are different types of scans that can be performed by using Nmap. The Nmap user performs these scans for various purposes.
TCP Scan
TCP scan performs a three-way handshake from your device to the targeted device. Someone with minimal effort can easily detect the TCP scan, and your IP address of the sender can be logged by the services efficiently.
UDP Scan
UDP is used to check whether there is any port that is listening for the upcoming requests on the targeted machine. You may get a false report in your scan results, as there is no mechanism to respond positively. The UPD scans can be used to uncover any hidden trojan or any RPC services. These scans are not very fast because the machines handle this kind of traffic slowly.
SYN Scan
It is a type of TCP scan. The syn packets are crafted by using Nmap itself, and this syn packet is used to initiate a TCP connection. Nmap results are based upon these special Syn packets. These packets themselves do not establish a connection, but they are utilized to produce scan results on Nmap.
ACK Scan
To check if ports are filtered or not, ACK scans are used. This type of scan can be beneficial if you want to check for the firewalls. If there is simple packet filtering, then it will allow an established connection with the help of ACK bit set.
FIN Scan
The FIN scan is most likely the SYN scan. If the targeted machine receives FIN input, then most of them will send the reset packet (RST) back.
NULL Scan
As the name suggests, the NULL scan sets all the header fields to zero (null). These kinds of packets are not authentic, and some of the targets do not know how to handle this packet. These targets could be your windows machine, and when you scan them using NULL packets, they produce undependable results.
XMAS Scan
XMAS scan has the same nature as the NULL scan, as both of these are hard to detect. The implementation of the TCP stack will prevent windows from responding to the Xmas scans. The XMAS scans are used to operate the FIN, URG, and PSH flag present in the TCP header.
RPC Scan
These kinds of scans are utilized to find the systems that reply to the RPC (Remote procedure call) services. It can allow the commands to run on a specific machine remotely. RPC services can also be used to run on many different ports; that’s why it becomes difficult to tell whether the RPC services are working or not. RPC scan should be done often to check the running RPC services.
IDLE Scan
From all of the above scans for Nmap on Windows or Linux, the IDLE scan is the stealthiest of them all. The attackers mostly use the IDLE scan for malicious attacks. Some specific conditions are necessary to perform this scan.
Scanning TCP/UDP ports with Nmap on windows
One of the best usages of Nmap is to scan ports on the network. By default, there are 1000 ports that Nmap can automatically scan, and you can change that port range according to your scan requirements.
Scanning all ports
In Nmap, we can specify the port range by using the “-p” option. The maximum or highest port number is 65535. If we want to scan all TCP ports, then we can use -p0-65535 option:
nmap -p- 127.0.0.1Code language: CSS (css)Scanning specific TCP ports within a range
In Nmap, we can specify the port range by using the “-p” option. The maximum or highest port number is 65535. If we want to scan all TCP ports, then we can use -p1-10 option:
nmap -p1-500 127.0.0.1Code language: CSS (css)Faster Scan option
If you want your scan to finish fast, then you can use the fast scan option. The regular scan will consume a lot of time, whereas a fast scan option will do it in less time. Use this option if your situation is not critical. You can use -T5 parameter for the quickest level scan of Nmap:
nmap -p- -T5 127.0.0.1Code language: CSS (css)Scanning TCP ports without a range
There is another way of scanning TCP ports without specifying the range of ports. It will scan for the common 1000 ports:
nmap 127.0.0.1Code language: CSS (css)Scanning UDP ports within a range
In Nmap when you scan ports, TCP is scanned per default. In order to scan UDP ports, you have to specify the UDP scan in the statement. You can use -sU for scanning UDP ports.^:
nmap -sU -p 1-500 127.0.0.1Code language: CSS (css)Scanning all UDP ports
Scanning UDP without range is similar to scanning TCP without range. You use the same -p- option to scan UDP ports without specifying a range:
nmap -sU -p - -T5 127.0.0.1Code language: CSS (css)👀 This Tutorial has some related Articles!
👉 How to get started in Cyber Security – The Complete Guide
👉 How to get started with Bug Bounties
👉 Terminal Customization Series
👉 Best Ethical Hacking Books
👉 Download Kali Linux Safe & Easy
👉 Best Ethical Hacking Tools
👉 Install VSCode on Kali Linux
👉 Dual Boot Kali Linux with Windows
👉 Install Kali Linux on VirtualBox – Complete Beginner Guide
👉 Top Things to do after installing Kali Linux
👉 WiFi Adapter for Kali Linux – The Ultimate Guide
👉 Nmap Beginner Guide Series
👉 Metasploit Tutorial Series
👉 Burp Suite Beginner Guide
Scanning TCP/UDP at once within a specific range
You can also scan both TCP/UDP by using a single statement. You have to use -sU for UDP ports and TCP ports ‘; you’ll use the -sT option:
nmap -sT -sU -p 1-500 127.0.0.1Code language: CSS (css)Other common Nmap commands
There are a ton of commands that you cannot master in a day, but there are some common and useful commands that you can use instantly. These commands are the basic ones. You can go advance, once you have learned the basics of it. Have a look at some of the most common yet useful commands.
Scanning OS & service detection
You can enable service detection and OS detection by using the -A option and to allow fast scanning we can use -T4 with it. Here is an example:
nmap -T4 -A 127.0.0.1Code language: CSS (css)Detecting vulnerabilities using Nmap
One of the most significant Nmap features that allow you to go beyond your expectations is that you can use the “Nmap scripting engine” through which you can execute a set of pre-defined scripts, and you can write your won scripts as well in Lua programming language.
NSE (Nmap Scripting Engine) is essential to use when you have to perform a full vulnerability scan. You have to automate everything during a scan that’s why we use scripts.
To perform a vulnerability test, you can use:
nmap -T5 --script vuln 127.0.0.1Code language: CSS (css)Saving your Nmap results
You can save your results after the scan in Nmap. You can save them in two formats i.e Nmap (.nmap) format or XML (.xml) format. While exporting the results from the Nmap, you have to use the following command statement:
nmap -oN output.txt example.comCode language: CSS (css)You can export the results as an XML document as well:
nmap -oX output.xml example.comCode language: CSS (css)Detecting Malware on the remote hosts
Nmap has the capability to run different tests to check for Malware or backdoor on some popular operating system services like Proftpd, IRC, SMTP, and SMB. It also offers a module that checks for any malicious file signs in Virustotal databases.
To perform a very simple & straight scan:
nmap -sV --script http-malware-host 127.0.0.1Code language: CSS (css)By using ‘google’s malware check:
nmap -p 80 --script HTTP-google-malware 127.0.0.1Code language: CSS (css)Conclusion
Nmap for Windows is one of the most important and robust tools used for gathering network information and performing operations using NSE. You can stick to Nmap and learn more about it to be a professional. The significance of this tool is enough that every security researcher has heard its name. If you want to be a cybersecurity expert, then you should consider using this tool that carries a lot of flexibility and strength in itself. This beginner’s guide will surely help you to make your base strong so that you can move to advance steps. We also have a series of Nmap tutorials, you may have a look at it to learn more about it here.
👀 This Tutorial has some related Articles!
👉 Part 1 – Nmap Basics
👉 Part 2 – Nmap Host Discovery
👉 Part 3 – Advanced Nmap Commands
👉 Part 4 – Nmap NSE Scripts
👉 Part 5 – Nmap on Windows


This is a great beginner guide to Nmap on Windows. I’m a beginner and found this guide very helpful.