Welcome back, everyone! As promised, I will show you how to install Plex on FreeNAS. I will cover each and every step, so you can’t get lost. If you have followed the previous tutorial on how to install FreeNAS 11, you should be pretty confident in creating new Datasets and Shares by now.
Plex Media Server is by far the most popular Media Server out there. I have been using it for several years already without any issues. You can access Plex from your mobile devices, PlayStation 4, XBOX, Chromecast, Amazon Fire TV Stick, Roku, and many other devices.
So without further ado, let’s start with the tutorial.
Step 1 – Creating a new Dataset
First, we are going to create a new Dataset for our Plex Media Files.
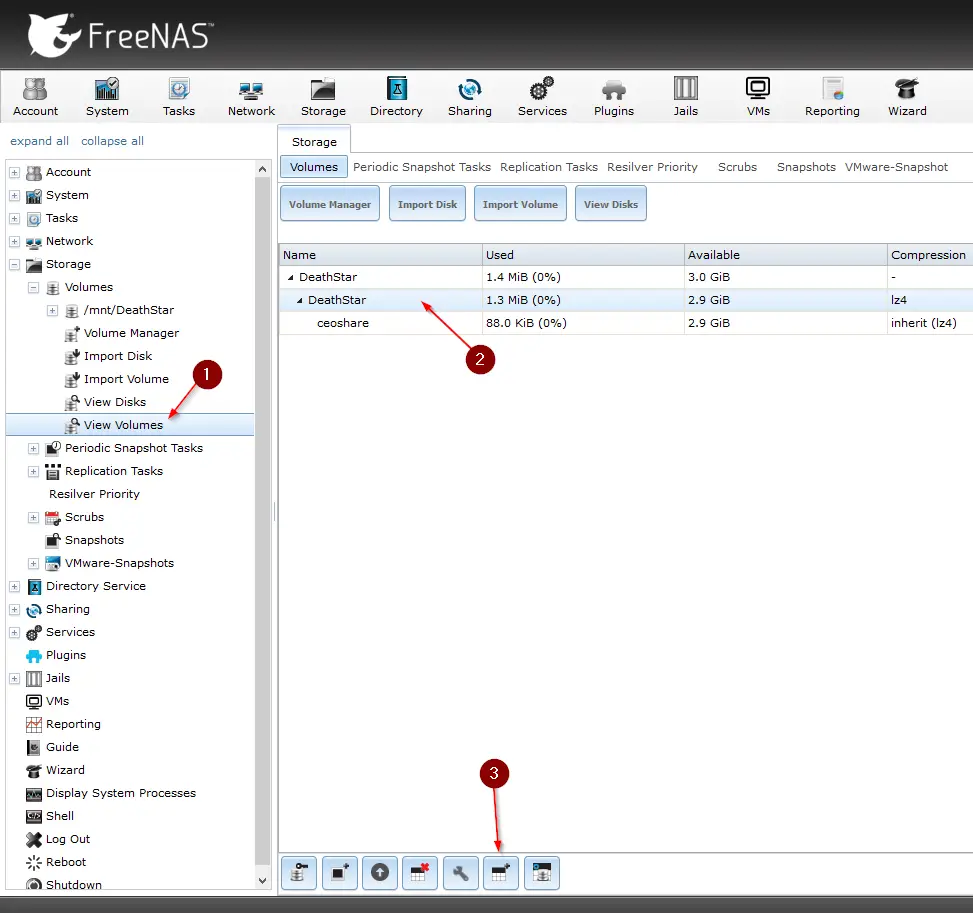
Navigate to Storage -> Volumes -> View Volumes and click on your main Volume. Now click on Add Dataset.
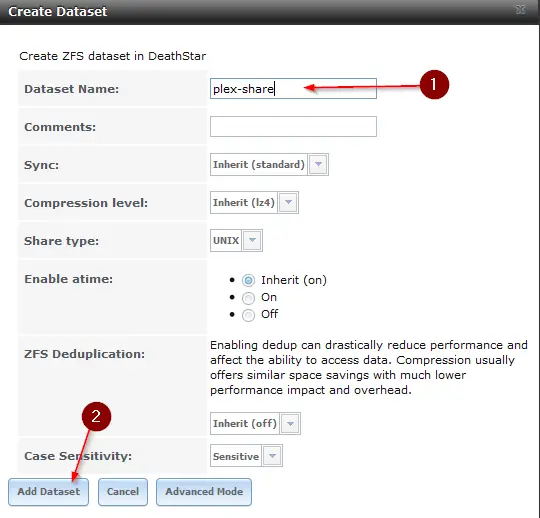
Now name it as you will and click on Add Dataset.
Step 2 – Creating a new user for Plex
This step is optional. You can use whatever user you already have. I prefer creating an extra user just for Plex.
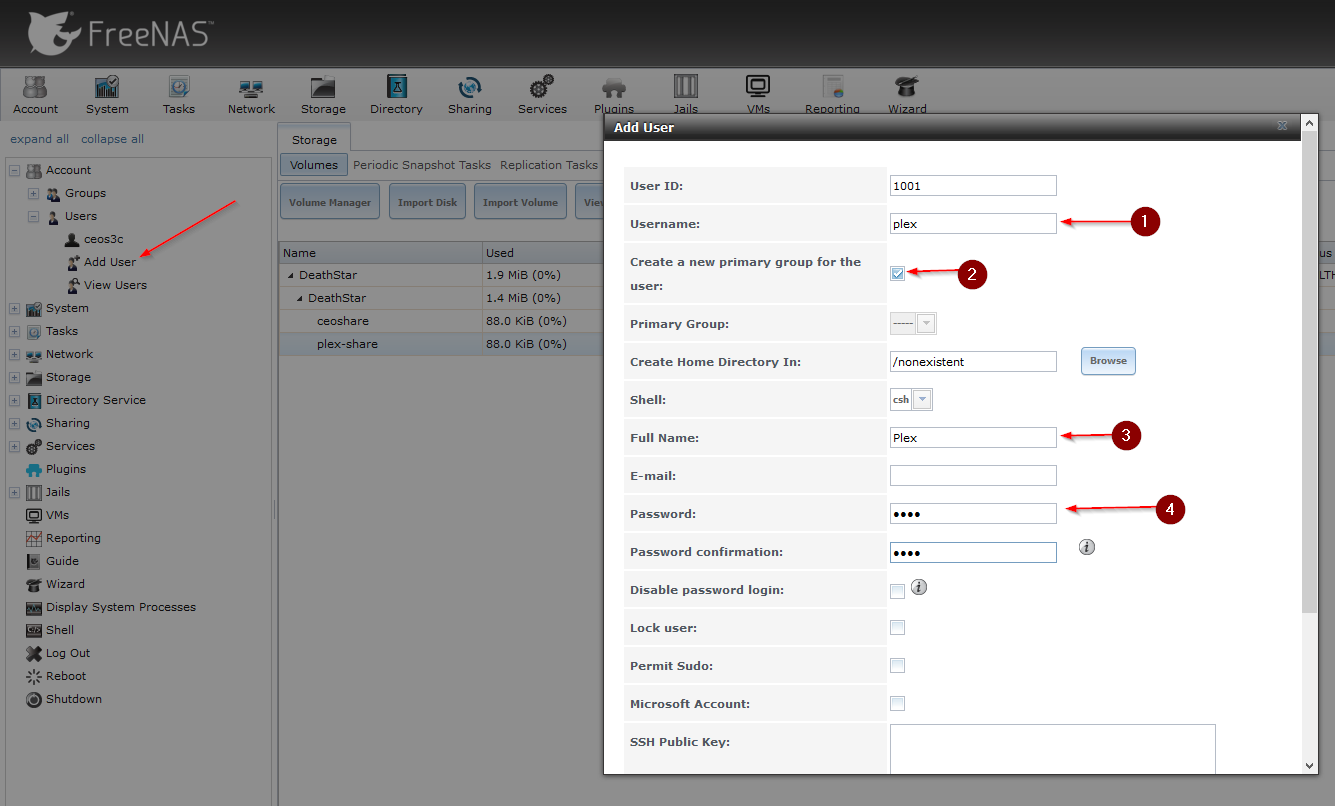
Navigate to Account -> Users -> Add User
Give it a Name, check Create a new primary group, enter a Full Name and a Password, and hit create on the bottom. Creating a new group is also optional. I prefer doing it tho.
Step 3 – Changing the Dataset Permissions
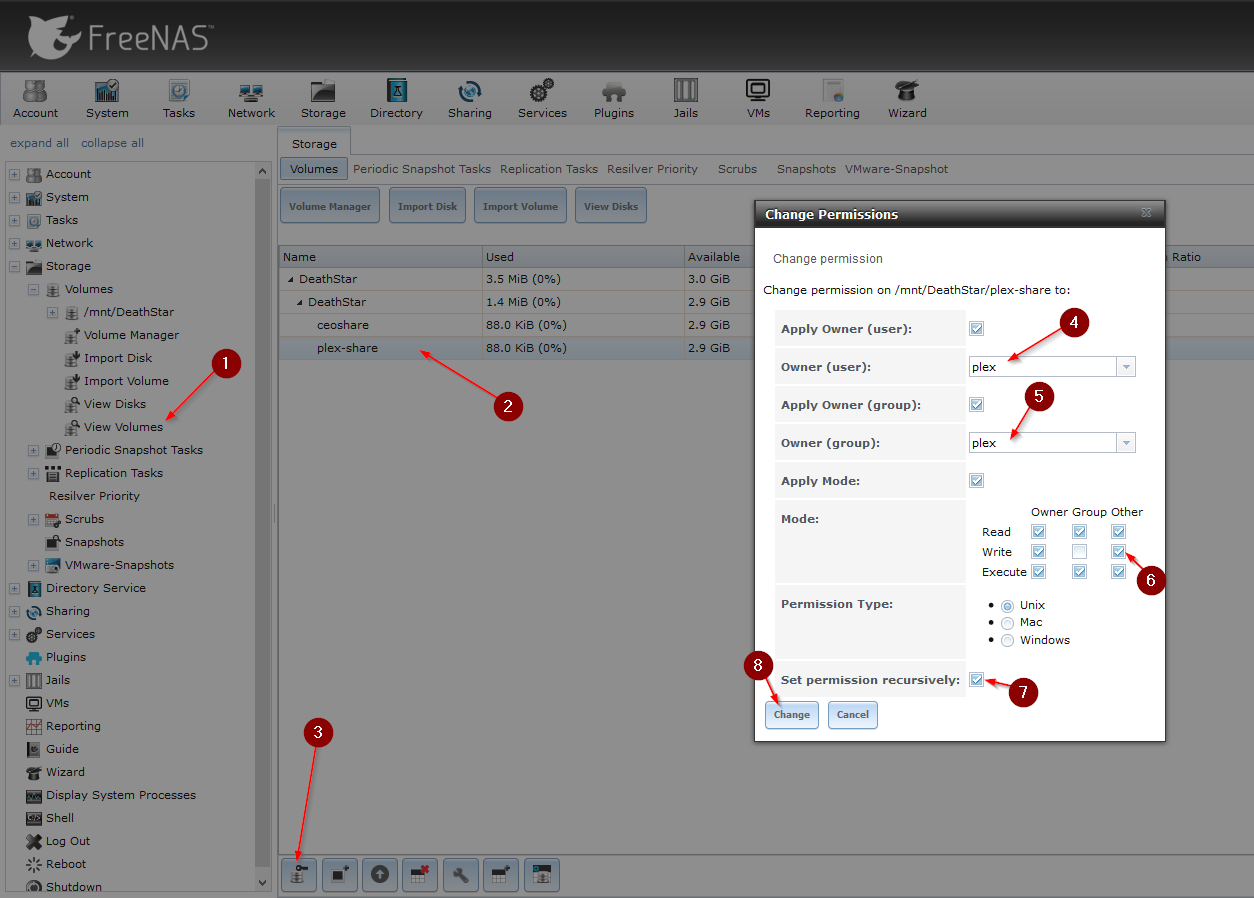
Now we need to change the Dataset permissions to our new User. Navigate to Storage -> Volumes -> View Volumes -> Select your volume -> Click on Permissions.
Apply as in the image below.
Step 4 – Creating an SMB Share
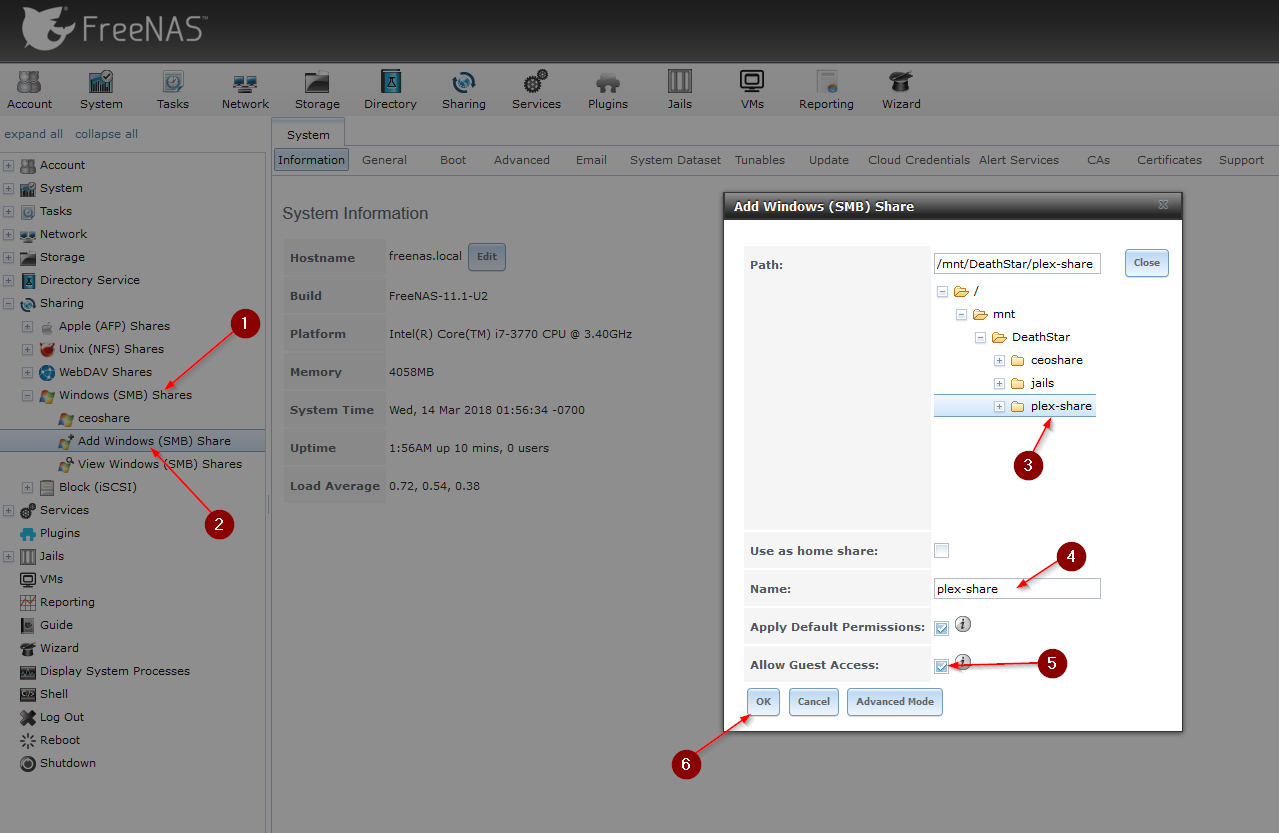
Now we got to create a share so that we can drag & drop files into our Plex Library directly from our Windows Computer. Navigate to Sharing -> Windows (SMB) Share -> Add Windows (SMB) Share. For the path choose your plex-share, give it a name, that can be the same as the dataset, and tick Allow Guest Access.
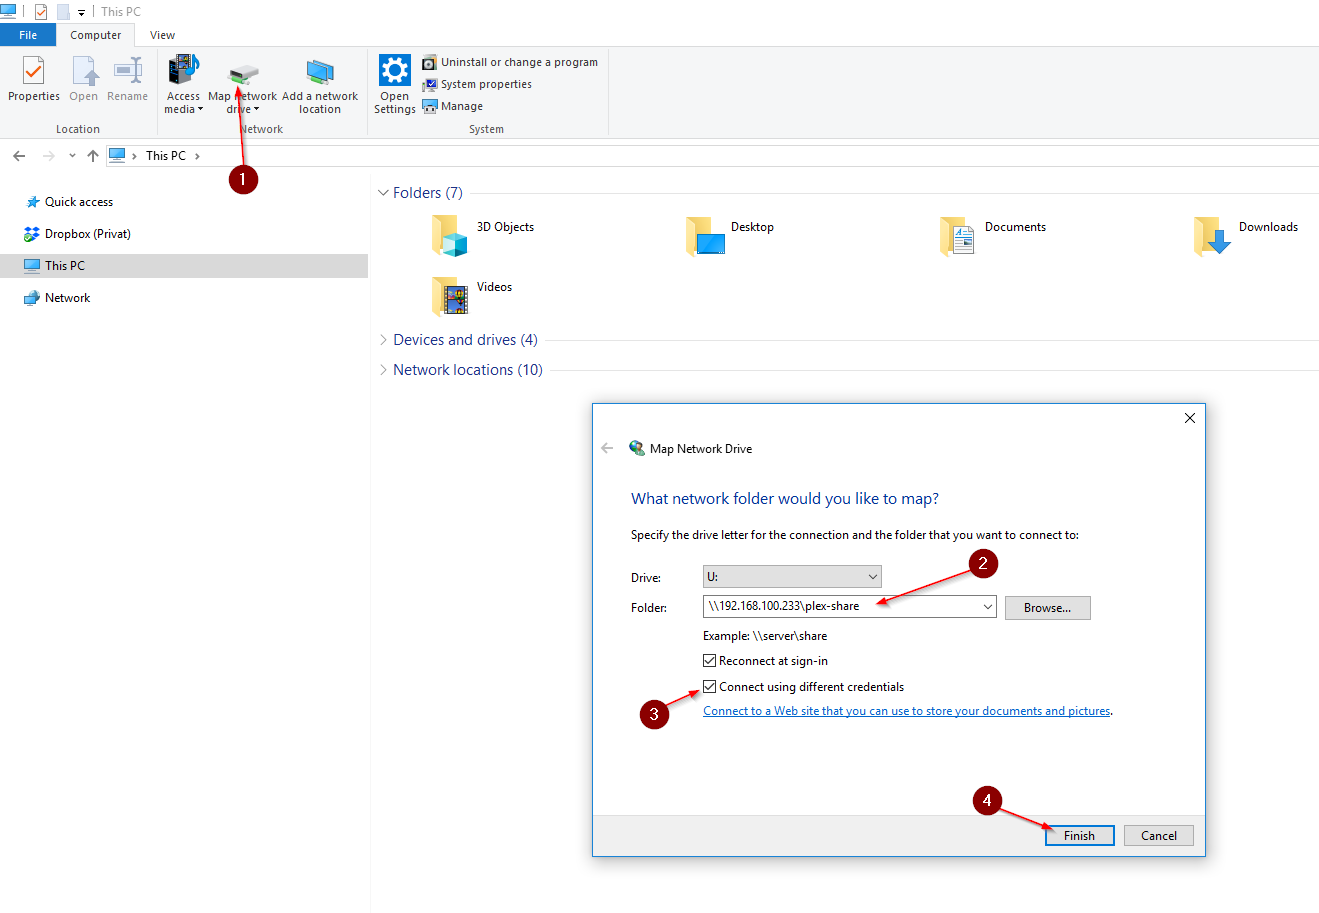
Next, we are going to connect the drive to our Windows Computer. Open an explorer window by pressing Windows Button + E. Click on Map Network Drive on the top. If you don’t have the mapped network drive option, just type the path to your NAS directly in the Breadcrumb Bar. Then right-click the plex-share and select Map Drive.
Adjust as in the image below.
So this is where you want to drop all your Videos, Music, et Cetera in.
Step 5 – Installing & Configuring the Plex Plugin
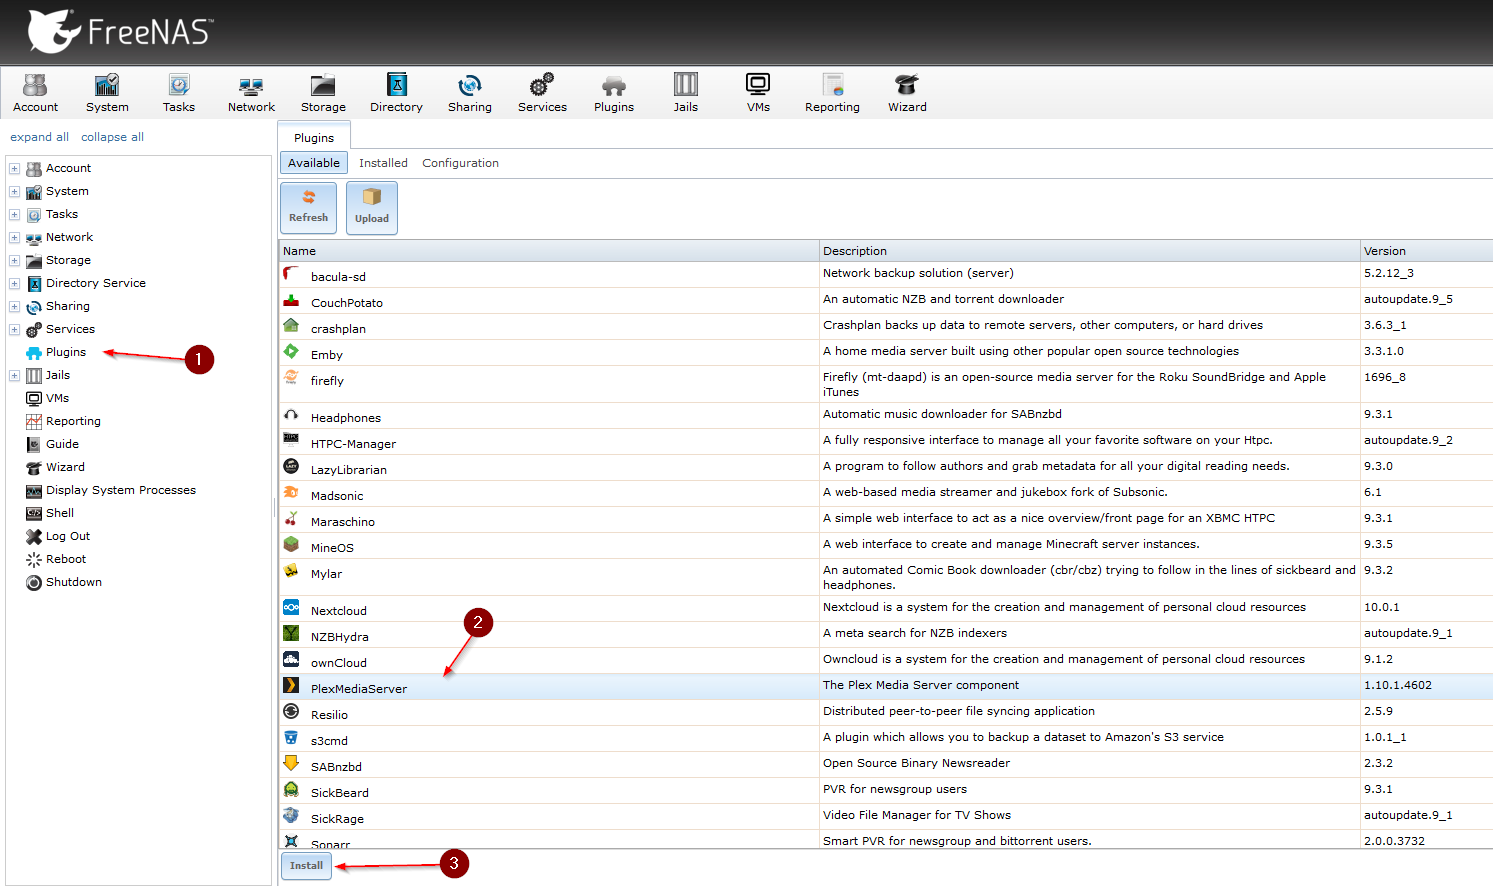
Navigate to Plugins, select PlexMediaServer, and hit Install.
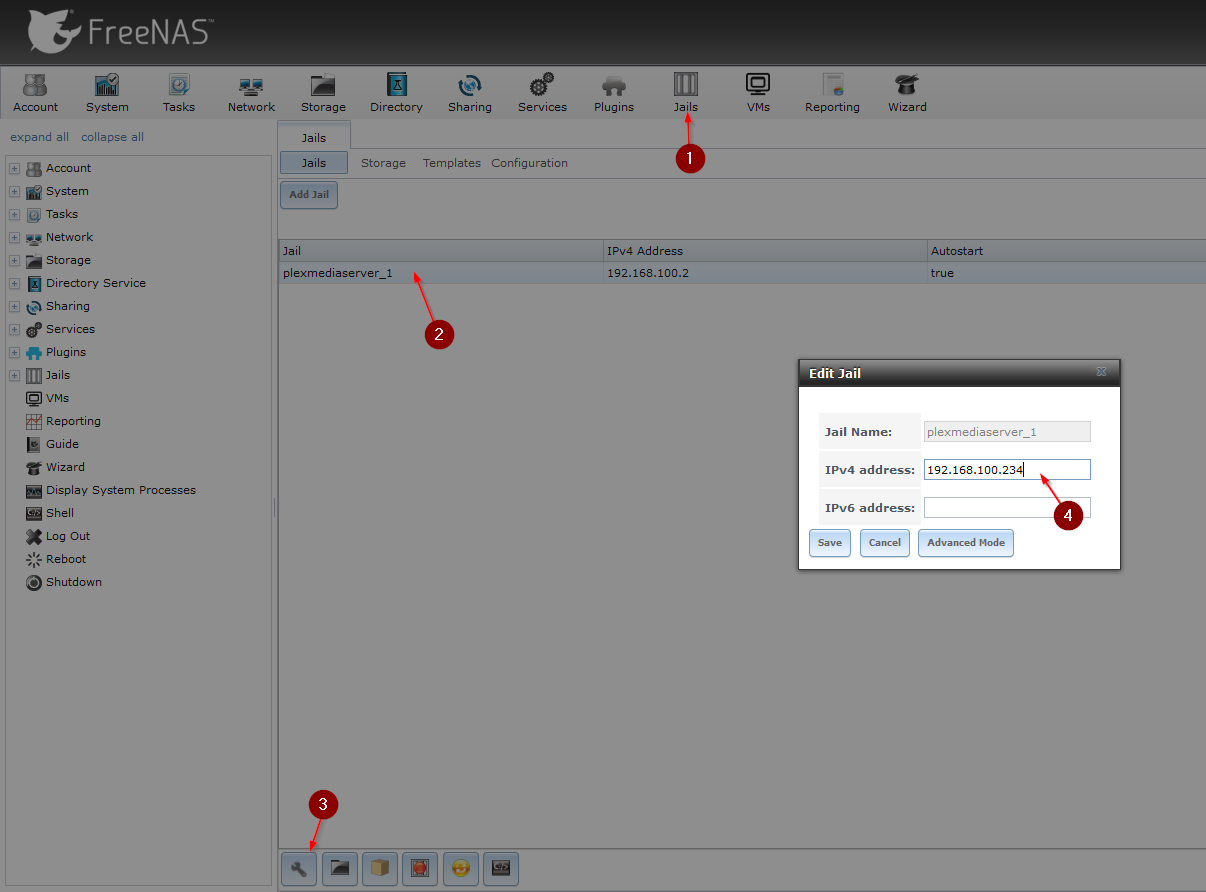
Now we are going to change the IP Address of the Plex Jail. Navigate to Jails -> Select your plexmediaserver_1 Jail and hit Edit. Adjust the IP to your own preferences.
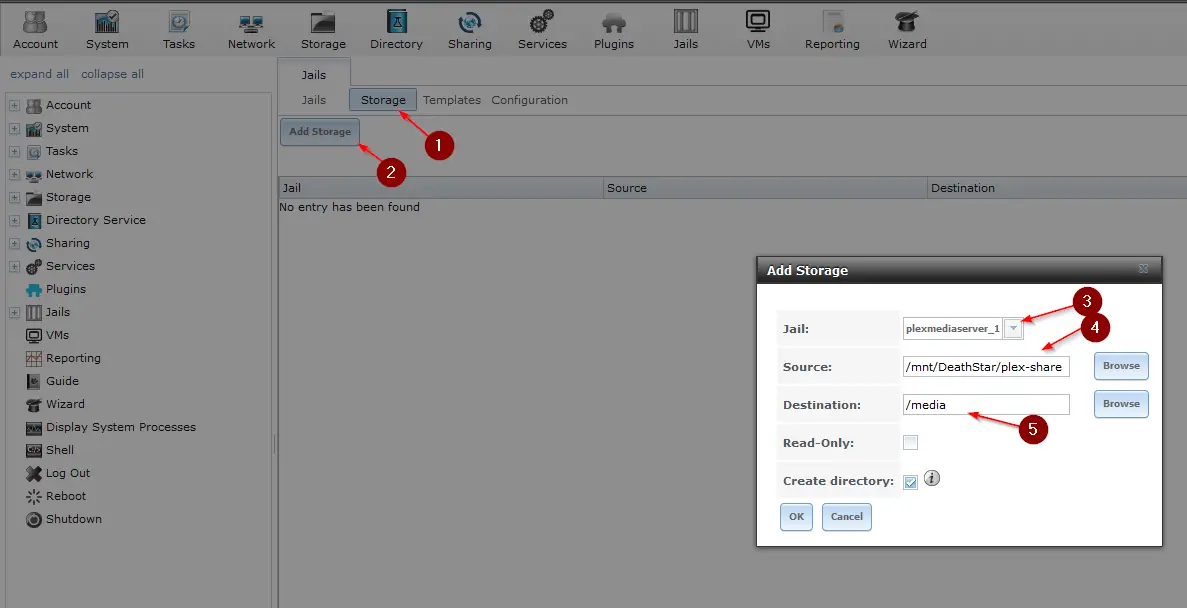
Next, we are going to assign Storage to our Plex server. Hence we are showing it the path to our plex-share.
The Source is our plex-share. This is where Plex searches for Media Files.
The Destination is the path where Plex stores information about the Media, like Movie Posters, Information, and all kinds of Meta.
For the Destination, click on Browse and choose the Media Folder within Plex.
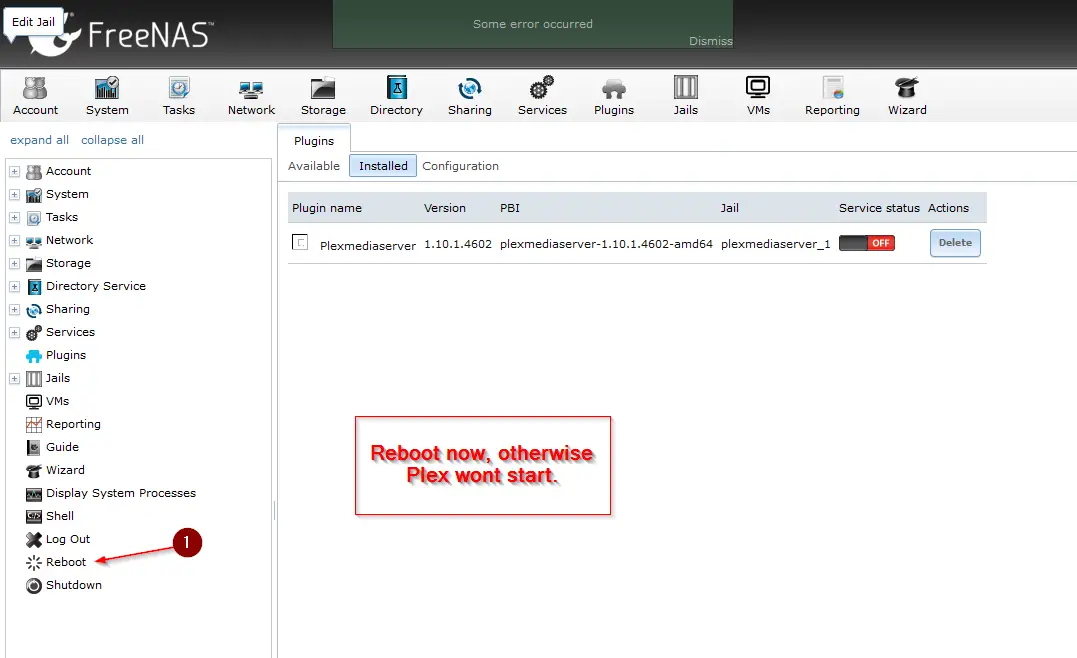
Reboot your FreeNAS now. Otherwise, the Plex Plugin won’t start.
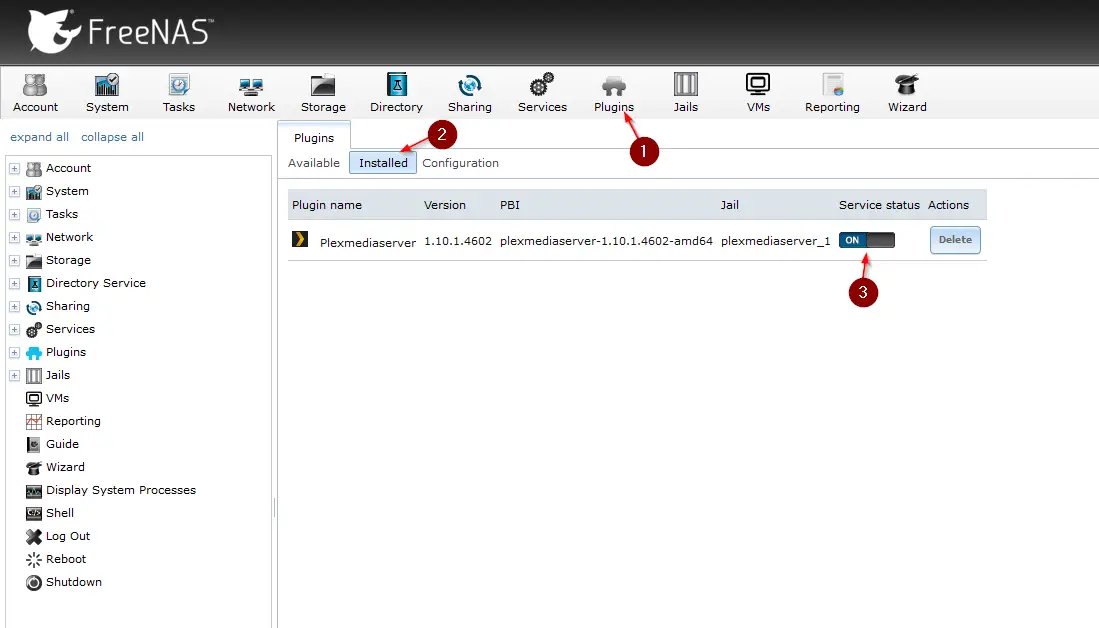
After the reboot, Navigate back to Plugins -> Installed and switch your Plex Media Server on.
Now navigate to Plugins -> PlexMediaServer and click on “here” to open a browser window and log in to Plex.
Step 6 – Adding a Library to Plex
Go through the initial steps, and rename your server if you want. You need to create an Account with Plex before being able to use it. After you have done all that, it’s time to add Media. This can be a little confusing, but I’ll help you through it.
Let’s say you want to add the Folder Movies from your plex-share.
After clicking on Add Library in Plex, you have to adjust the path like this: \media\Movies
This will add the Movies Folder to your Plex Media Server. Be careful! The input is case-sensitive! If Movies is written with a capital M and you would write \Media\movies, it wouldn’t work.
Conclusion
This is how easy it is to install Plex on FreeNAS. If you are using a pfSense Firewall, you can learn how to enable HTTPS on Plex with it here.
The Plugin is not updated as frequently as it should be. To manually update your Plex Media Server check out this article. Alright, this concludes this tutorial. This should have you covered as we went through each and every step.
ℹ️ Related Articles
👉 My Popular DIY FreeNAS Build
👉 Use FreeNAS as an UniFi Controller
👉 FreeNAS Smart Tests & Scrubs
👉 How to install Plex Media Server on FreeNAS
👉 How to install FreeNAS
👉 How to create Windows Shares on FreeNAS
👉 Manually Update Plex Media Server on FreeNAS
👉 Upgrade FreeNAS to TrueNAS



if i already have media backed up in FreeNas – can I get Plex plugin to just import from the source location itself? I don’t want it to redundantly keep copies of the media files.
Why not mount the datasets inside of the jail instead of losing performance to network overhead?
Great post, thanks for keeping the plex installations on freenas up to date!
A question though, I noticed that your data set has Unix permissions but then you use a SMB share with windows permissions. Isn’t mixing permissions like that quite risky?
Thank you ceos3c for the clear and concise instructions.
I did have an issue scanning my libraries into Plex. Where you say to adjust the library path to “\Media\Movies” should read “\media\Movies” as Plex is scanning the destination, /media, for data as set up in step 5, shown in image item 10 of 13.
Thanks again and keep up the great work. Now on to updating Plex per your link.
Thanks for pointing that out! I updated the Guide accordingly.
Hello again, I’m not sure why it didn’t let me reply down from my previous comment. I have everything correct following your video up until the last couple minutes. I have the /media correct when you were doing the jail and I have the correct folder path. Its still not showing up on the plex site. I have /media/Shows/USA/TheLastShip04 and it still doesn’t pop up. Anything off the top of your head that I might of missed?
When adjusting the IP address, is it a IP address other than the FreeNAS IP itself. I saw that your FreeNAS IP was .233 and you use the next address for the Plex Server. Stupid question, but if my FreeNAS was .120, I would just use .121 to adjust the IP then?
Sure, if that IP is free. It has no particular reason I chose that address. You can choose whatever address you want.
Found your guide very helpful, and I can log in to my Plex server, but I can’t get it to scan any media! I have the path set correctly, and if I shell into the Jail I can see the I can list the movies and photos, but the Plex library scan simply doesn’t find anything!
Hey Sean, that is odd. Have you googled this Problem? It’s weird if it shows up in your shell. Do you maybe have something like NoScript activated?
Thank You, Thank You, Thank You! I would not have been able to get this working without your detailed instructions. I’m using FreeNAS 11.1 on an Intel NUC i3. I activated AFP to share with Macs on the network running Mac OS X 10.13.6 (High Sierra). Your instructions worked perfectly!
Dominick, thank you for leaving a comment. Comments like this keep me going 🙂 Enjoy your Media Server!
FINALLY! A simple and complete guide to Freenas 11 and initial Plex setup! Thanks a million!
Great it was helpful to you 🙂