Unfortunately, I had no time to play around with my FreeNAS server in the last year or so. I had no use for it so far other than storing my files and running Plex Media Server. Finally, I have little time to spend on this awesome open-source NAS. I almost forgot how amazing FreeNAS was. In this tutorial, I will show you how to install UniFi Controller on FreeNAS 11.2-U5.
In the past few years I was still running the old WiFi hardware (FritzBox!, it’s a German thing) I had laying around at home. Working with UniFi professionally for some time, I already knew how awesome UniFi WiFi hardware is; unfortunately, I haven’t had the means to upgrade my private WiFi network, until now.
I decided to buy the UniFi AP AC LITE, as it fits my needs for now, and it’s a low-cost option in their line-up.
To run UniFi access points, you need something called the UniFi Controller. The UniFi Controller is a web interface that allows you to manage all of your UniFi access points, and it works really well. You have a couple of options to run the UniFi Controller software:
- Install it on your Windows 10 computer
- Buy an UniFi Cloud Key
- Install it on FreeNAS
I’m sure there are different ways to do it, but that’s the ones I know of. My first thought was to install it on my workstation. The problem is, my workstation isn’t always on anymore (the hardcore gaming days are over 🙁 ). So I thought FreeNAS should be able to run the UniFi Controller Software! Turns out it does.
The best thing: It’s really easy to install! I’ll take you through each step; let’s dive right in.
This tutorial uses FreeNAS 11.2-U5. If you want to upgrade from 11.1 to 11.2, I got you covered. It’s a matter of minutes and definitely worth it considering the brand-new GUI.
Step 1 – Creating a new Jail
To install UniFi Controller on FreeNAS 11.2-U5, we are going to use a so-called Jail. Jails are a very lightweight virtualized environment on the operating system level. You can run single or several services completely isolated from your FreeNAS. Meaning everything you install in a Jail stays in the Jail and doesn’t affect your FreeNAS at all. FreeNAS 11.2 uses the iocage utility for managing Jails.
Creating a Jail is very easy.
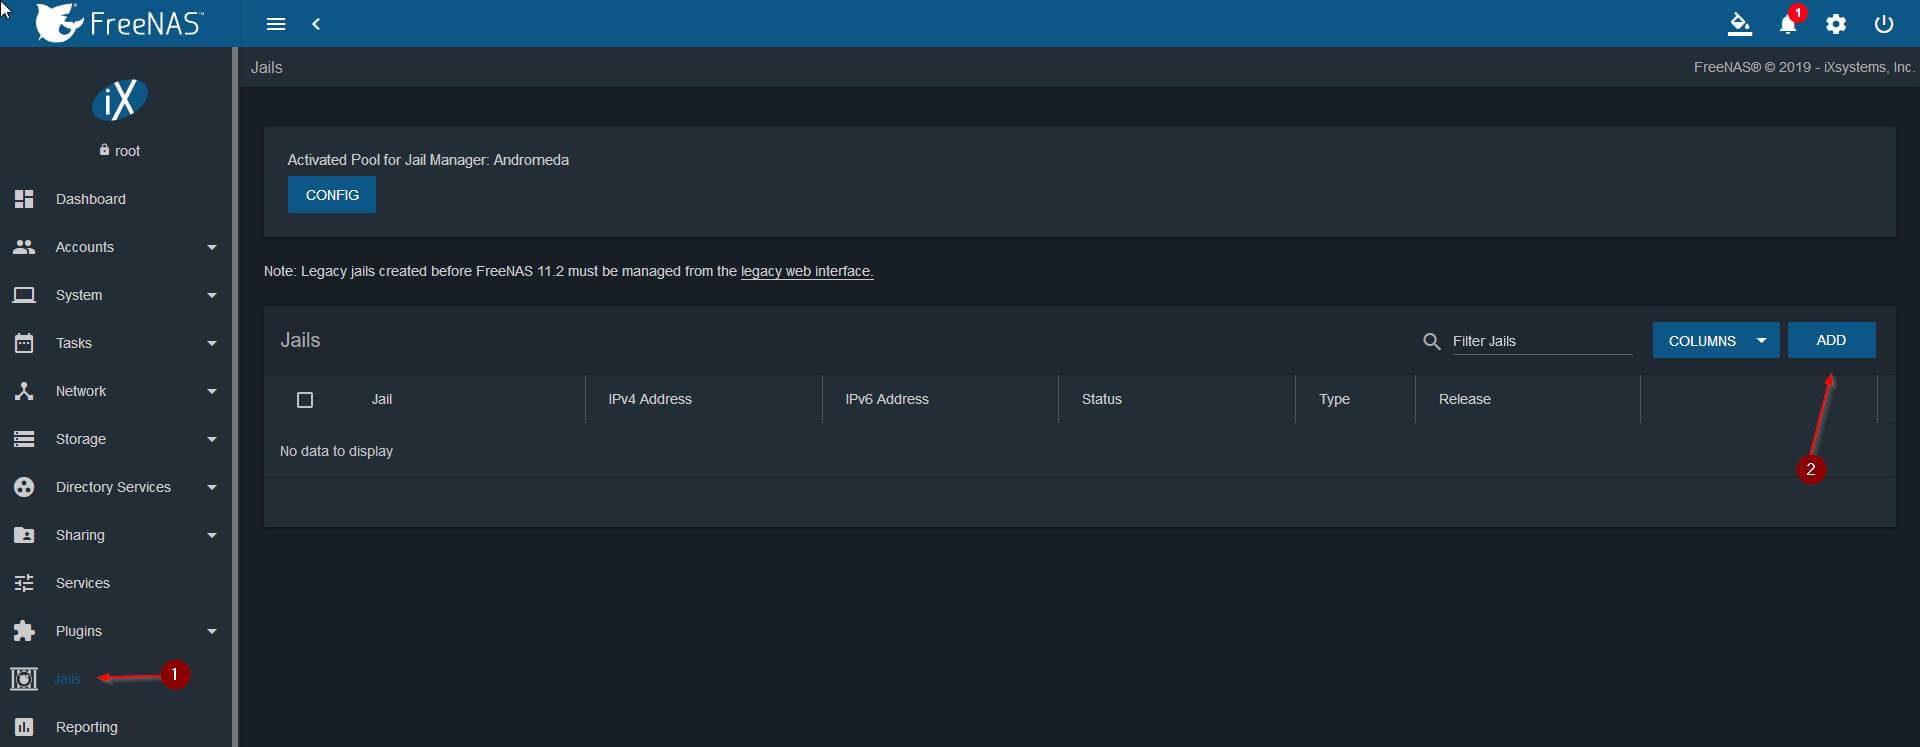
Log in to your FreeNAS server and navigate to Jails. Click on the ADD button on the right side.
Enter a name for your Jail, like UniFi Controller, and choose a release. Choose the release according to your installed FreeNAS version, so if you run 11.2, choose 11.2. Click Next.

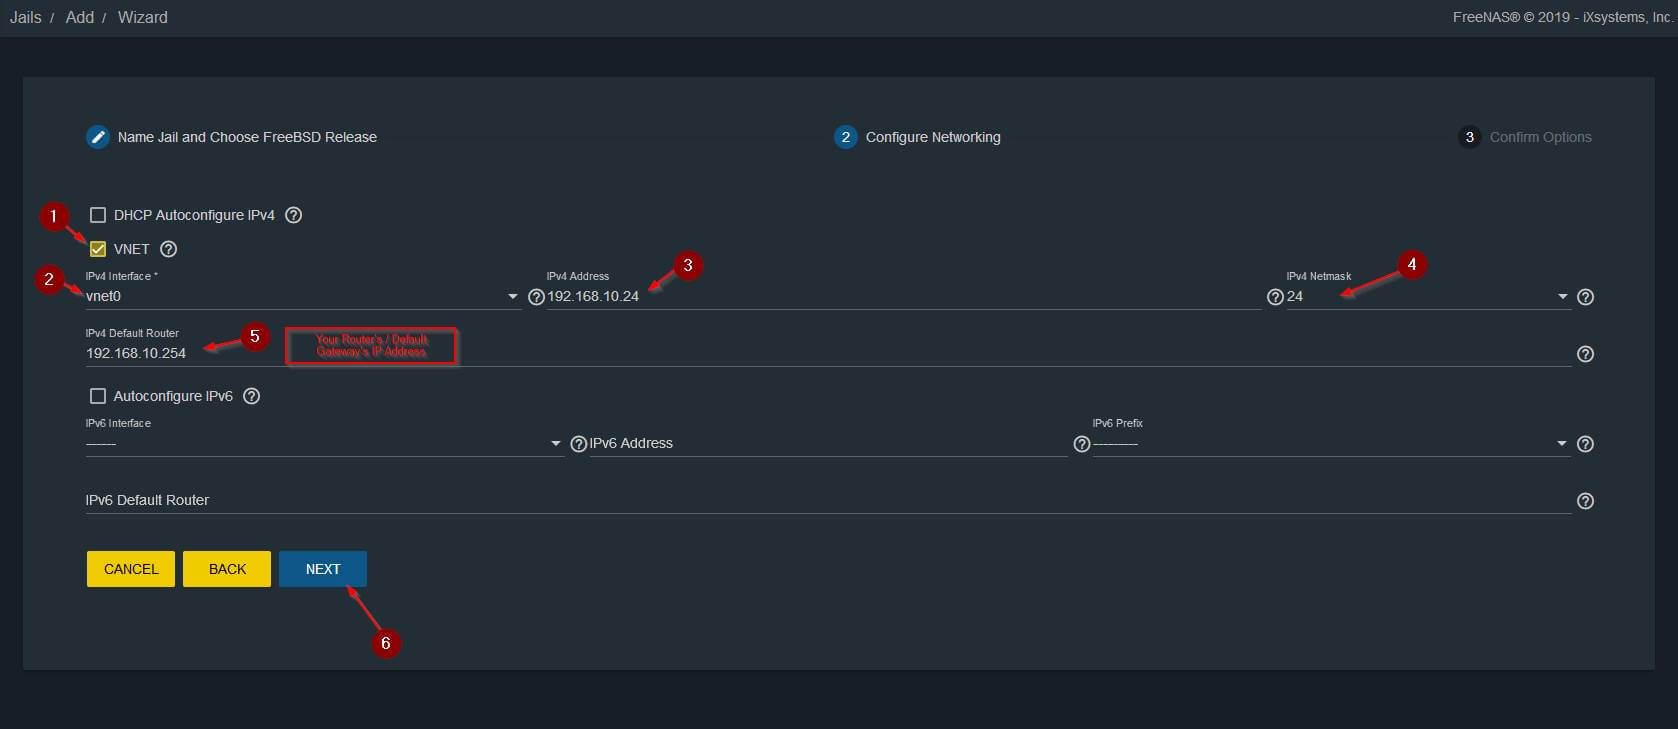
Next, make sure to fill in all the info accordingly:
- Tick the VNET box to create a virtualized network adapter (So you can assign your Jail it’s own IP address to be able to access your UniFi Web Interface later on).
- IPv4 Interface: Choose vnet0.
- IPv4 Address: Choose whatever address you want to assign to your UniFi Controller Software.
- IPv4 Netmask: If you don’t know what that is, it’s probably 24.
- IPv4 Default Router: The IP address of your router/gateway. You can find that out by hitting the Windows key, enter cmd and hit enter again. Then type ‘ipconfig /all’ scroll all the way up till you find Ethernet adapter and find “Default Gateway”. That’s your router.
- Click Next.
Double-check that everything is correct and hit Submit.
Step 2 – Enable autostart for the UniFi Controller Jail
Now we want our Jail to automatically start up when FreeNAS starts (or the Jail crashes).
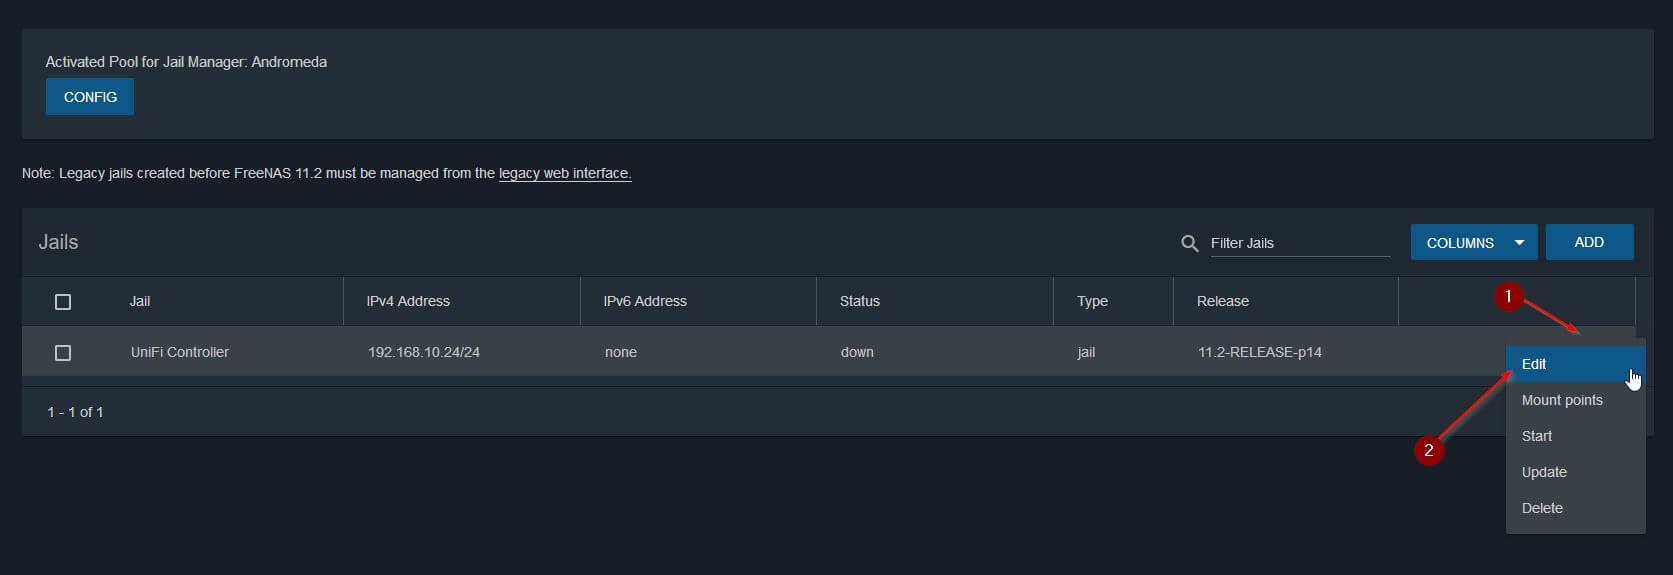
Click on the 3 little dots next to your Jail and select edit.
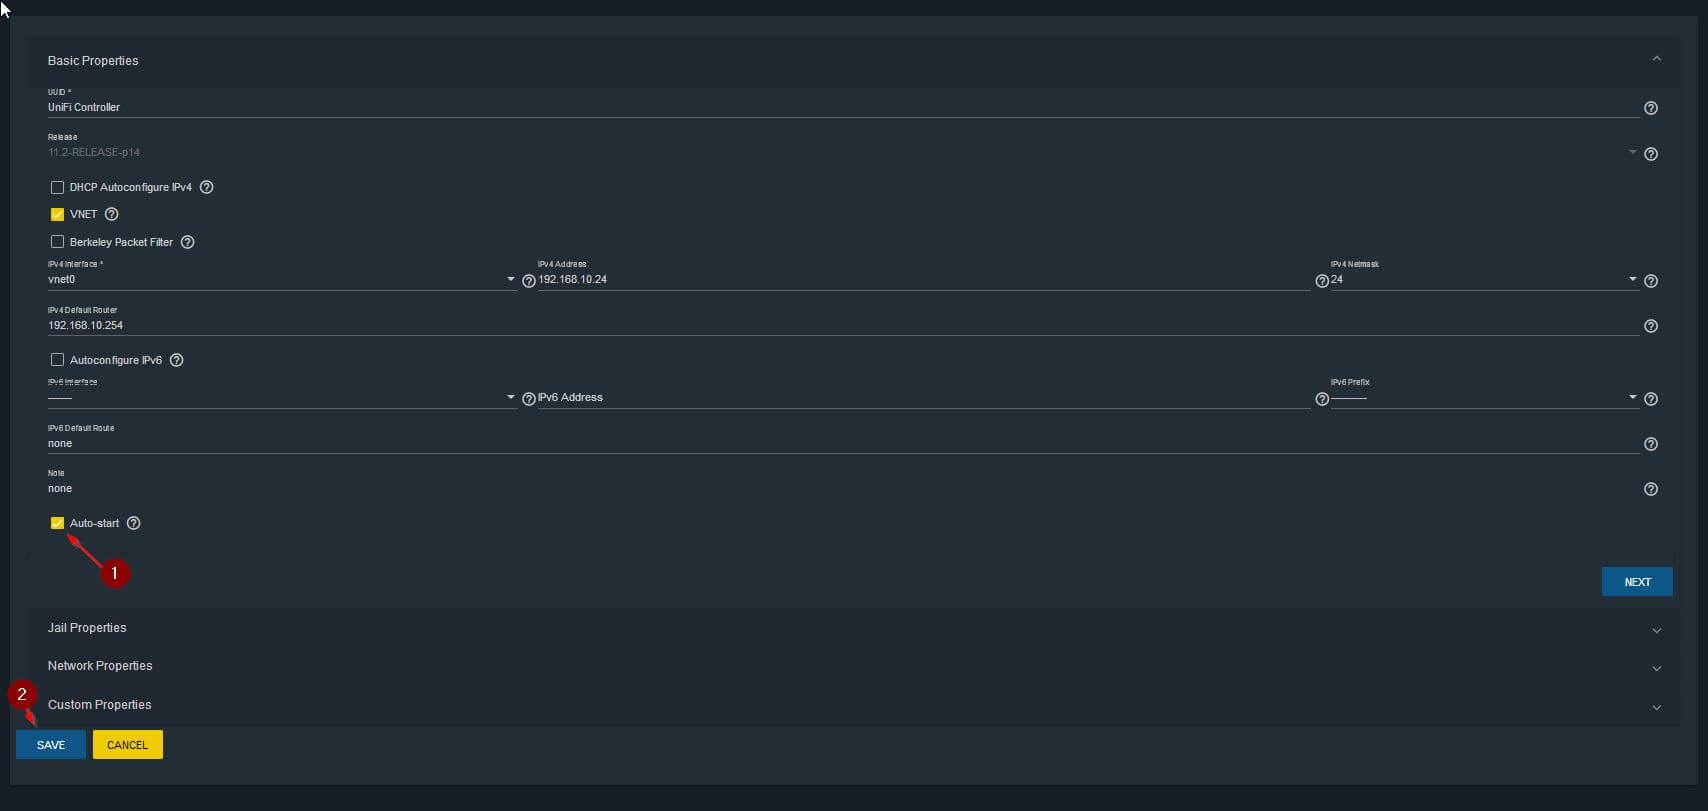
Tick the Auto-start box and hit Save.
Step 3 – Starting the UniFi Controller Jail
To be able to install UniFi Controller on FreeNAS 11.2, we need to first start the Jail. Click on the 3 dots next to the Jail once again, and this time select Start.
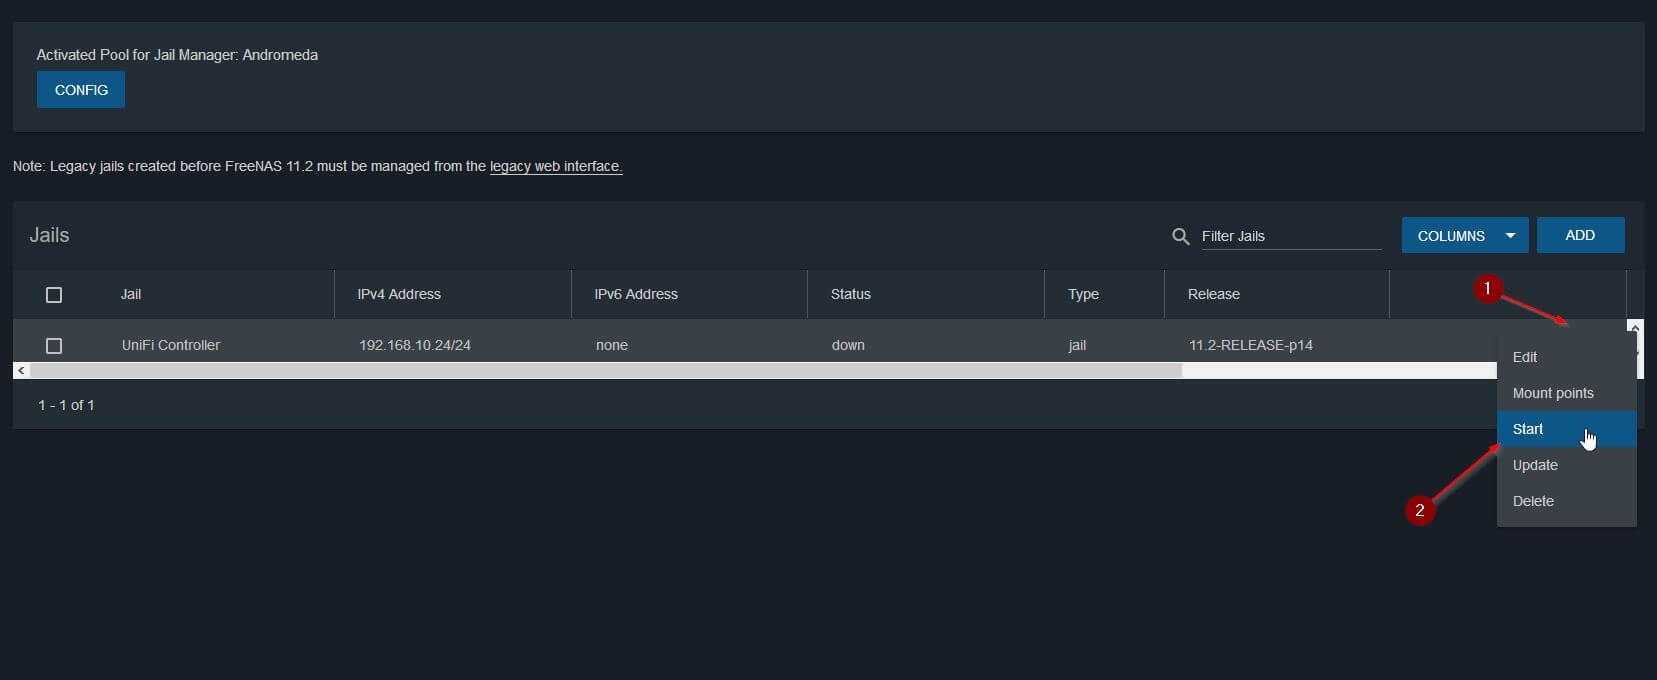
Step 4 – Install UniFi Controller on FreeNAS
Almost done. Click on the 3 dots once more and select Shell. Don’t be scared of the next steps, they will take place INSIDE of your Jail, being completely isolated from your FreeNAS server.
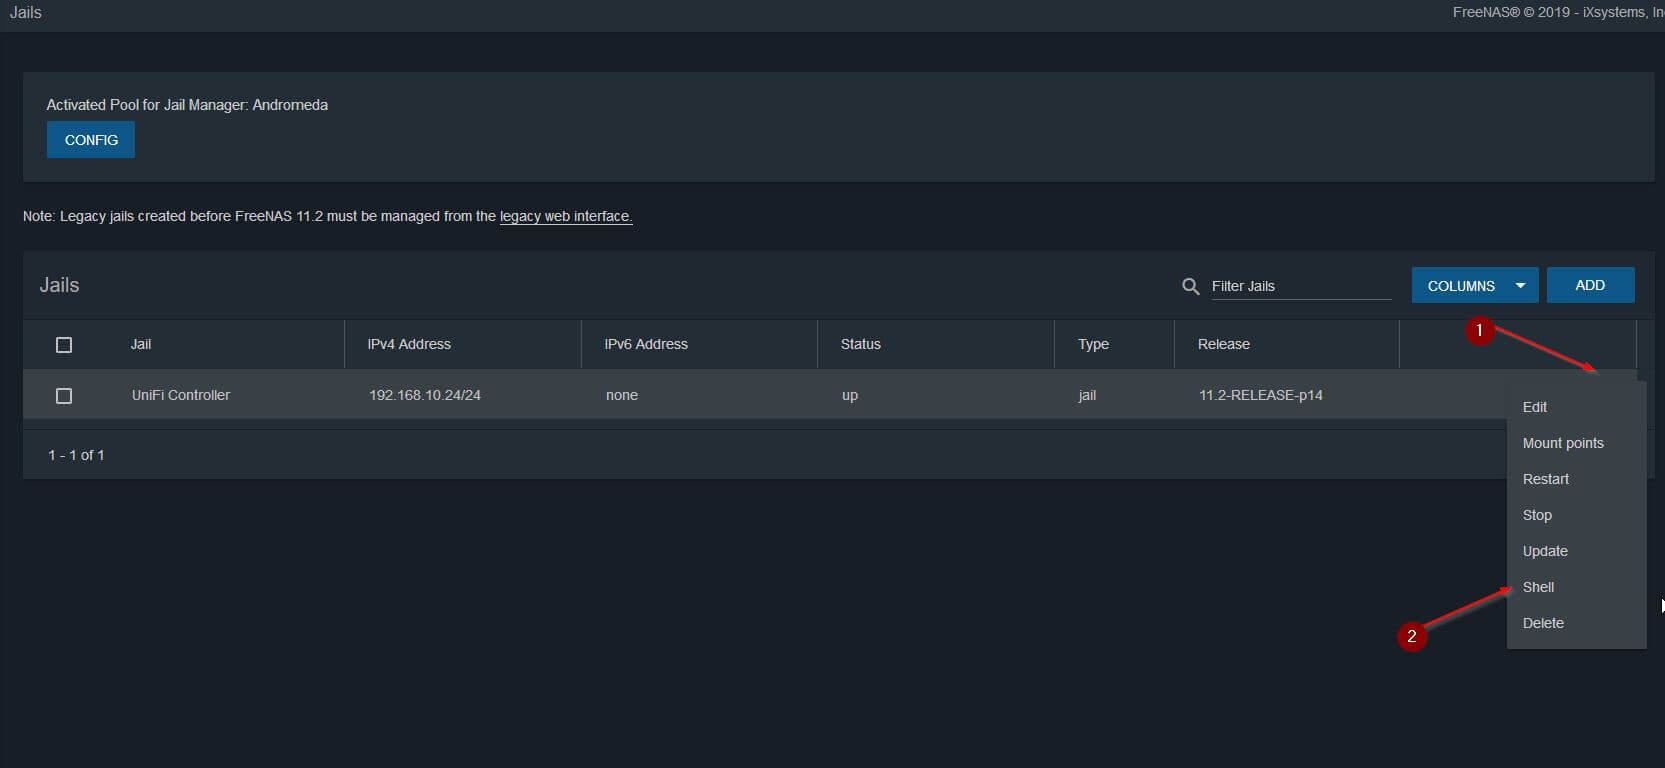
We now run through a couple of shell commands to install the UniFi Controller on FreeNAS 11.2.
Updating the package database, make sure to confirm with Y on the end.
pkg update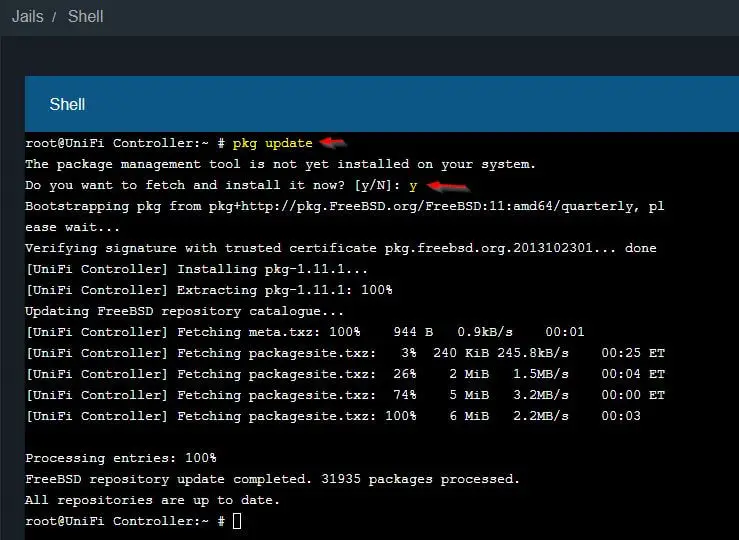
Once our repository is up to date, we can install the UniFi Controller package that sits in the official repository. Make sure to confirm with Y once more.
pkg install unifi5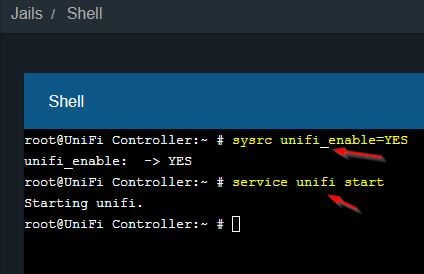
Alright, now we enable autostart of the UniFi Controller Software (previously, we automatically started the Jail itself), and we start the UniFi Controller Software.
sysrc unifi_enable=YES
service unifi start
You made it. You are now able to access the UniFi Controller Web Interface via your FreeNAS server.
Step 5 – Accessing the UniFi Web Interface
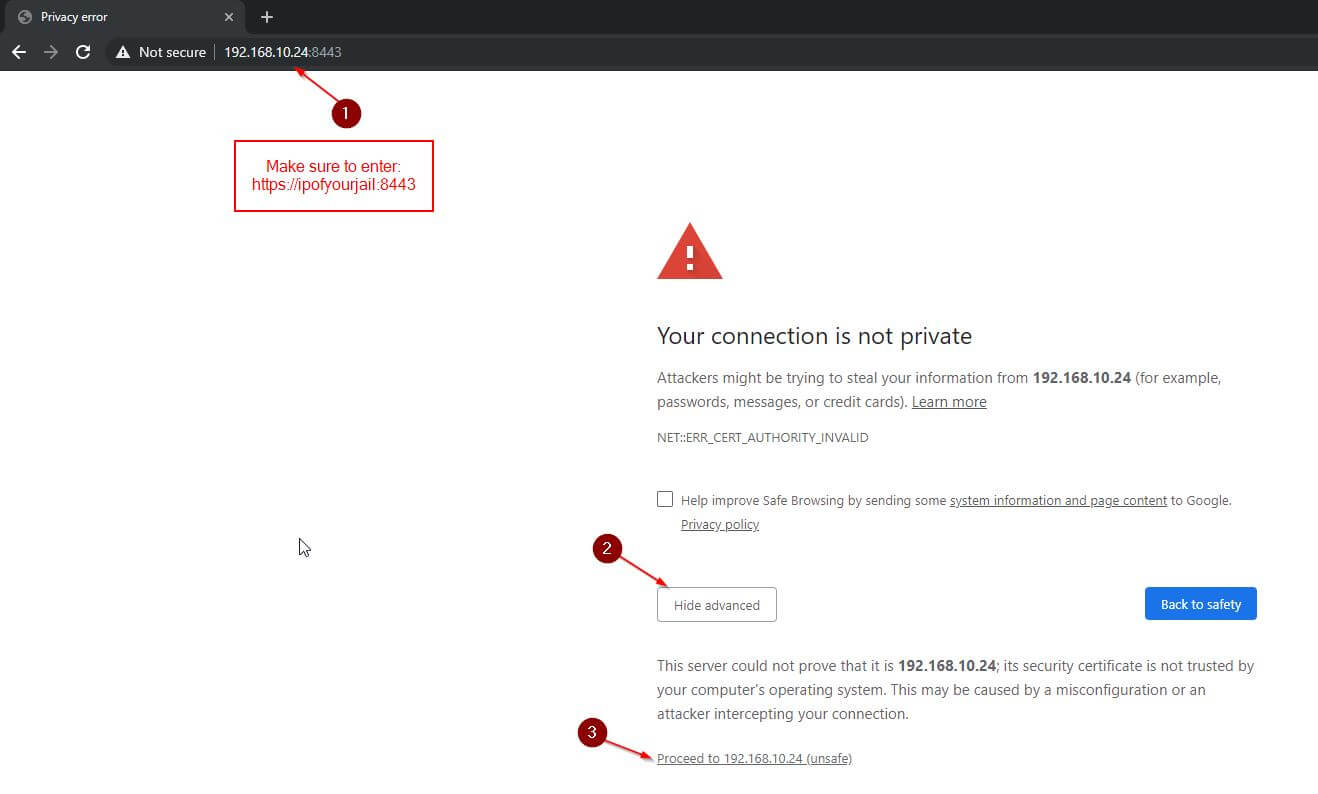
Open a browser. In this example, I use Chrome and navigate to the URL: https://ipofyourjail:8443
You will get a warning and need to add a security exception. Don’t worry about the warning. The UniFi Controller sits in your local network anyway. For Chrome, click on Advanced and click on Proceed to ….(unsafe). The steps for Firefox should be similar.
This message comes with all devices that don’t issue a security certificate, which is almost all devices on your local network.
And once you are done with this, you will be presented with the initial configuration wizard of your UniFi Controller Software. Congratulations!
Conclusion
It is a no-brainer to use FreeNAS for something like the UniFi Controller Software, as your NAS is probably running all the time anyway. Now that I have more time, you can look forward to more FreeNAS tutorials in the near future and a thorough review of the UniFi AP AC LITE.
ℹ️ Related Articles
👉 My Popular DIY FreeNAS Build
👉 Use FreeNAS as an UniFi Controller
👉 FreeNAS Smart Tests & Scrubs
👉 How to install Plex Media Server on FreeNAS
👉 How to install FreeNAS
👉 How to create Windows Shares on FreeNAS
👉 Manually Update Plex Media Server on FreeNAS
👉 Upgrade FreeNAS to TrueNAS

Great instructions! I was about to actually get UniFi running on TrueNAS wiht your great instructions. I was never able to get the plugin working. Once I got to the login screen for UniFi though I saw no devices available. In settings I could see my DMPro but none of my other devices (switches/APs).
Are you able to access the controller from the Unifi cloud dashboard?
I do not know this, sorry. I am not using it.
Exactly what I was looking for, thanks so much.
Thanks! That’s the clearest and easiest to follow tutorial I’ve found on the topic. Many thanks for making it friendly to novices.
Great to hear Ben! Glad it worked out for you 🙂 Thanks for the comment.
I have a unifi controller (latest version) running on a windows box. How would I backup the windows configuration and load the backup into this solution?
How would you go about updating the controller after this install?
My best guess is, if the package is maintained, then a ‘pkg update && pkg upgrade’ should do the trick.