If you have followed me lately, you probably know that I started a Linux for SysAdmins Series on YouTube. So far, I have worked with Windows 10 and Linux in Dual Boot. So every time I needed a Windows Machine, I would reboot and boot into my Windows 10 Installation. This changes today because we are going to Install Windows 10 on Linux using the free Virtualization Software VirtualBox.
Follow along to learn how to Install Windows 10 on Linux Step-by-Step!
Table of Contents
- Step 1 – Downloading the Windows 10 ISO File
- Step 2 – Installing VirtualBox
- Step 3 – Creating a new Virtual Machine
- Step 4- Adjusting Virtual Machine Settings
- Step 5 – Starting the Virtual Machine
- Step 6 – Install Windows 10 on Linux
- Step 7 – Install VirtualBox Guest Additions on Windows 10
- Step 8 – Taking a Snapshot
- Wrapping Up
Step 1 – Downloading the Windows 10 ISO File
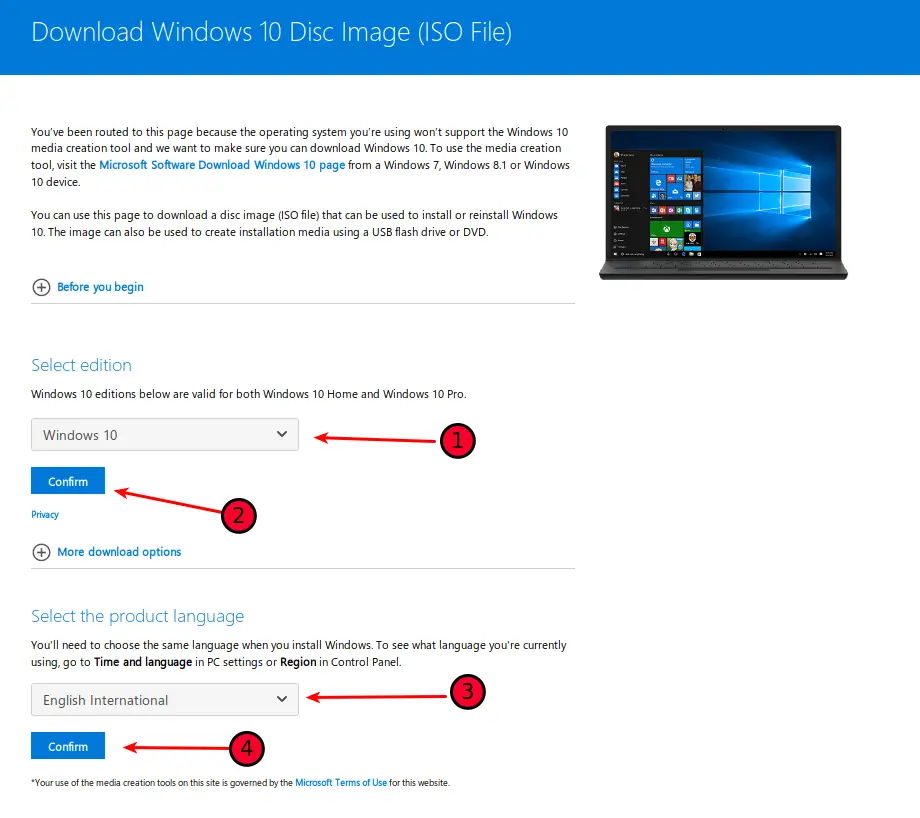
First things first, we need the Windows 10 ISO File. Open a Web Browser and open the Microsoft Website. Choose the latest Windows 10 Version and choose the Language that suits you. Click on Confirm. Now choose the 64-bit Version and Download the ISO File.
Step 2 – Installing VirtualBox
If you use Linux Mint, VirtualBox comes pre-installed. In case it is not, either install it through your Software Manager or by opening a Terminal and typing:
sudo apt-get update -y
sudo apt-get install virtualbox -yCode language: JavaScript (javascript)
Step 3 – Creating a new Virtual Machine
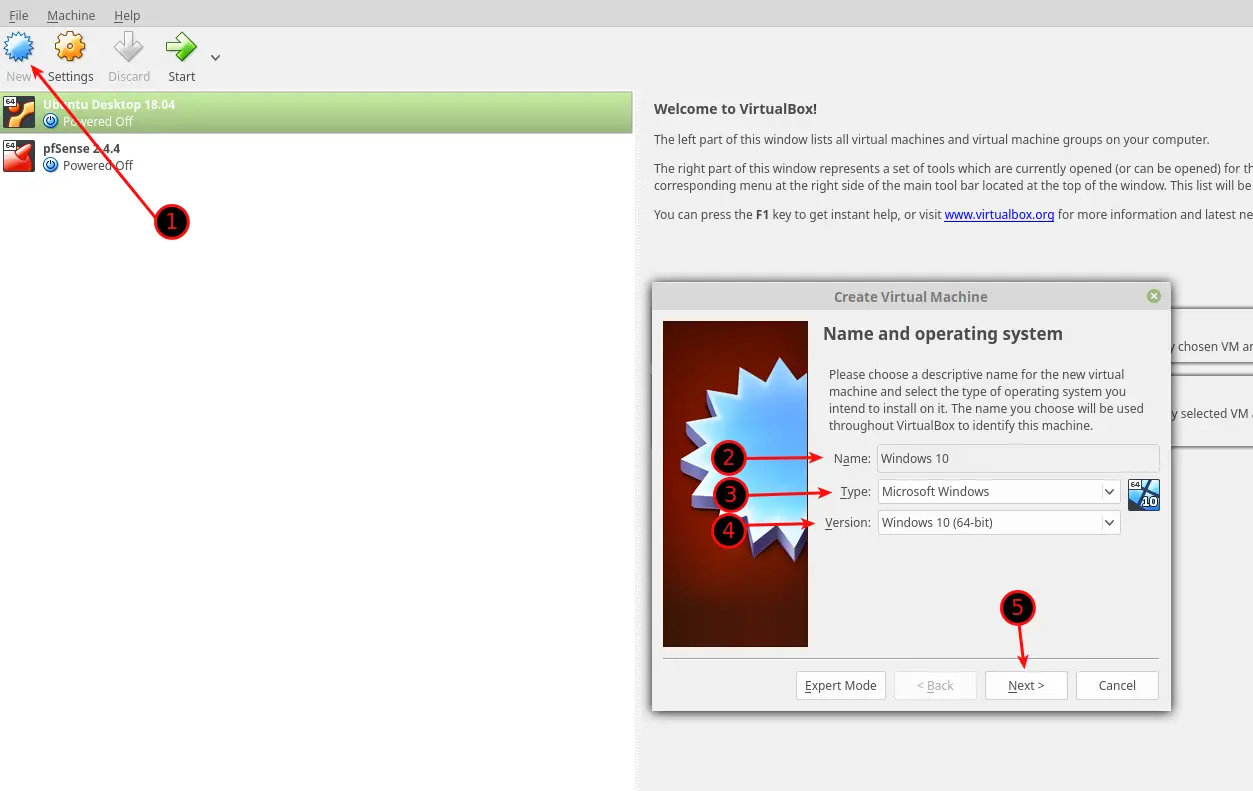
Start VirtualBox. Enter a Name, choose the correct Type and Version and click on Next.
Memory Size
Allocate at least 4096 MB of RAM to have a smooth experience.
Hard Disk
Select Create a Virtual Hard Disk now. Click on Create.
Hard Disk File Type
Choose VDI (VirtualBox Disk Image)
Storage on Physical Hard Disk
Choose Dynamically allocated
File Location and Size
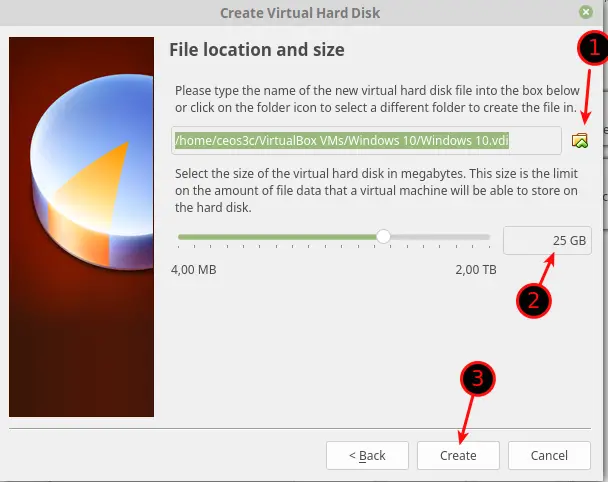
For Windows 10, depending on your needs, I would at least assign 25GB to it. Because we chose Dynamically Allocated above, the Virtual Hard Disk will only take up as much physical Disk Space as the Windows 10 installation is big. So if your Windows 10 only eats up 18GB, only 18GB will be taken from your Physical Drive, up till a maximum of 25GB, or whatever you choose.
You can choose where you want to store your Virtual Hard Disk by clicking on the Folder.
Step 4- Adjusting Virtual Machine Settings
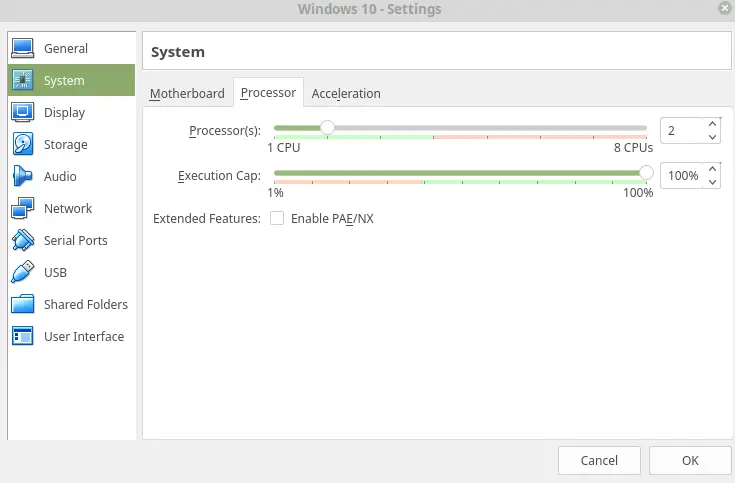
Right-Click your VM and select Settings. Navigate to the System / Processor Tab. Assign it 2 CPU’s if you can for a better experience.
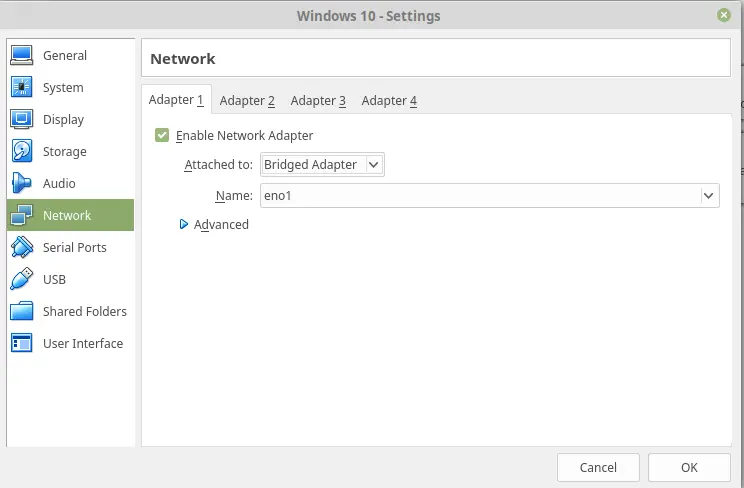
OPTIONAL: Navigate to the Network Tab and choose if you want NAT or Bridged, or even Internal Network. NAT is a Virtual Network running on your Computer (With Internet Access); Bridged is like the VM is plugged straight into your local Network (With Internet Access, obviously), and Internal Network is an Internal Network on your Computer (Without Internet Access).
So choose what suits you best and click on OK.
Step 5 – Starting the Virtual Machine
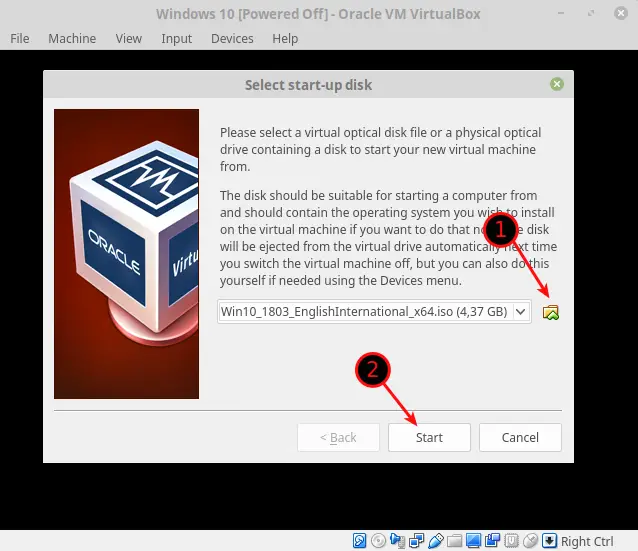
Select your VM and click Start. It will ask you to provide the Windows 10 Image File you downloaded earlier. Click on the Folder and select it from your Downloads Directory. Click on Start.
Step 6 – Install Windows 10 on Linux
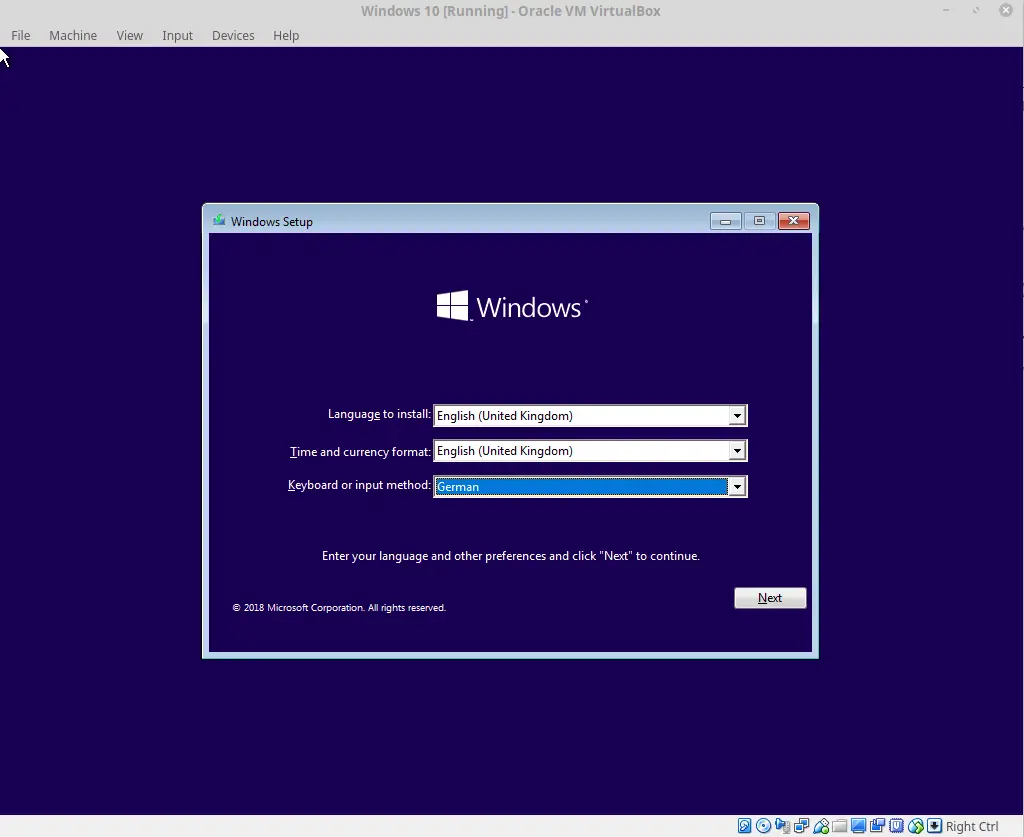
Now we will run through the Windows Installation. Select the Language and Keyboard Layout and click Next.
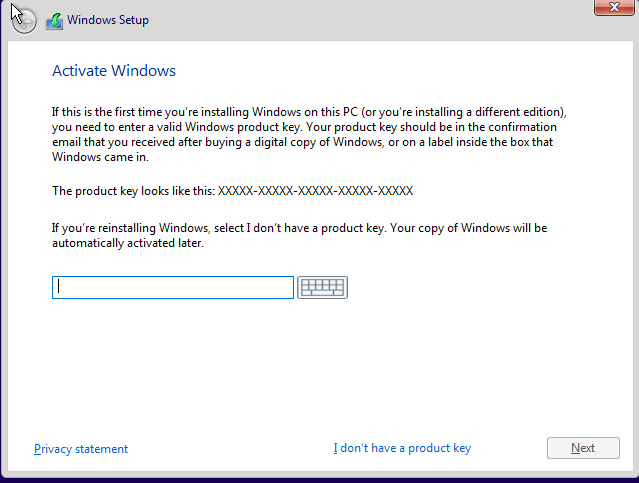
Click on Install Now. Now, either enter a Product Key if you have one or select I don’t have a product key if you want to enter it later once it’s completely installed.
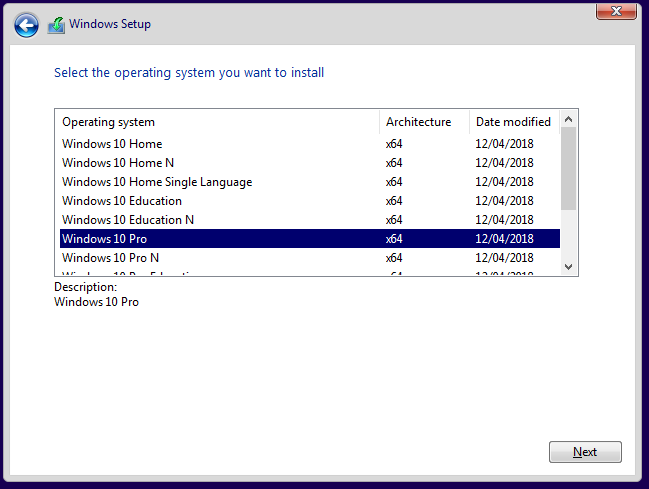
Choose for which Windows Version fits the Windows Key you have and click Next.
Accept the License Terms and click Next.
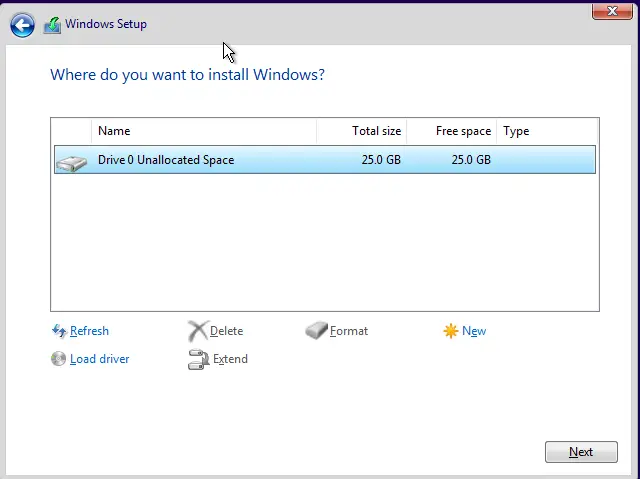
Now choose Custom: Install Windows only (Advanced). Select the only available Hard Drive and click Next.
The Windows installer will do its job now. You can go and grab a Coffee in the meanwhile, or even better, Donate a Coffee to me!
I leave going through the initial Windows Installer to you. Once you have answered all of Cortana’s annoying questions and you are booted into your System, we are going to continue installing the VirtualBox Guest Additions.
Step 7 – Install VirtualBox Guest Additions on Windows 10
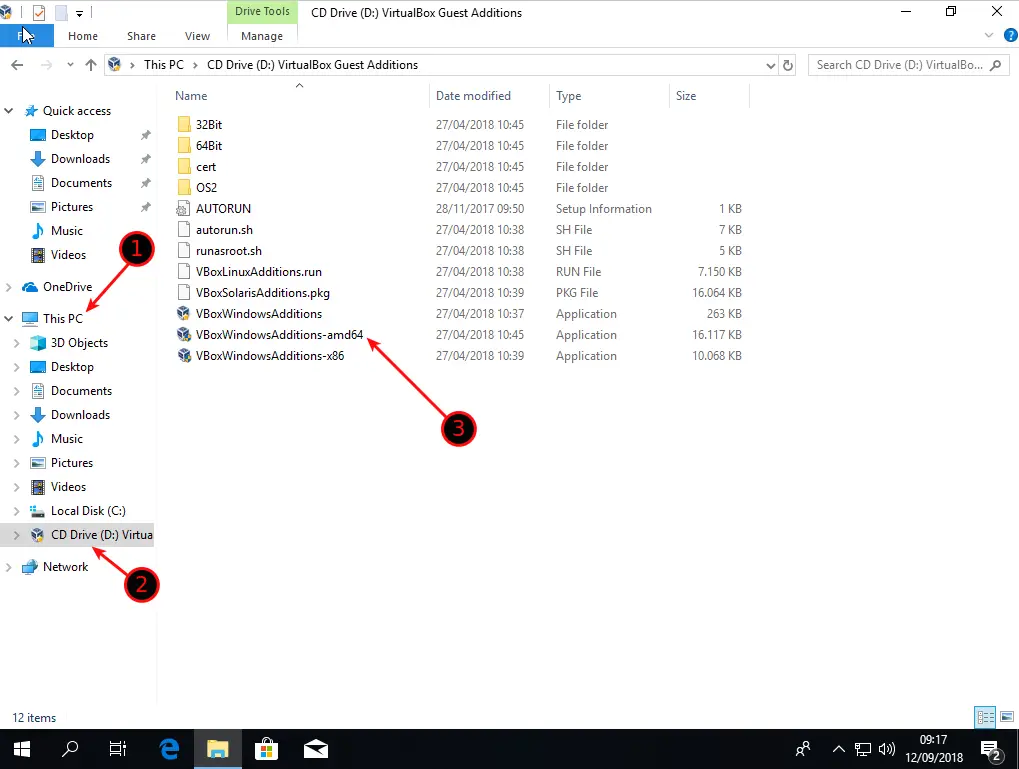
In your VM Window, click on Devices -> Insert Guest Additions CD Image. When prompted to Download it, select Yes and Confirm all the following dialogues. Once the Image is inserted, open a Windows Explorer (WIN Key + E) and expand This PC and click on the CD Drive. Start VBoxWindowsAdditions-amd64. Run through the installation and restart your Windows 10 VM.
Once you have rebooted, I recommend you to take a Snapshot of the VM. So in case something goes wrong, you can revert back to the freshly installed state.
Step 8 – Taking a Snapshot
Shut down your VM. In VirtualBox, select your VM, click on Machine Tools and, select Snapshots, click on Take.
Name your Snapshot something like “Fresh Install not Activated”. So you know the state of the VM later on when you need to revert back to it.
Wrapping Up
The next thing I recommend you do is to run Windows Update to make sure you are on the latest version. (Hit the Windows Key and simply type “Update” in the Search Field)
Now you have a fully functional Windows VM on top of your Linux install; you can use it for Windows Exclusive Tools like Adobe Suite. It actually works pretty well if you have a beefy enough Computer. Please let me know in the comments below how you use your Windows VM, and I would love to know.

