I recently started to stream on Twitch when I play Overwatch and found that you quite have to fiddle around with your settings until you get it right. So, I created this OBS Twitch settings guide to give you a little help in setting up a lag-free stream.
I spent the last few weeks finding the best OBS Twitch settings to stream lag-free from my computer. My stream was always a bit laggy, and it took me ages to find out what the error was. I hope with this article; I can give you a clue if you are in the same spot.
But let’s start at the beginning. I will quickly show you how to set up OBS to stream on Twitch. If you have already installed OBS and set everything up, just scroll down to Step 2.
Table of Contents
Step 1 – Installing OBS Studio
Go ahead and download OBS Studio. Install it, leaving everything on default. Start OBS after the installation is finished.
Initial OBS Studio configuration
Once you start OBS Studio, select Yes to start the Auto Configuration Wizard. This saves us a little bit of time.
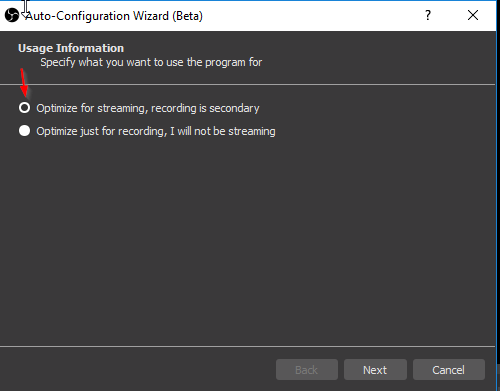
Choose to optimize for streaming.
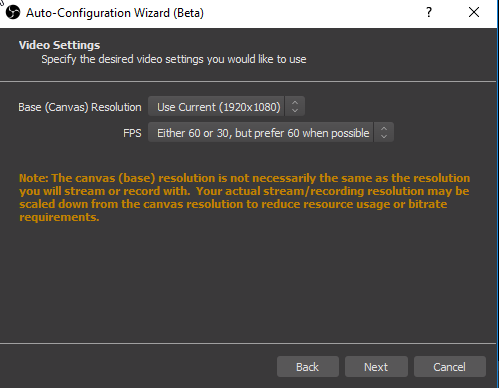
For Video settings, leave it on the default. You want to aim for 1920×1080. Leave FPS on default, we will talk more about FPS later.
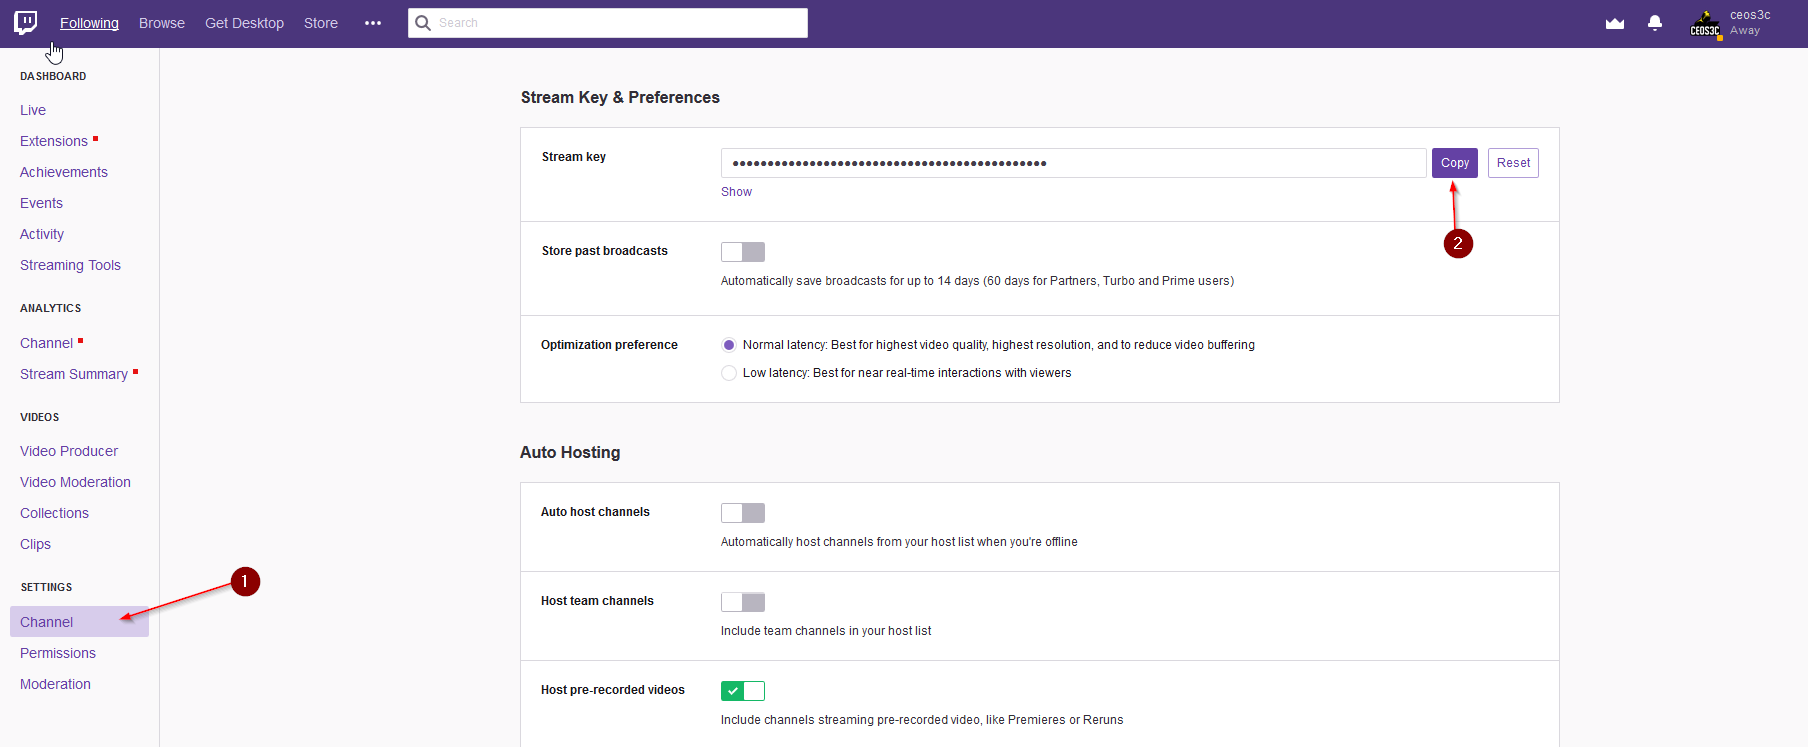
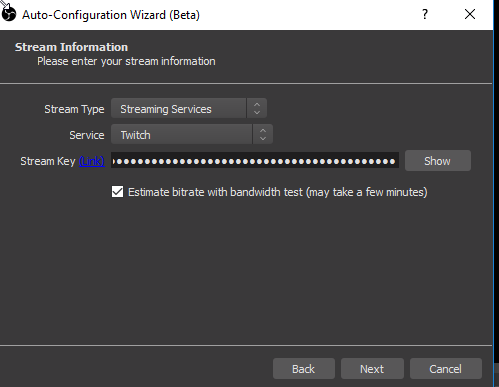
Next, we need our Twitch Stream Key. You will find it when logging in to your Twitch account and go to Dashboard when you click on your profile picture in the upper right corner. Click on Copy to copy your key.
Paste it in the Auto Configuration Wizard and leave Estimate Bitrate ticked.
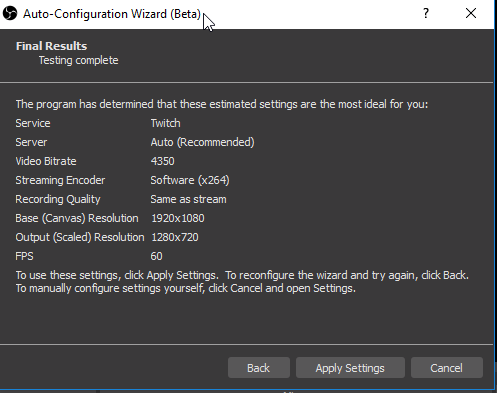
Click Apply Settings to use the recommended Settings once the test is finished. This gives us a good starting point.
Good. Now we are done with the initial configuration.
Setting up a Game Stream
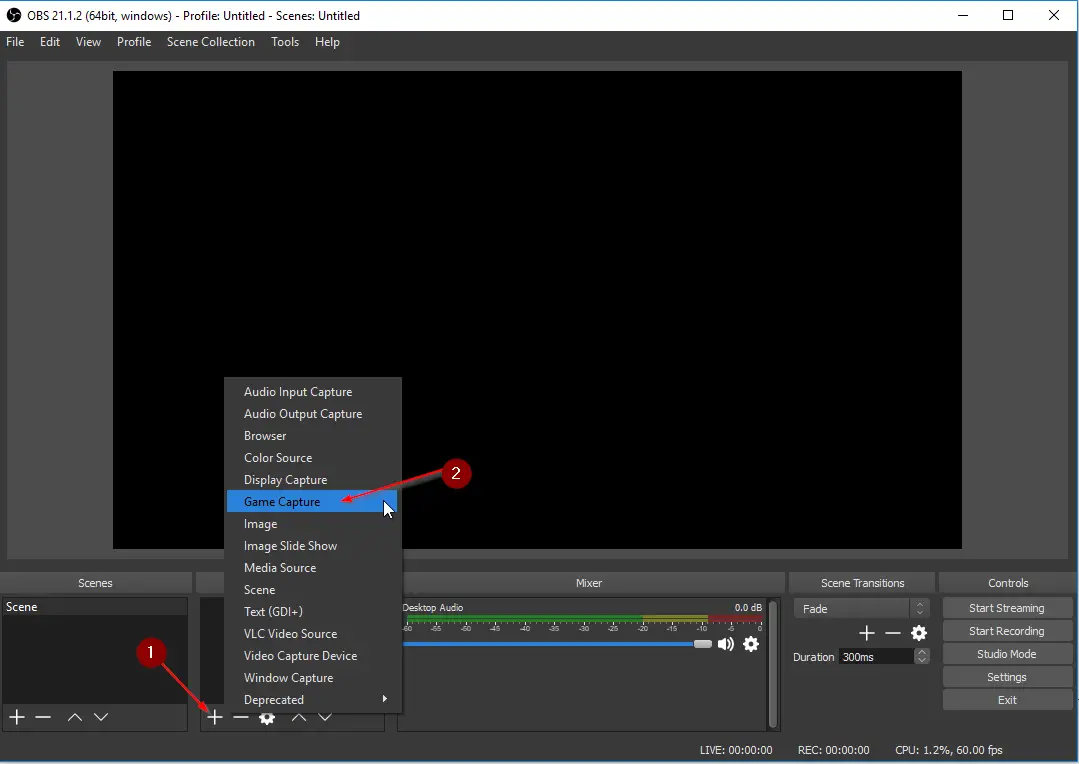
Now let’s take Overwatch as an example. To start sharing your Game Window, simply start Overwatch and then hit ALT + TAB to minimize Overwatch. In your OBS Studio, under Sources, click on the + and select Game Capture. Click OK and select: Capture Specific Window: Overwatch.exe
The next time you start Overwatch, OBS will automatically capture your window, so you just need to press start streaming.
Now I encourage you to simply start streaming. Have a friend watch your stream and tell you if it’s playing fine or if any lags occur. If it plays fine, perfect! You are all set. If not, continue below to find the Best OBS Twitch Settings for you.
Step 2 – Finding the Best OBS Twitch Settings
Alright, if your stream lags, I have a couple of things for you to try out. First, make sure to check out Twitch’s recommended Stream Settings. Take those as a guideline.
I had my settings set to:
- Bitrate 2500
- FPS 60
- Resolution 1920×1080 rescaled to 1280*720
I had lags and screen stutters in my stream. Now I was searching together with a friend what the best OBS Twitch settings for my machine were and found the following solution. Take into account that every circumstance is different. I have a different computer than you; I have a different Internet Connection then you, and so on.
You have to tweak your settings a little bit; this is just a guideline and to show you what did the trick for me.
My lag-free OBS Twitch Settings
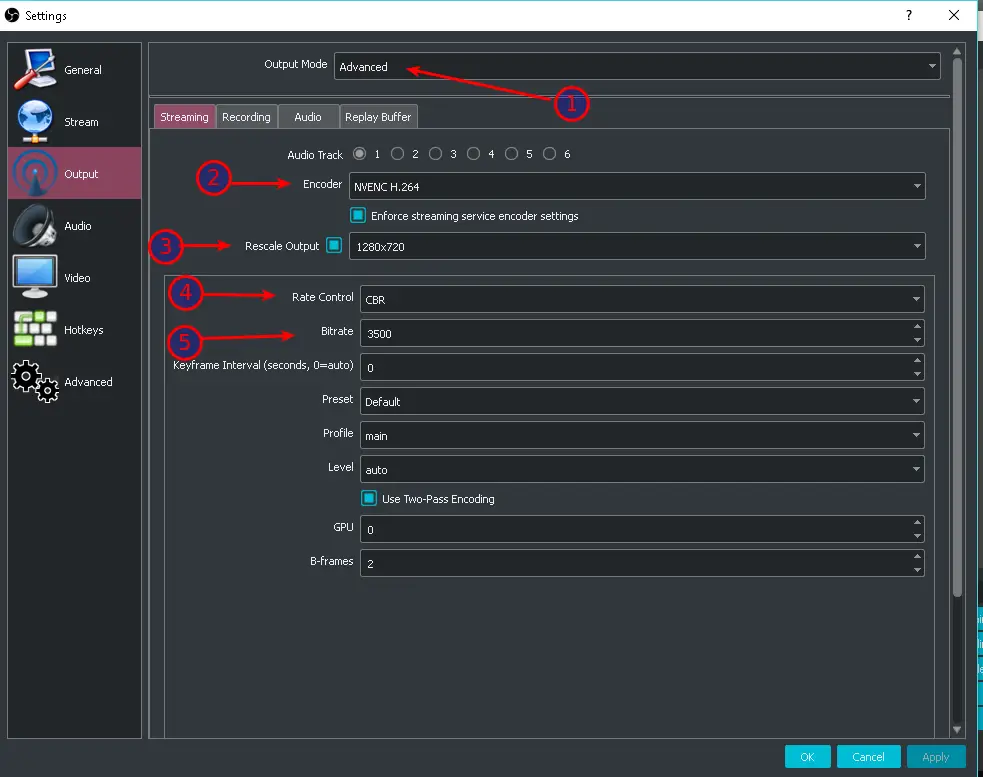
Open Settings and navigate to Video. First, choose Output Mode on Top and set it to Advanced. Then Select the Streaming Tab. Set everything as in the screenshot below.
Now I have a 50MB Down/10MB up Internet Connection, and Bitrate 3500 works fine for me. If you have only would have 16MB down / 1MB up, 3500 probably won’t work for you. Check out Twitch’s recommendations for Bandwith to adjust accordingly.
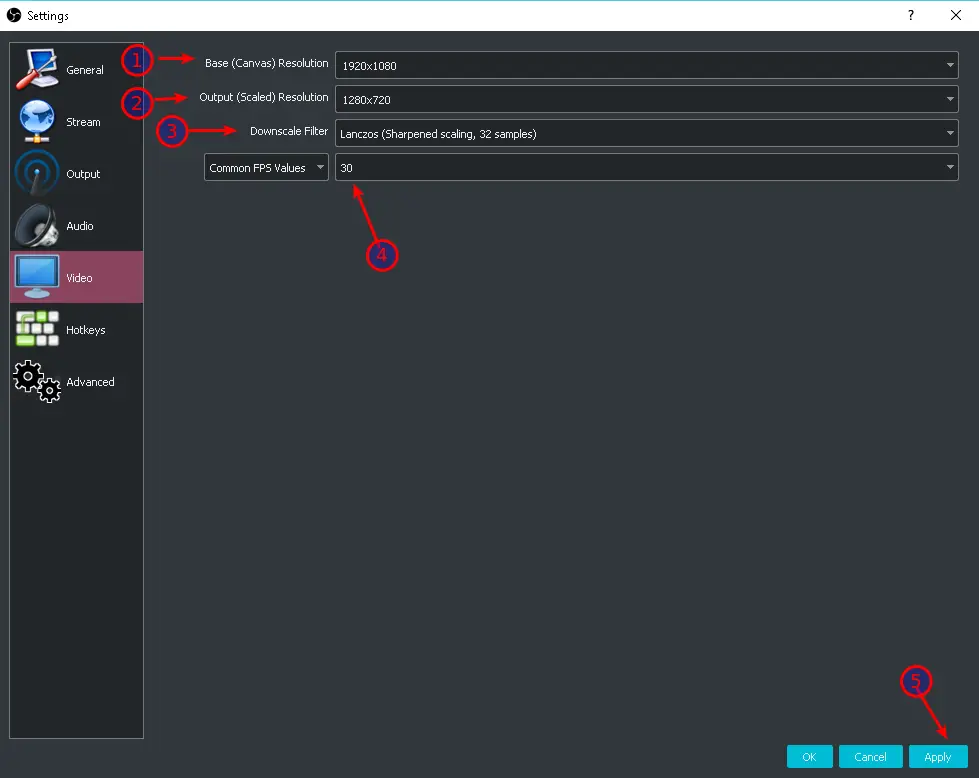
Next, Navigate to Video and adjust the settings as below. Now I have tested a bit and I didn’t found a huge boost in quality by not scaling Output to 1280×720. I have also seen quite a lot of famous streamers just streaming in 720p. So you can try it yourself, but those are the lag-free settings for me.
FPS is set to 30. I got lags again when switching it to 60fps, but you can certainly try if it works with 60 for you!
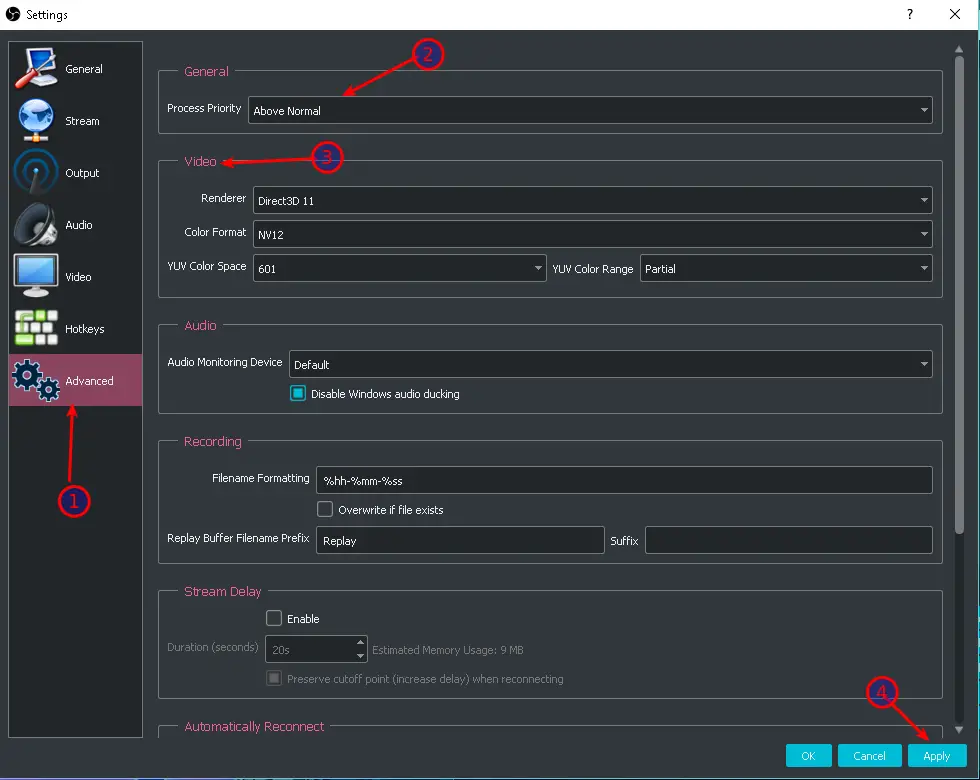
As a last step, navigate to Advanced and set the Process Priority to Above Normal. This did the final tick in performance for me. Also, adjust the Video Settings if you will, I found those to look pretty good.
And there you have it. This completely fixed any stuttering for me. I hope it helps you too to find your perfect OBS Twitch Settings. Let me know in the comments below if this worked for you.

Thanks for the detailed guide! I was experiencing some lag issues on my streams and after implementing the settings according to your guide, the difference is noticeable. My viewers don’t experience any more buffering issues and my streams are now super smooth
That worked for me, thanks!!!!!
Great to hear!
You’re having seeing issues not because of OBS. Turn off “Game Mode” in Windows. Also, your downstream bitrate of your connection doesn’t affect the bitrate that you stream at. It’s your upload speed, which I can bet that it’s not 50mbps. It’s more likely 5mbps, or possibly 10. That puts a big damper on the rate at which you can stream. Higher fps means you need more bandwidth. There’s a lot going on in your walkthrough, and a lot of misleading info. Needs to be cleaned up and corrected quite a bit, honestly.
I forgot to make it 50/10 in the example. Thanks for pointing that out. Of course the download speed has nothing to do with your stream performance, but your upload speed is what is important.