If you run an instance of the popular Data Cloud NextCloud, you probably want a way to back up your data too. Today I show you how to Backup NextCloud and how to move your files to another server.
We will do this the easiest way possible, with no data deduplication, no incremental backup, simply creating a tar.gz file of our most important data and moving it over to the backup server, overwriting the existing one, using Cron. I’ll give you an option that doesn’t overwrite the existing backup but creates each backup individually with dates, too.
Let’s look at our scenario first.
Table of Contents
- The Scenario
- Step 1 – Setting NextCloud to Maintenance Mode
- Step 2 – Mounting the Backup Server
- Step 3 – Creating the Backups
- Step 4 – Disabling Maintenance mode
- Step 5 – Creating a Cron job
- Step 6 (OPTIONAL) – Using individual file names
The Scenario
NextCloudServer = Our NextCloud server, obviously.
BackupServer = Our Backup server.
What do we want to achieve? We want to create Backups on NextCloudServer and move them to our BackupServer. For both servers, wbe use Ubuntu 16.04 LTS in this example.
So where to start? We first need to mount our BackupServer folder on our NextCloud server.
Let’s assume our backup server has a folder called “backups”, which of course, you need to create on your BackupServer.
So let’s assume the path to our BackupServer including the backup folder is:
//BackupServer.com/backups
Step 1 – Setting NextCloud to Maintenance Mode
To ensure data integrity, we first will set NextCloud into Maintenance Mode. This ensures that nobody is working actively on NextCloud and reduces the risk of corrupt backups.
cd /var/www/nextcloud
sudo -u www-data php occ maintenance:mode --onCode language: JavaScript (javascript)
Step 2 – Mounting the Backup Server
On your NextCloudServer, create a new directory. You can create it wherever you want, for this example, we use the following:
mkdir /mnt/cifs/backups/nextcloudTo be able to mount CIFS shares, you need to have cifs-utils installed, so we do that first.
apt-get update
apt-get install cifs-utilsCode language: JavaScript (javascript)
Manually mounting the drive
First, we are going to create a file where we store the credentials to our backup server, so we don’t need to use them as clear text in our script.
nano /etc/backup-credentials.txtAnd enter your credentials as in the example below:
Hit CTRL+O to save and CTRL+X to exit.
Now we need to adjust the permissions:
chmod 600 /etc/backup-credentials.txtAfter this, we are going to manually mount our BackupServer.
mount -t cifs -o credentials=/etc/backup-crendetials.txt //BackupServer.com/backups /mnt/cifs/backups/nextcloudCode language: JavaScript (javascript)This should have mounted your //BackupServer.com/backups folder to /mnt/cifs/backups/nextcloud.
You can verify this by using the following command:
df -hIf you restarted your NextCloudServer now, the mount would be gone because we just manually added it. You can automatically map the drive by modifying the /etc/fstab file or simply include the mount command from above into your cronjob, which is the option we will choose.
I specifically choose this option to avoid errors while restarting. If the drive is unavailable while the server reboots, it might enter Emergency mode and won’t come up. There are ways around that by using the nofail or noauto option within the fstab file, but I won’t go over that and choose the safe and easy way instead.
If you want to automatically mount your drive by modifying your fstab file, do a Google search on how to do it, but be smart about editing your fstab file as it can prevent your server from booting.
The choice is yours.
Step 3 – Creating the Backups
Alright, now that we have the mount in place, we need to figure out which files we need to back up.
We need to backup:
- The main directory, located at
/var/www/nextcloud - The data directory, by default located at
/var/www/nextcloud/databut it is recommended to move it to a different location not inside of the/www/folder, but I will show you how to find it. - The SQL Database
Backing up the main directory
tar -cpzf /mnt/cifs/backups/nextcloud/NextcloudBackup_FileDir.tar.gz -C /var/www/nextcloud .Code language: JavaScript (javascript)Mind the . in the end, it belongs to the command. That’s it for that.
Backing up the data directory
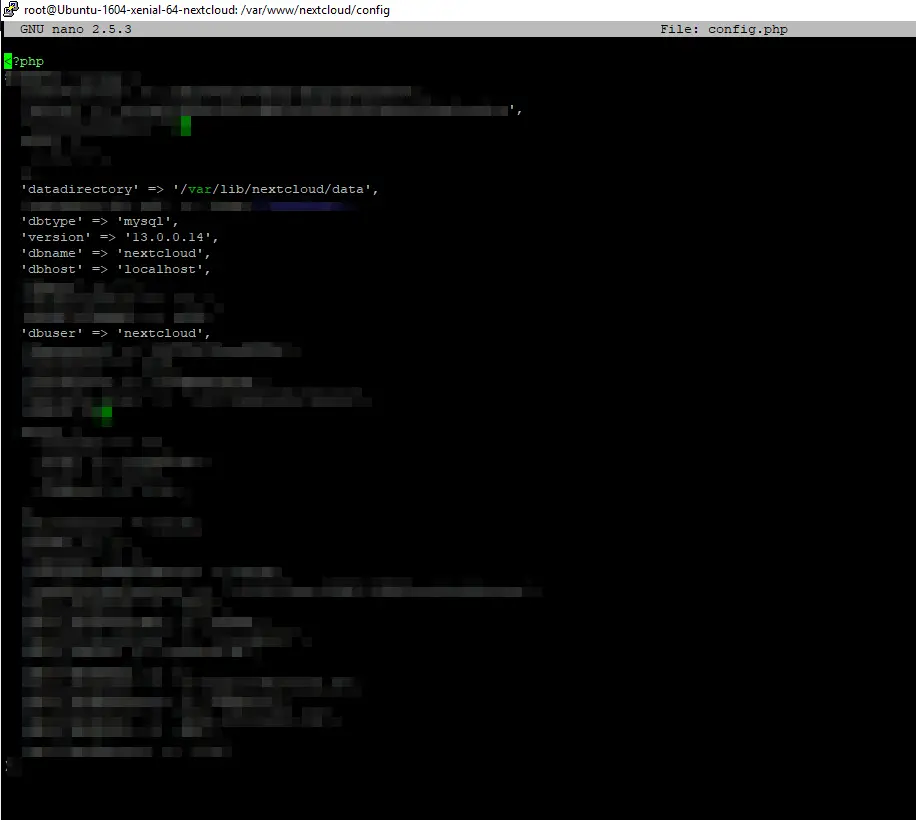
So if your data directory is not located on its default location, you can find it by opening the nextcloud config file:
nano /var/www/nextcloud/config/config.phpCode language: JavaScript (javascript)You can leave the file by pressing CTRL+X.
As you can see, it shows you where your data directory is located. So use this path for backing it up. Also note that there is written which kind of database your NextCloud uses, which is relevant for the next step.
Alright, to backup your data directory, run:
tar -cpzf /mnt/cifs/backups/nextcloud/NextcloudBackup_DataDir.tar.gz -C /var/lib/nextcloud/data .Code language: JavaScript (javascript)Adjust the /var/lib/nextcloud/data path to your own path! Mind the . in the end, it belongs to the command. This can take a long time to finish.
Backing up the database
Ok, so there are several databases that NextCloud can use; in this example, we assume we use MySQL. If your installation uses a different database, you have to google the appropriate command for yours.
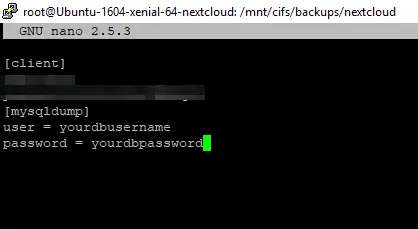
To do this database dump in a secure way without a password prompt in a Cron job, we first need to create / or modify the .my.cnf file located in the ~/ directory.
nano ~/.my.cnfIt’s possible the file already exists and has an entry, depending on your server configuration, don’t worry about it; just add the lines below the existing text.
[mysqldump]
user = yourDBusername
password = yourDBpasswordHit CTRL+O to save and CTRL+X to exit.
If you don’t know your DB Username or Password – It’s written inside of your config.php that we looked at earlier.
Next, we need to adjust the permissions of the file:
chmod 600 ~/.my.cnfNow you are ready to run a dump of your database without entering a password.
You can run the SQL Dump by typing:
mysqldump --single-transaction -h localhost -u nextcloud > /mnt/cifs/backups/nextcloud/NextcloudBackup_DB.sqlCode language: JavaScript (javascript)Alright, now we created a backup of the three most important files. Let’s verify if all is there.
We CD in our backup directory and also will run df -h again to verify that space actually filled up.
cd /mnt/cifs/backups/nextcloud
df -h
And sure enough, it did:
We can also run ls inside of our backups directory to verify that the files are there:
lsAnd that’s it for the backup process. Now we know everything works, and we can now automate the whole process using Cron. But first, we have to disable Maintenace mode again.
Step 4 – Disabling Maintenance mode
Quick and easy:
cd /var/www/nextcloud
sudo -u www-data php occ maintenance:mode --offCode language: JavaScript (javascript)
Step 5 – Creating a Cron job
Now we basically create a Cron job that runs all the commands that we just run manually on a specific date that we set. You should learn at least Cron job basics before attempting this blindly. I have a short and informative tutorial on that, including a video.
I want my Cron job to run every Sunday, starting at 20:59.
We create a Cron by modifying the crontab file:
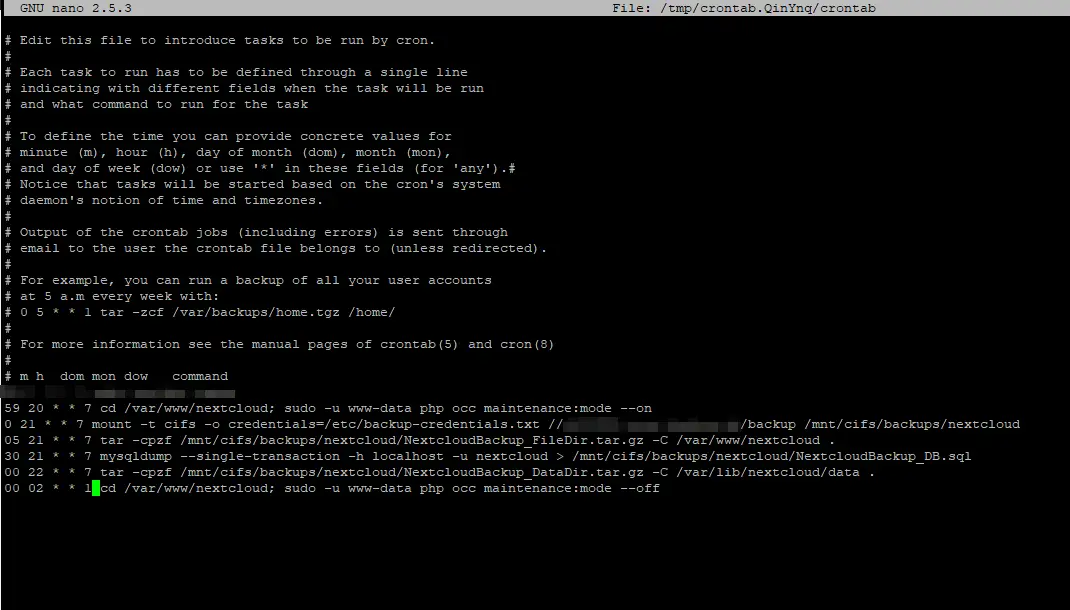
crontab -eNow we know that the backup of our Data Directory will take the longest by far, so we will run this as the last command.
59 20 * * 7 cd /var/www/nextcloud; sudo -u www-data php occ maintenance:mode --on
0 21 * * 7 mount -t cifs -o credentials=/etc/backup-credentials.txt //BackupServer/backup /mnt/cifs/backups/nextcloud
05 21 * * 7 tar -cpzf /mnt/cifs/backups/nextcloud/NextcloudBackup_FileDir.tar.gz -C /var/www/nextcloud .
30 21 * * 7 mysqldump --single-transaction -h localhost -u nextcloud > /mnt/cifs/backups/nextcloud/NextcloudBackup_DB.sql
00 22 * * 7 tar -cpzf /mnt/cifs/backups/nextcloud/NextcloudBackup_DataDir.tar.gz -C /var/lib/nextcloud/data .
00 02 * * 1 cd /var/www/nextcloud; sudo -u www-data php occ maintenance:mode --off
Code language: JavaScript (javascript)
Let’s quickly run through each line to take out the confusion.
- Every Sunday 20:59: Activate Maintenance mode
- Every Sunday 21:00: Make sure our BackupServer is mounted/remount it
- Every Sunday 21:05: Backup our NextCloud File Directory
- Every Sunday 21:30: Backup Our SQL Database
- Every Sunday 22:00: Backup our big Data Directory
- Every Monday 02:00: Disable Maintenance mode
Now you can see that I gave the script enough time between the last Data Directory Backup and leaving the Maintenance mode.
CTRL+O to save and CTRL+X to exit.
If you want to validate that the script was running, just navigate to the backup folder on Monday and run.
ls -laTo verify that the files have the correct dates.
And that’s it. As I said, this is a simple and easy way to create a Backup. If you want to create incremental backups or implement data deduplication, you have to look into something like Rsync or Borgbackup.
As promised, the option to create individual files without overwriting them is below.
Step 6 (OPTIONAL) – Using individual file names
It’s very easy to do that, but keep in mind that this will fill up your hard drive space pretty quickly depending on how often you run backups. We simply create individual file names by adding the date option in our backup command.
So instead of using this command:
tar -cpzf /mnt/cifs/backups/nextcloud/NextcloudBackup_FileDir.tar.gz -C /var/www/nextcloud .Code language: JavaScript (javascript)You would use this:
tar -cpzf /mnt/cifs/backups/nextcloud/NextcloudBackup_FileDir_`date +"%Y%m%d"`.tar.gz -C /var/www/nextcloud .Code language: JavaScript (javascript)This would add the date to the file name with the specific date it was created.
You simply repeat this step for all of the other backups too. I will teach you how to restore backups in a future tutorial.


“I will teach you how to restore backups in a future tutorial.”
Please share this, waiting for a longggg time now 🙂
Hi I am trying to backup nextcloud (hosted on hostio.cloud) to backblaze do you have any insights on it?
” I will teach you how to restore backups in a future tutorial.”
Hi, when is this coming?