In this guide, I will show you how to improve surfing speed with pfSense using Namebench.
Namebench is a DNS benchmarking tool that measures the response time of your DNS servers and compares it to other publicly available DNS servers.
This guide is specially tailored for pfSense users but also applies for any router where you are able to change DNS settings.
So let’s get into it. What usually is the case when you use a customer grade router, you will automatically get assigned a DNS server by your ISP. Most ISP’s provide their own DNS servers. This might or might not be good for you, according to how fast their DNS server is and how far it is away from you.
With Namebench, we are able to benchmark the speed of this DNS server by comparing it to other publicly available DNS servers, as mentioned above.
What we need to do then is, tell our router to use the faster DNS servers instead of the one from your ISP.
I did this for a few different customers now and was almost always able to get a significantly faster DNS server out of it. I even got a 450% faster DNS server in my own home after running the benchmark, and I can definitely feel the difference in page loading speed.
So let’s dive into the configuration part.
First, head over to the Google Code page of Namebench.
Then simply download the newest version which is namebench-1.3.1-Windows.exe or simply click on this link.
Or choose the Linux version if you use Linux, I will do a separate tutorial for the Linux users under you.
After that’s done, simply open the file and click on extract.
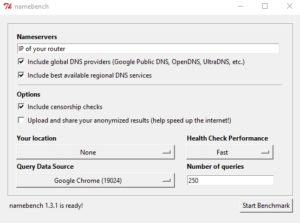
The Namebench window will open automatically and look like this:
So let’s go over the options real quick:
- Nameservers
- Here goes the IP address of your router, which should be automatically filled in already
- Include global DNS providers
- This includes public DNS servers like Google DNS and OpenDNS, we want to keep that box checked
- Include best available regional DNS services
- That might include DNS servers provided by your ISP, we keep that box checked as well
- Include censorship checks
- This will check a list of compromised or “hacked” DNS servers and will exclude them from the results, we check this box too
- Upload and share your anonymized results
- Self-explanatory
- Query Data Source
- This is where the benchmark tool pulls your data from, so you should select the browser you are mainly surfing with
We will leave the rest of the options as they are.
Now, before you hit Start Benchmark make sure you don’t have any downloads running or anything producing traffic on your network. Don’t surf the internet while the benchmark is running, we do not want our test results being influenced by any traffic.
So close your browser, close Steam or any gaming platform that could start updating games or download data.
Just go for a short walk or get another coffee, it might take up to 30 minutes to finish.
After that’s done a report automatically opens:
For me, because I got my DNS servers optimized already my primary server, which is my router, is already the fastest.
For you, there will be probably written something like Server xxx.xxx.xxx.xxx is 500% faster than your current DNS server.
So what you want to do is, enter those 3 recommended servers in your router to use as DNS servers, in exactly that order.
We go over to our pfSense and log in.
Be aware that you have to have DNS Forwarding enabled in your DNS Resolver for this to work!
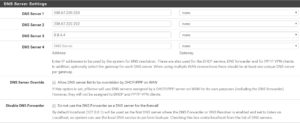
Then we head over to System > General Setup
Here, you want to enter the 3 DNS servers recommended by Namebench. Also note that you need to uncheck the DNS Server Override box, otherwise the DNS server assigned to your WAN interface by your ISP will automatically override your newly entered DNS servers.
After hitting Save and Apply Changes you are all set. You are now using your new and hopefully faster DNS servers. This also is possible with every other router that allows you to change the DNS configuration.
This really is a fast and very easy way to improve your page loading speed and cut down the time waiting for web pages to build up. It was a huge improvement for me.
https://www.youtube.com/watch?v=suTpTT3E0Rc&feature=youtu.be
You can get pre-installed pfSense hardware here:
- Firewall Micro Appliance With 4x Gbe Intel Lan Ports for PFSense
- Firewall Micro Appliance with 2x Gbe Intel LAN Ports for PFSense Barebone
- Firewall micro appliance with 4x Gigabit Intel LAN Ports for pfSense with 4GB RAM / 16GB mSATA
- Firewall micro appliance with 2x Gigabit Intel LAN Ports for pfSense with 2GB RAM / 16GB mSATA
I use a PC Engines APU.1D4 Bundle which is only available on the German Amazon, so you have to look how to get it in the US, but I assume the options above are of equal quality.


Seems like an interesting program only thing that sucks is that it says this is the best deletes the whole rapport while it uploads all this info to the maker, did all didn’t get a piece of the cake !? Sucks !!!