Today is a very quick guide on Using a DrayTek Vigor 130 as a Modem for pfSense!I exclusively use DrayTek’s Vigor 130 for my pfSense firewalls, private and in corporate environments.
⚠️ If you would like to learn more about pfSense, I highly recommend you check out my pfSense Fundamentals Bootcamp over at Udemy. This is the most up-to-date as well as the highest-rated pfSense course on Udemy.
Table of Contents
- Why Choosing a DrayTek Vigor?
- Step 1: Firmware Upgrade
- Step 2: Configuring your DrayTek Vigor 130 as a Modem
- Conclusion
Why Choosing a DrayTek Vigor?
They are cheap, reliable modems that perform well even under constant heavy load.
I don’t exactly know how it is for the US, but you can certainly Google things like MTU size for your own internet connection and adjust it accordingly.
When you buy a new DryTek Vigor 130, it comes pre-configured as a router.
It is a fully usable router, by the way, we are just going to limit his function to be a simple modem.
I live in Germany and used it for both – Telekom and 1&1 ISP. Works really well for both.
This specific configuration was made for a Telekom VDSL 50 connection.
Assuming your pfSense will establish the Internet Connection (Means, you will enter your ISP’s Credentials IN your pfSense firewall, not in the DrayTek.)
Step 1: Firmware Upgrade
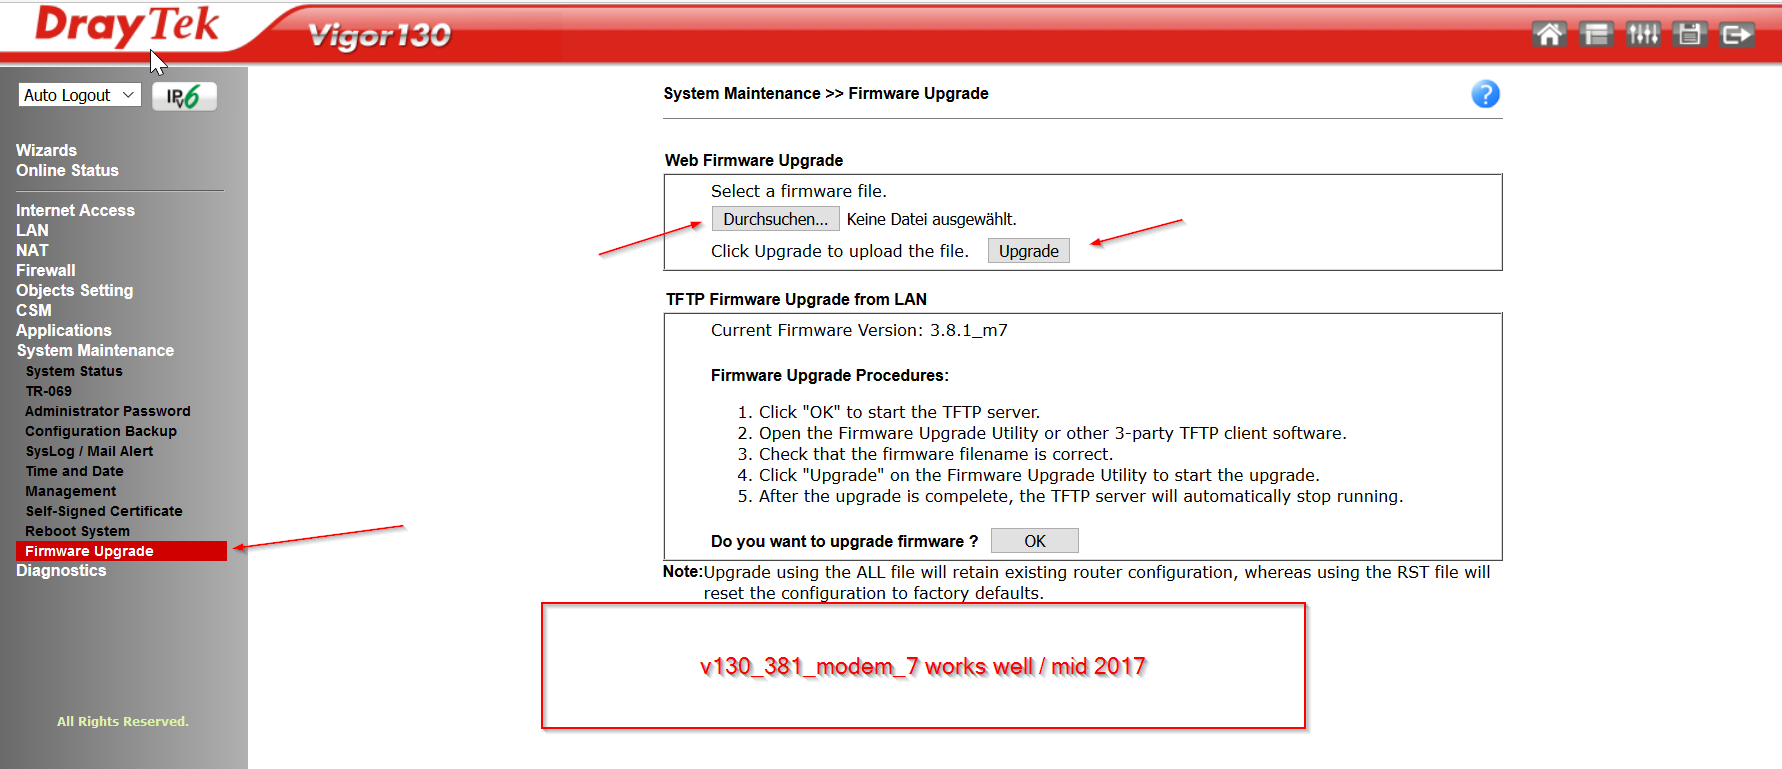
There are plenty of firmware versions out there, but because we use the DrayTek as a modem, we have to choose the MODEM firmware.
I had a particularly good experience with the v130_384_modem7 which I run on Telekom as well as 1&1 connections.
http://www.draytek.com.tw/ftp/Vigor130/Firmware/v3.8.4/ is the link to the firmware. Choose the Modem 7 one.
Now a side note. Again, no clue how you handle it in the US or elsewhere, but Telekom as well as 1&1 (One of the biggest ISP’s in Germany) both use VLAN-Tagging, specifically VLAN 7 (VLAN 8 if you have entertain from Telekom). So again, Google to find which version YOU need to YOUR ISP.
Now log in to your new DrayTek Vigor:
The Vigor comes with the default IP Address of 192.168.1.1 and you can log in with the credentials admin/admin.
I’m not entirely sure if DHCP is activated by default and you get a IP or not, in case not, just give your own computer an IP Address of 192.168.1.2 so you are able to establish a connection.
Once logged in, go to:
System Maintenance -> Firmware Upgrade
Now find the downloaded 3.8.4_m7 firmware and click on Upgrade. The router will restart after it’s done. There are 2 file endings of that update file:
One is .rst and one is .all
.rst resets everything back to factory default
.all keeps all your settings
Step 2: Configuring your DrayTek Vigor 130 as a Modem
First you always should change the default login of admin/admin to something more secure, you can find the option under System maintenance.
Now Navigate to:
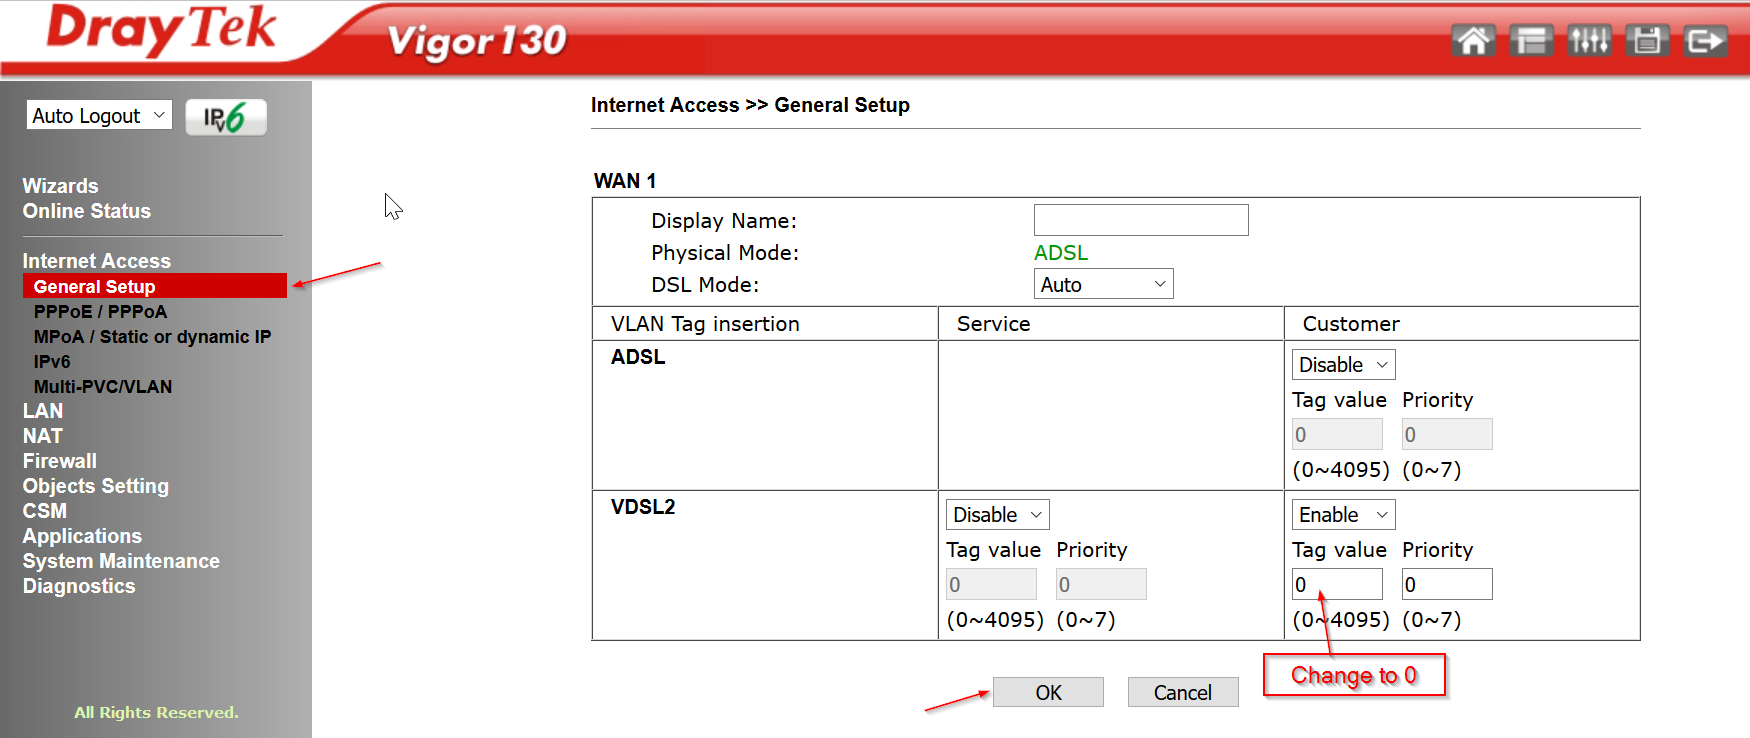
Internet Access -> General Setup
This is the part that drove me crazy once. Almost every guide says you have to change the Tag value under Customer on the right side to 7. Which indicates the above-mentioned VLAN7. That is correct if your pfSense DOES NOT have a VLAN7 Tag on its WAN Interface.
The crux is, most of the pfSense guides use a Vlan7 Tag on the WAN Interface, so if you now also tag your modem to vlan7, you will not establish a connection.
pfSense automatically forwards the VLAN7 tag that you set on your WAN Interface to the modem, hence you DON’T need to set it on your modem as well.
That being said:
Change the Tag value to 0.
DSL Mode should be on Auto
Now navigate to: Internet Access -> PPPoE / PPPoA
And make sure it’s set on: Disable
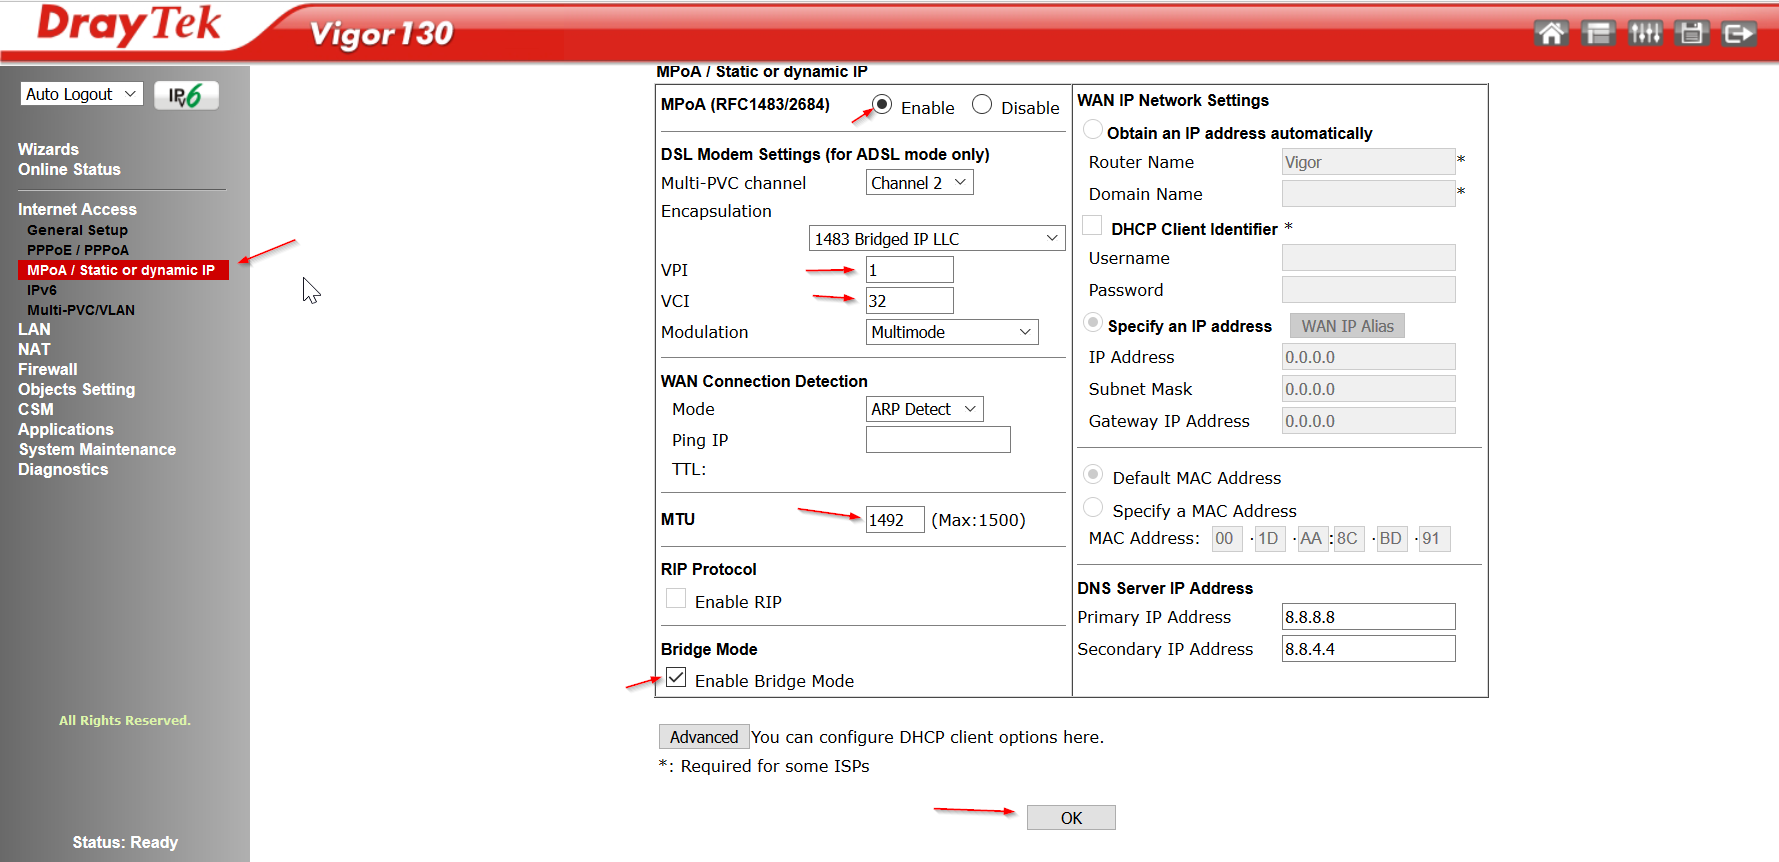
Next Navigate to: MPoA / Static or dynamic IP
Make sure it’s set to: Enable
Multi-PVC Channel: Channel 2
Encapsulation: 1483 Bridged IP LLC
VPI: 1
VCI: 32
Modulation: Multimode
MTU: 1492 (For Deutsche Telekom, you find this information with your ISP)
Bridge Mode: Enable Bridge Mode
Navigate to LAN:
Change the IP Address of the Vigor to your liking and disable the DHCP Server.
Conclusion
Now you should be all set and done. As I said, it works like a charm for me. I have one running at home and its uptime is now well over 480 Days and counting. Great solid little modem.
I hope this helps, there are many guides out there but I feel none of them is complete and goes into the details as much.
If you liked this, please consider buying the fantastic Vigor 130 Modem .


My ISP switched my port from ADSL to VDSL2 today and I had big trouble with the connection.
Due to the different defaults for ADSL and VDSL2 regarding the VLAN tag insertion, the pfsense (configured with VLAN tag 7) couldn’t reconnect right away.
Didn’t know that before I switched to Client Mode in Vigor 130 and disconnected the pfsense – everything worked for about 2 hours and then failing again.
I decided to switch back to original setup including pfsense without knowing the root cause.
Finally found this tutorial and turned off the VLAN insertion for VDSL2 as well.
Now everything seems to work like a charm.
Thanks for this tutorial
Hey Michael. Yea. It’s always a hassle with that VLAN tagging. Glad it works.
Remember if you ever upgrade to the faster 200mb + Telekom connection with vectoring, you need to use another draytek. I think it’s the 160.
Danke ich stelle mein netz auch grad auf proxmox mit virtualisiertem pfsense um
das war super hilfreich
Love the site, this is a tutorial I’ve been desperately searching for as I’ve got a dedicated APU board I’m using as a pfsense box and 1und1 vdsl2 as my ISP. I just bought the Vigor 130 and am still having trouble sadly. I’ve followed your guide but my Vigor 130 is still reading as disconnected on the WAN interface. I’ve tried playing around with the VLAN tags, and MTU sizes, but no luck. Any suggestions?
Did you use any tags on your Vigor? The Tagging should be forwarded from your pfSense.