Ah, what better title could I have chosen considering the latest events? The outside world is getting crazy right now. Until recently, I didn’t know that people are so much into Toilet Paper. It seems like that in the face of havoc, people are the most concerned about being able to wipe their asses with sweet, 4-layer strong toilet paper. Well, nobody wants to give up their comfort.
Back to something a little more interesting. Hacking. I don’t want to call it “upside”, but there is an advantage to this whole house arrest/quarantined situation – I get to spend a lot of time inside. As promised in the introductory post, this second post will be much shorter but also will go much more in-depth into the things I have learned the past week.
I was basically walking around with my notepad, so I could take notes on all the tiny things I’ve learned and don’t skip anything. If this is your first point of contact with this blog, I highly suggest you read the introduction post from last week.
I am not exactly sure yet how I will deliver the information that I have gathered, and I will probably refine the delivery method over-time, but let’s just get started and I do the best I can to deliver in an understandable format. Please let me know in the comments below if this format works for you, if it doesn’t I’m switching it up.
There will also be accompanying videos to each week on the Ceos3c YouTube Channel that will make it a little easier to demonstrate certain techniques and explain them in even greater depth. (Writing those articles takes a long time…)
What I have learned in Week #11 of 2020
Last week was a bit chaotic due to the Corona Virus and I had to take measures to work from home, so I didn’t have much time to spend on CTF’s. But, I did do one CTF on HackTheBox – Postman. You can find a walkthrough on my YouTube Channel. Some of the things I’ve learned last week are coming from solving the Postman machine.
Burp Suite
I have learned a couple of new things while working with Burp Suite on some Bug Bounties and by watching tutorials. I’ll walk you through each thing.
HTTP History
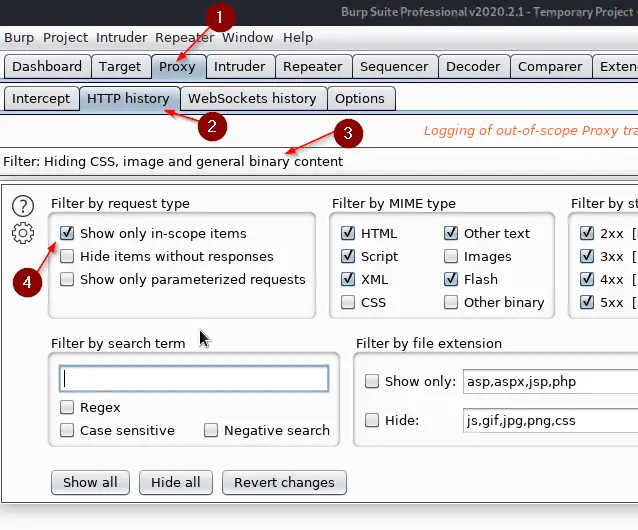
Proxy -> HTTP History -> Filter only in-scope items
Match & Replace
Go to Proxy -> Options and scroll down to Match & Replace. Those rules can be used to automatically replace parts of requests and responses that are passing through the proxy. I haven’t looked into it in more depth as of now, but there is a lengthy article on the topic at Matthew Setter’s blog that does a better job of explaining it than I am capable of as of now.
There are and there will be certain topics I will mention regardless of my having “mastered” them. A lot of topics are very complex, so it can be that I just had an introduction to it but I will provide further reading material for you guys to dig in.
Burp Intruder Grep Match
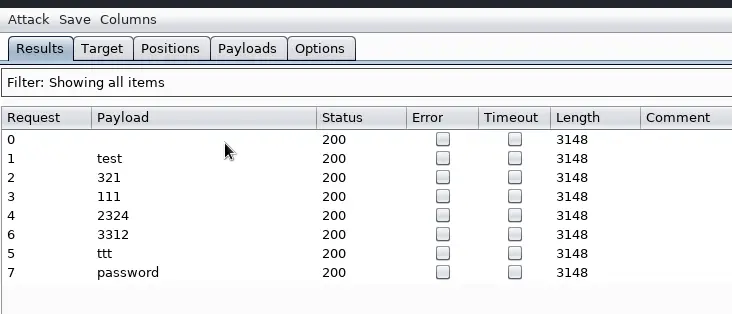
This is a very useful feature of Intruder that I will definitely use. Let’s say you run a password attack against a login form with Burp Intruder. How do you know that you are successfully logged in with a password? Well, by analyzing the length of the response. But there is another way.
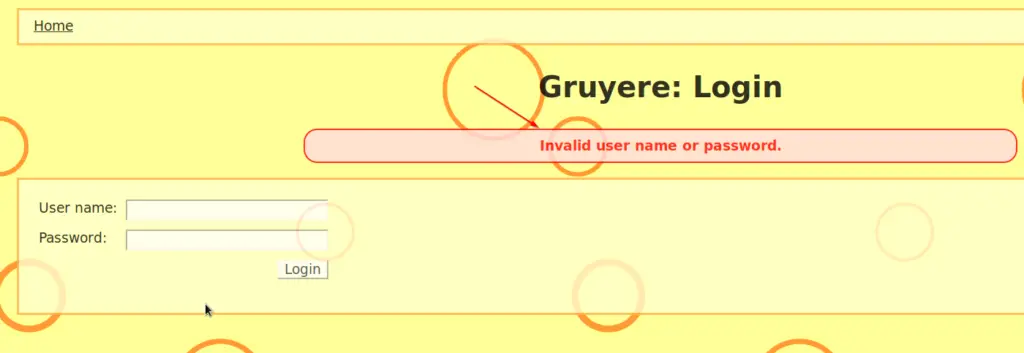
Now let’s assume the page you are attacking gives you an error message back if a failed login was detected, something like this:
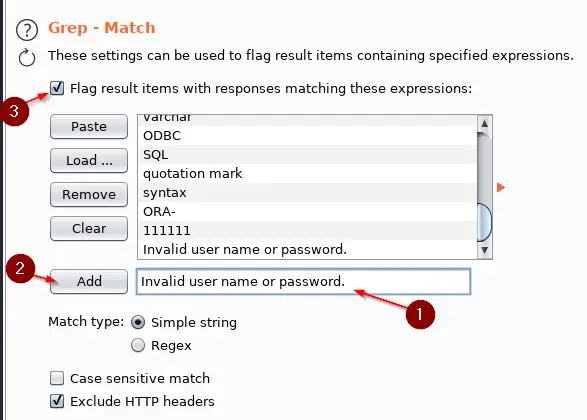
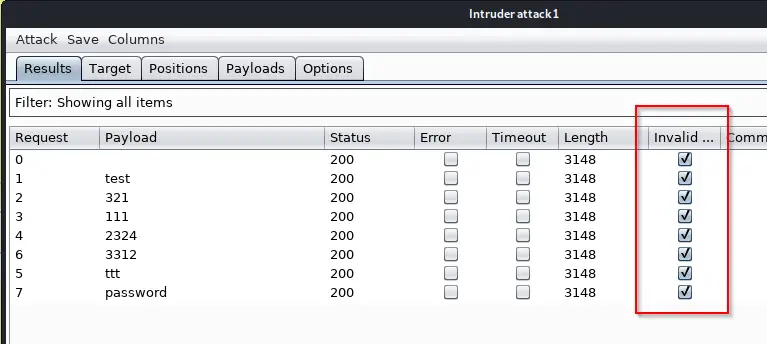
We can use Grep Match to search for this phrase. In your Intruder Attack Window go to Options -> Grep – Match. Paste the phrase “Invalid user name or password.” into it and click on Add. You can also work with Regex here if you want. I’m a total noob at Regex so I don’t. You could also make it case sensitive if necessary. Make sure “Flag result items….” is ticked. You see that there is other stuff in there, like SQL that is checking if some kind of SQL injection worked. So you can play with it.
If you only want your phrase in there, click on Clear before Adding your Phrase.
Now if you go back to the Results tab, you’ll see a new column representing our phrase. Because all of our logins failed, all of the requests have a checkmark next to them. If there wasn’t a checkmark next to a request, the login attempt would be successful.
 Very useful. I love this kind of stuff.
Burp Repeater
I also learned a couple of things on Burp Repeater I didn’t know before. I’ll summarize.
Sending a Baseline Request
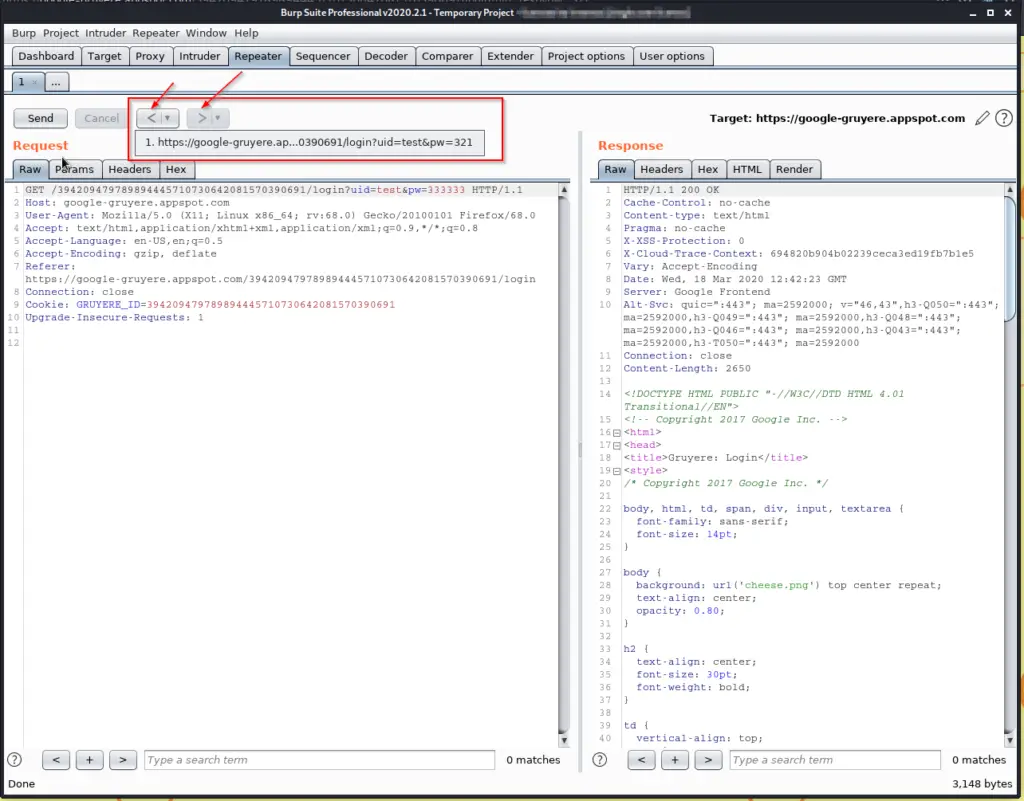
When sending something over to Repeater, hit the Send button right away so you create a baseline for your further testing. Once you did that, you are ready to modify your requests.
Repeater Navigation
A feature that is overlooked way too often. Once you have sent a couple of requests, you can use the arrow buttons next to send to navigate through them, making it easier to analyze the results. That’s why we created a baseline, so we can easily get back to it and compare it.
Request in Browser
If you right-click anywhere inside of your repeater window, you can use the Request in Browser -> In Current Browser Session tool to repeat the request inside of your browser. You just copy the link and then paste it inside of your browser window.
Advanced Scope Control / Subdomain Wildcards
If you work on bug bounties, a thing that you see often is a subdomain wildcard. Let’s take example.com as an example here. Let’s assume example.com wants us to also test all of its subdomains. The Scope in HackerOne or Bugcrowd would look like this: *.example.com where the * indicates the Wildcard for “all subdomains”.
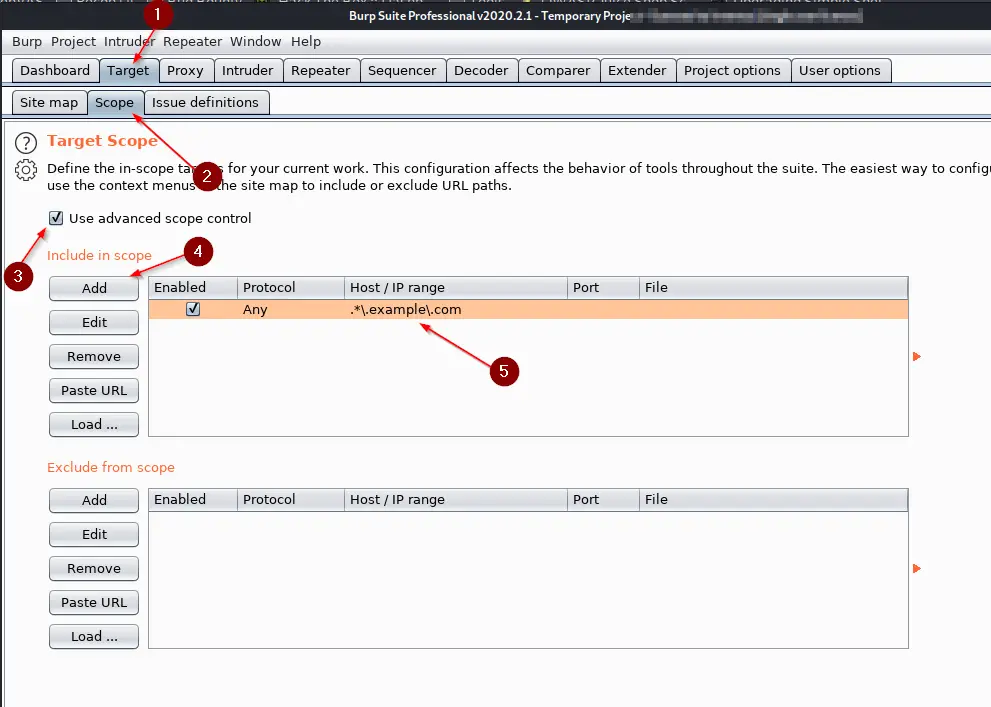
To utilize such a Wildcard and tell Burp Suite that we also want to add all of the possible Subdomains to our Scope, we can use Advanced Scope Control with a Regex expression.
Go to Target -> Scope and click the checkmark for “Use advanced scope control“. Click on Add and Add the following Wildcard to include example.com with all of its subdomains: .*\.example\.com
 That’s a bunch of stuff just for Burp Suite, enough for this week!
XST (Cross-Site Tracing)
While doing a Bug Bounty, I found a Cross-Site Tracing vulnerability on a site. I had no idea what it was, so I had to read up on it (Burp’s Active Scan found it).
In short, XST is related to XSS (Cross-site Scripting). Cross-Site Tracing attacks the Web Server itself, where Cross-Site Scripting attacks the Web Application. I put some research in it, but in the end, it turns out that modern Web Browsers automatically prevent XST attacks. I’ll borrow a comment from a Reddit user named oauth_gateau from the Netsec Subreddit:
TRACE works on plenty of servers still, but no modern browsers will issue a TRACE request ever, so XST is completely unexploitable. This has been the case for quite a few years – I view its presence in a pentest report as a red flag indicating that the tester has not kept up to date with domain knowledge.
That said, the presence of TRACE is still an information leak in some situations – it can disclose internal headers appended by authentication gateways and the like.
Hence, it turned out to be a dead-end, but I learned what XST is. If you want further information on it and how to test for XST, there is a great article on OWASP’s website.
What I’ve learned from HackTheBox
I had only time to play one machine, which was Postman. I had a blast playing Postman! I don’t want to spoil the fun, so if you plan on doing Postman, maybe skip this part.
Solving Postman taught me a bunch about enumeration. You have to dig through all the folders to find something sometimes, enumeration is so important. It also taught me a thing or two about privilege escalation. Let’s get a quick overview of the things I have learned. I don’t want this to be a walkthrough, so I keep it in short details.
Exploiting Redis
Oh, man, did I struggle with this in the beginning. Before attempting this machine I had no clue what Redis was.
I had to do some digging and eventually found an article that explained how to exploit Redis. Great write-up, by the way! Following through with this article I was able to exploit Redis and I learned some basic Redis syntax.
SSH Keys
I also learned a thing or two about SSH keys that I didn’t know before, like that I could just upload my own, generated SSH key using Redis and then using SSH to connect to Redis with the Redis user. Very interesting.
Upgrading Shells
I also improved my Shell-Game a bit. I knew how to upgrade a dumb shell to a beautiful shell before, but I refined my technique. It’s so freaking useful if you have a few tools at your repository that you can use to upgrade shells. It makes everything easier. I will create a separate tutorial that will just cover upgrading shells, but the gist is:
If you got a dumb shell on a server while using a Metasploit exploit, you can do the following to upgrade it to a Meterpreter Shell:
Press CTR + Z to move your current session to the background.
sessions
Note the session ID, probably 1.
sessions -u 1
This should create a Meterpreter shell, or at least attempt it.
sessions -i 2
To switch to the newly created Meterpreter Shell.
Tadaaaa! Fully interactive shell.
Postman Summarized
- Learned a bunch of Redis stuff
- Improved Shell-Game
- Learned a bit more SSH stuff
- Upgraded my Privesc Game a bit
- Learned: Enumerate, Enumerate and Enumerate some more!
- Learned: Don’t give the fuck up!
Wrapping Up
Puh, I have to honestly say I didn’t intend those posts getting so long. I probably have spent 2-4 hours writing this down. I don’t know if I can sustain this in the future at this level of depth. If you think I should, please comment below and I will.
I will also create an accompanying video to each week in the future. Maybe I can show you more detailed stuff in there as well, as it doesn’t eat as much time up as writing. I want to combine both video and written posts to a fully interactive experience for you. Let’s see how this works out.
I will keep putting stuff out weekly, but there will be weeks where I will not be able to learn as much and the posts will be shorter, especially now due to the whole freaking Corona thing going around. Well, let’s see where the journey goes, happy to have you on-board anyway!
Thanks for sticking around until here if you did.


