In this tutorial, I will show you how to install Kali Linux 2020.2 on VMWare Workstation Player in an easy to follow Step by Step tutorial. This is the easiest and fastest way to install Kali Linux 2020.2 on VMWare Workstation Player. Let’s dive right in.
Step 1 – Downloading and installing WMWare Workstation Player
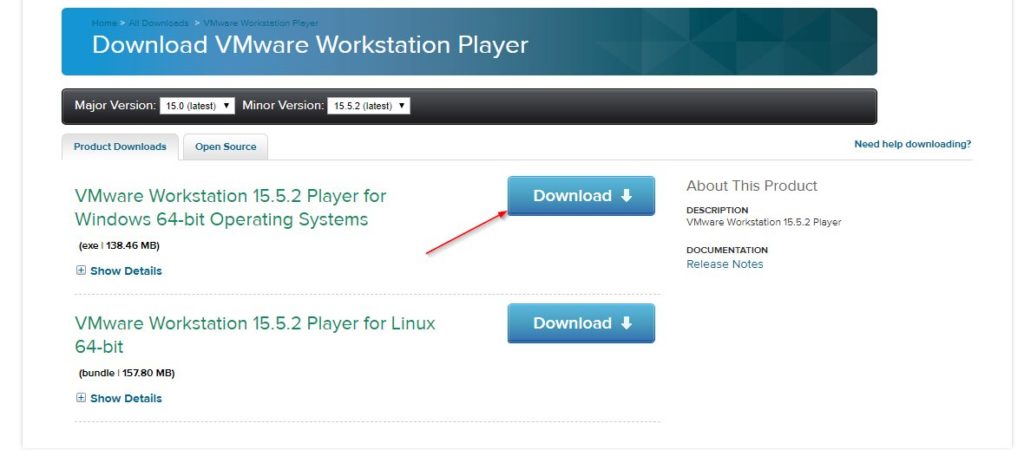
Head over to the VMWare Workstation Player Website and download the appropriate version for your system.
While installing it, make sure you tick the box where it says “Enhanced Keyboard Driver“. You’ll want to have this feature. You can leave everything else on default.
Step 2 – Downloading the Kali Linux 2020.2 VMWare Image
Go to the Offensive Security Homepage and Download the Kali Linux 2020.2 VMWare 64bit Image file. This is a pre-configured Virtual Machine Image, so we don’t need to go through the whole installation process manually, saving us time and unnecessary confusion.
After the download is finished, go to your Downloads folder and unzip the 7z file ( You can use 7zip for this).
Now you can choose to move this unzipped file to another hard drive or location before importin git, as it will be your Virtual Hard Drive. I like to create a folder somewhere that says “VMs” or something like this.
Step 3 – Install Kali Linux 2020.2 on VMWare Workstation Player
Now for installing Kali Linux, or better said, importing it.
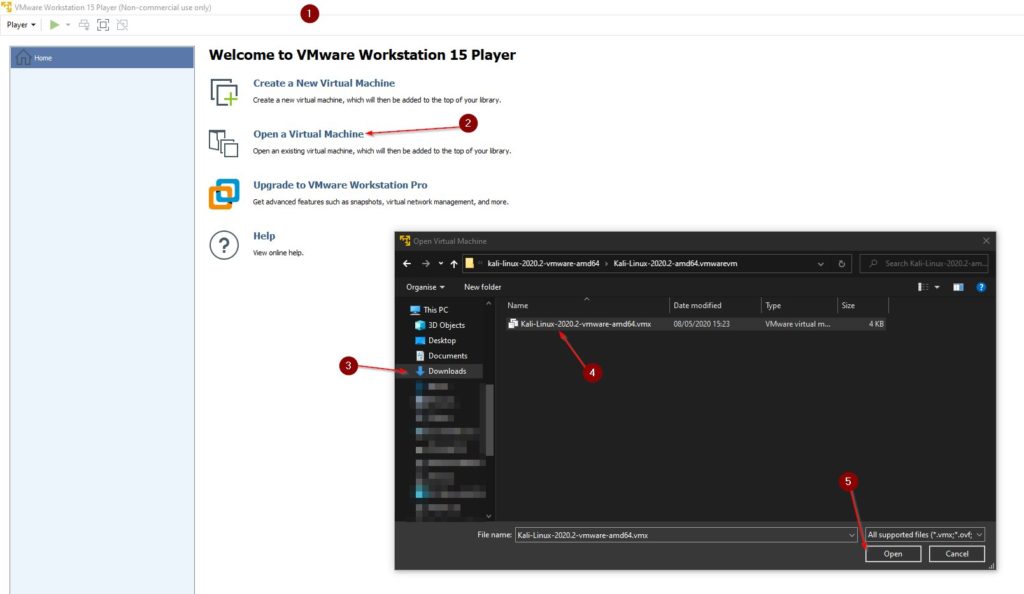
- Open VMware Workstation Player
- Click on Open a Virtual Machine
- Select your Downloads folder (Or wherever you have moved the file in Step 2).
- Choose the extracted Kali-Linux-2020.2-vmware-amd64.vmx file
- Click Open
Step 4 – Initial Configuration
Click on Edit virtual machine settings underneath of your VM. Or right-click it and select Settings.
Edit Memory and Processors on the Hardware tab to your liking. If you don’t know what to choose, choose the recommended value indicated by the green arrows.
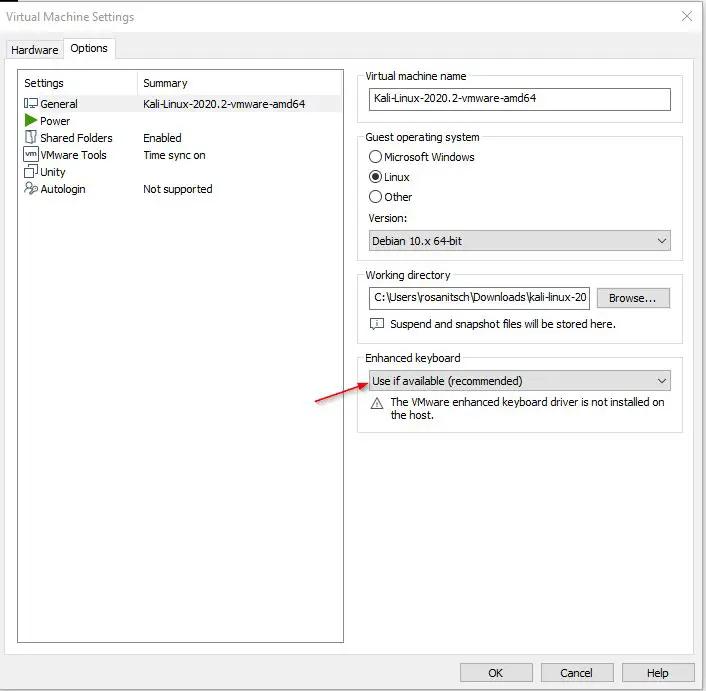
Click on the Options Tab. Under General, make sure Enhanced Keyboard is set to “Use if available”. Click Ok once you are done.
Step 5 – Starting Kali Linux 2020.2
Now simply select your VM and click on Play virtual machine, or click on the Play button in the taskbar on the top.
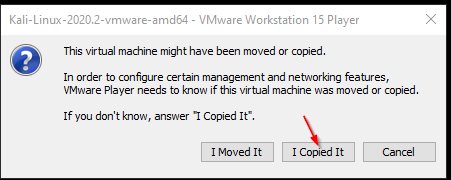
When you get asked “This virtual machine might have been moved or copied” select I Copied It.
If you get prompted to Download Software Updates, do it.
Log in with the default credentials:
Username: kali
Password: kali
Minimize and Maximize your Screen once or twice to get to full-screen mode.
Step 6 – Essential First Steps
Those steps below are the bare essentials I give you on your way. For a more thorough guide on what to do after installing Kali Linux, I highly recommend checking out my constantly updated guide The Top Things to do after Installing Kali Linux
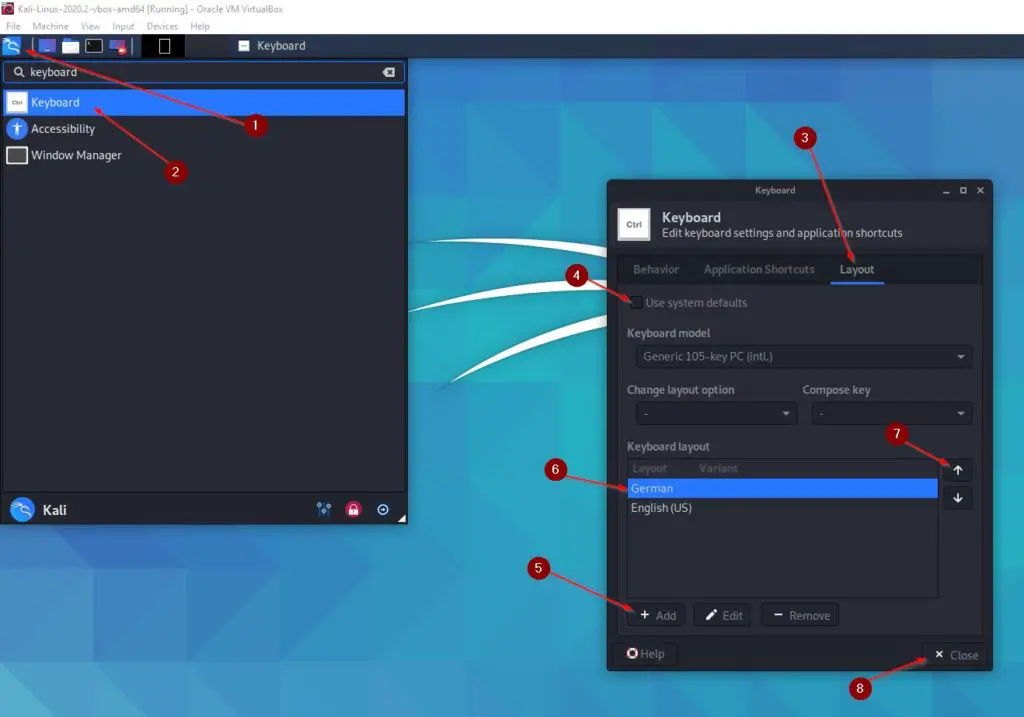
5.1 – Changing the Keyboard Layout
To avoid annoyance, change the keyboard layout to fit your keyboard.
- Open the Kali Menu and type “Keyboard”
- Select Keyboard
- Select Layout
- Untick the box
- Click on Add and select the layout you want
- Select the Layout you want to use
- Click on the up-arrow to move it up
- Click on Close
- Remove the default Layout
5.2 – Updating and Upgrading your System
Open a Terminal Window and type:
sudo apt update && sudo apt upgrade -y
5.3 – Changing Default Passwords
To change your default Kali user’s password type:
And choose a new one.
To also change your root user’s default password type:
And change this too.
Conclusion
This is how easy it is to install Kali Linux 2020.2 on VMWare Workstation Player. You are now set and ready to start your journey of becoming an Ethical Hacker. Good luck!

