In this article, we will show you how to install Kali Linux on VMware. Kali Linux is a Debian-based Linux distribution aimed at advanced Penetration Testing and Security Auditing. It has over 600 pre-installed penetration testing tools. VMware is virtualization software that allows you to run multiple operating systems on your computer.
Table of Contents
- Can I install Kali Linux on VMWare?
- How much RAM do I need for a Kali VM?
- Step 1 – Download VMWare Workstation
- Step 2 – Download Kali Linux
- Step 3 – Install Kali Linux on VMWare
- Step 4 – Configure Virtual Machine Settings
- Step 5 – Starting Kali Linux
- Next Steps
- FAQ
- Conclusion
Can I install Kali Linux on VMWare?
Yes, you can install Kali Linux on VMWare. VMWare is a powerful virtualization platform that allows you to run virtually any operating system within your main operating system. This makes it ideal for trying out new systems like Kali Linux without installing them directly onto your computer.
There are two choices when it comes to installing Kali Linux on VMWare:
- Option 1: Use a pre-installed VMWare image provided by Kali.
- Option 2: Installing Kali Linux from scratch on VMWare.
There is not really an advantage or disadvantage in either of these options. We prefer to use the pre-installed version because it saves us some time!
How much RAM do I need for a Kali VM?
Kali Linux can be run with as little as 128MB of RAM if you choose to not use a graphical user interface. If you do want to use a GUI, you should dedicate at least 2GB of RAM and 20GB of disk space.
However, you also have to take your host system memory into consideration. If you run Windows 11 on a modern PC or laptop, you will probably have at least 8GB of RAM available.
In our opinion, 8GB is barely enough to run Kali Linux in a VM since your host system will require at least 6GB of RAM to work properly. That leaves your Kali VM with just 2GB of RAM, which can run out rather quickly if you plan on using RAM-hungry tools like Burp Suite, which recommends at least 8GB of RAM to begin with.
| RAM | Recommendation |
|---|---|
| From 128MB (512MB recommended) and 2GB disk space | Kali Linux without GUI can be run |
| From 2GB and 20GB disk space | The absolute minimum to run Kali with GUI |
Step 1 – Download VMWare Workstation
There are multiple versions of VMWare Workstation available. There is:
- VMWare Workstation Player (Free)
- VMWare Workstation Player (Paid)
- VMWare Workstation Pro (Paid)
Generally, the free version of Workstation Player is very capable and will be enough for most. The biggest downside of the free version is the lack of snapshots. If you want a full feature comparison between the free and the paid versions, check it out here.
For everyone else, we are going to use VMWare Workstation Player for this tutorial. Download and install it here, leaving everything as default during the installation.
Step 2 – Download Kali Linux
We have written a complete guide on how to download Kali Linux and check the downloaded file for legitimacy for those of you looking for 100% safety.
Head over to the Kali Linux website and download the Kali Linux 64-bit VMWare Image. The advantage of this pre-configured image is that we don’t have to run through the initial installation process of Kali Linux. It also comes pre-loaded with all the necessary drivers we need to run Kali Linux on VMWare.
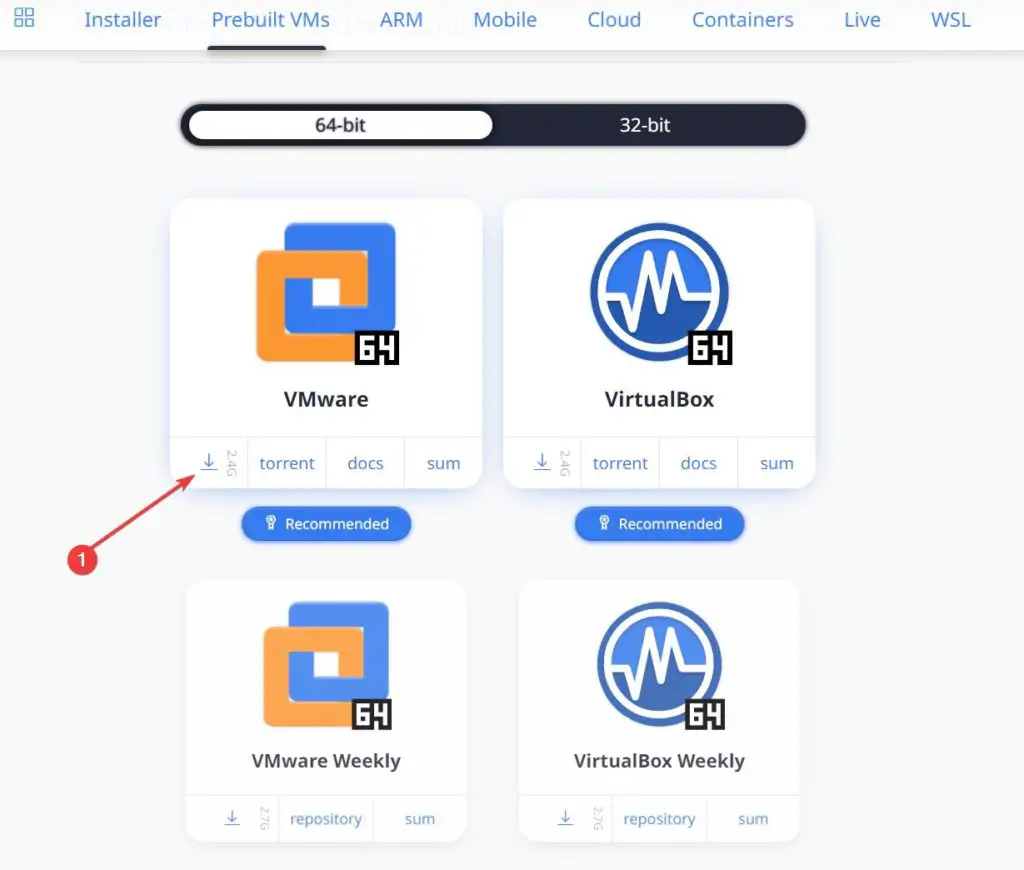
Once you have downloaded the virtual machine, you have to unzip it using 7-Zip. If you haven’t installed 7-Zip, download it here and install it. It’s free.
After unzipping the file, move it to a folder on your computer where you want to store the virtual hard disk since you can’t change that easily after importing the machine to VMWare.
Step 3 – Install Kali Linux on VMWare
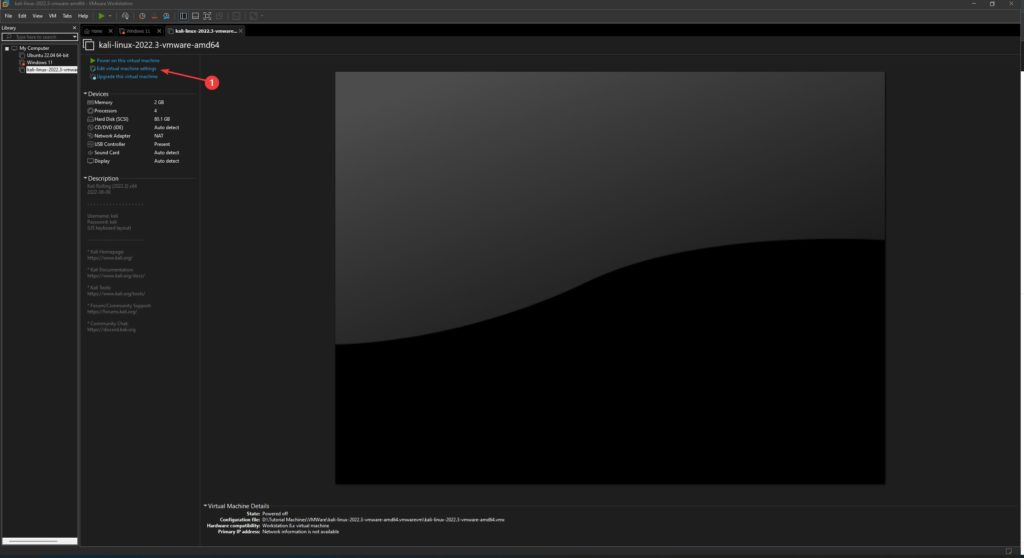
Start VMWare and click on File -> Open. Now navigate to the folder where you have stored your unzipped kali-linux-vmware-amd64.vmx file, select it, and click on Open.
This should immediately import the machine to VMWare and open it up. Once it opens, click on Edit this virtual machine:
Step 4 – Configure Virtual Machine Settings
Now that we have successfully imported the Kali Linux VM into VMWare, it’s time to adjust some of the settings.
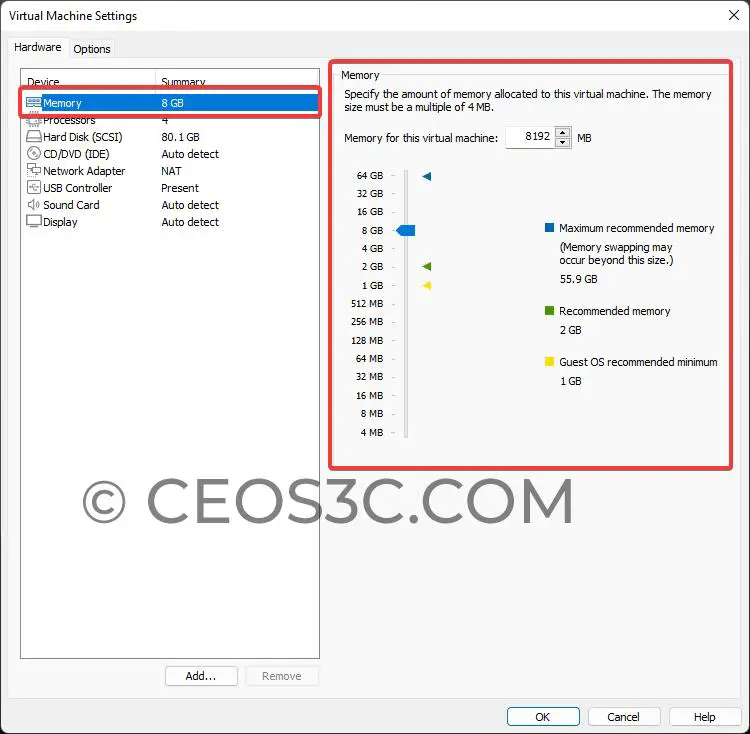
Memory
Spare as much memory as you can for your Kali Linux VMWare VM. If your host computer has 16 GB of RAM available, you can safely dedicate 4 GB – 8 GB to your Kali Linux VM.
If you run on Windows 10 or 11, make sure that your host (Windows) has at least 6 GB of RAM available for the operating system.
Processors
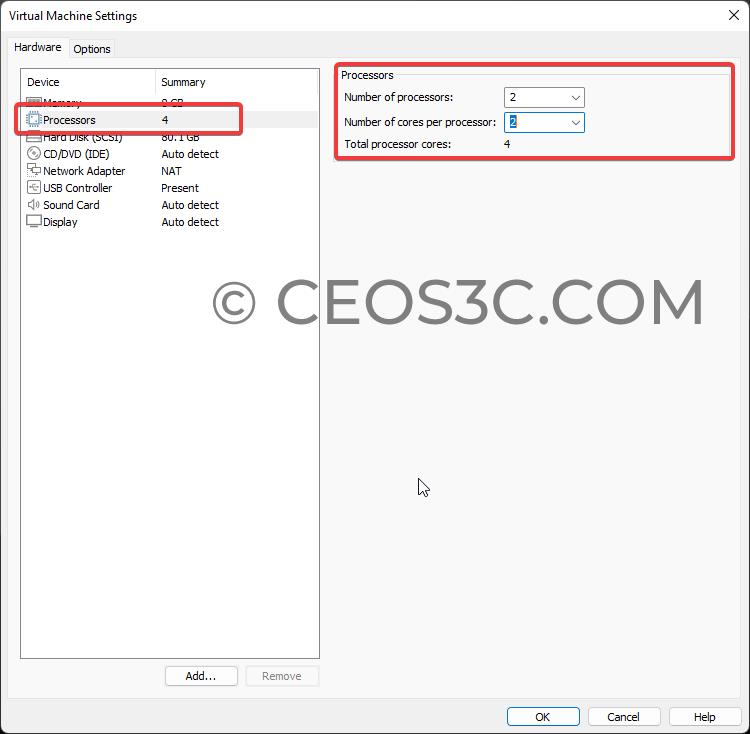
As for processors, it’s the same as with RAM. Spare as much as you can. There is no real guideline here as long as you stick to the minimum requirements of Kali Linux.
For this tutorial, we’ll leave it at 2 processors with 2 cores per processor.
Network Adapter
While it is perfectly fine to leave this as the default (NAT), we just want to quickly explain what the settings are since some of you might not be comfortable with running Kali Linux with a live internet connection.
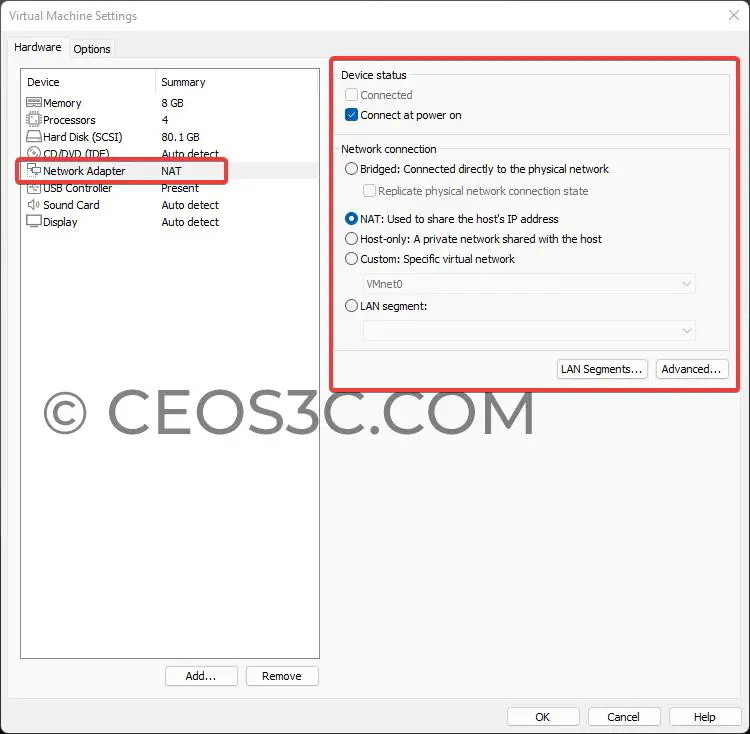
Let’s quickly run over them:
- Bridged – Connected directly to your physical network and acting as a physical device (Internet Access Available)
- NAT – Shares the hosts IP address on the network (Internet Access Available)
- Host-only – This is a private network on the host computer (Internet Access Not Available)
- Custom – Here, you can create a custom network, with or without internet access.
For this tutorial, we are going to leave it on NAT as we want to have access to the internet.
This is about everything we are going to configure in the settings to keep things as basic as possible.
Step 5 – Starting Kali Linux
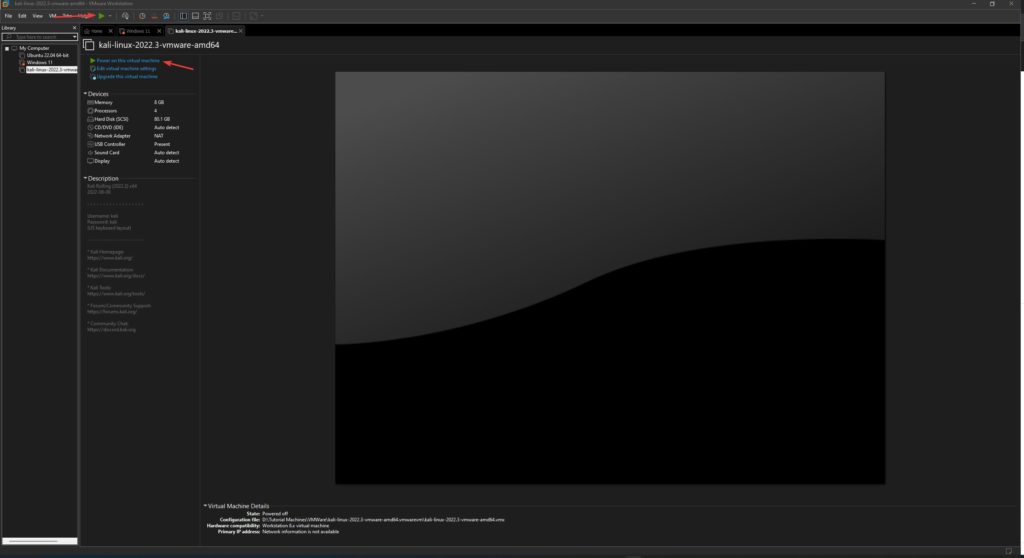
Now it’s time to start up Kali Linux for the first time. Click on Power on this virtual machine or use the big green play button up top:
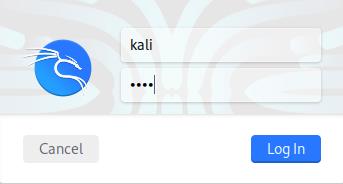
Once Kali Linux has booted up, you can log in by using the default credentials:
- Username: kali
- Password: kali
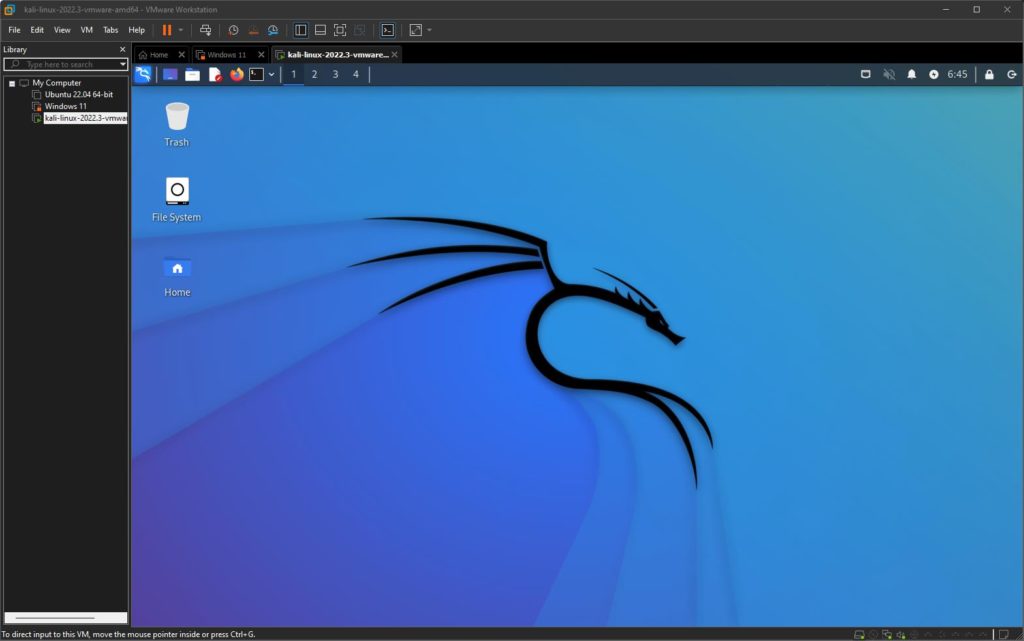
This should be everything you need to install Kali Linux on VMware.
Next Steps
I won’t go over the next steps in this article as I have a complete dedicated article for that: The Top Things to do after Installing Kali Linux in 2023.
I highly suggest you follow at least the initial steps in this article, as I cover things like changing the default password and user and also show you my favorite Kali Linux tweaks.
FAQ
Here are some commonly asked questions we get on the topic of Kali Linux on VMWare:
Can we use VMware in Kali Linux
Yes, you can. Installing Kali Linux on VMware is an easy and straightforward process, provided that you have the right tools and resources to complete it with ease.
Is Kali VMWare Free?
Yes, VMware Workstation Player is free for personal use. However, you may need to purchase a license if you plan to use it commercially or if you want to use the Snapshot feature.
Is VMWare or VirtualBox better for Kali Linux?
This is really hard to say. While VirtualBox is open-source software and VMWare is a commercial giant, we can’t really say what’s better in terms of Kali Linux. We had mixed experiences using both options over the years. Sometimes VMWare performs better, and sometimes VirtualBox performs better. It always depends on how often drivers and packages are updated to keep things as compatible as possible.
The biggest downside when it comes to features is the missing snapshot feature in the free version of VMWare Workstation Player, which is an important feature for most of us.
Since budget is a concern for most beginners and most people are not willing to put down 200$ for a VMWare Workstation Pro license, VirtualBox is the clear winner if budget is a concern.
Conclusion
Kali Linux works great on VMWare Workstation, and we have been using it extensively for the past few years. It doesn’t really matter which virtualization platform you choose as long as your requirements are met.
⚠️ Kali Linux Wiki
➡️ Download Kali Linux Safe & Easy
➡️ Install Kali Linux on VirtualBox
➡️ Install Kali Linux on VMWare Workstation
➡️ Dual Boot Kali Linux with Windows
➡️ Install Kali Linux on WSL 2
➡️ Install Kali Linux on a Laptop
➡️ Install VSCode on Kali Linux
➡️ Install OpenVAS on Kali Linux
➡️ Install Docker on Kali Linux
➡️ WiFi Adapter for Kali Linux

