Nmap is a very popular free & open-source network scanner that was created by Gordon Lyon back in 1997. Nmap is widely used in the Hacking and Cyber Security world to discover hosts and/or services on a network by sending packets and analyzing the following responses. In this Nmap Tutorial Series, you will learn everything you need to know about Nmap.
Most beginners only use Nmap to scan a network for open ports, although it is capable of much more than that. You can use Nmap to discover hosts, services, and operating systems and even use its extensible scripting library for vulnerability scanning. In this first Nmap Tutorial, we will cover only the Nmap basics. We will go through a couple of basic scans, and we will learn how to install Nmap.
All of the following Nmap tutorial articles will be linked to the Getting Started in Cyber Security article. Later on, in this series, we will look into the very powerful Nmap NSE Scripts.
Nmap is available for Linux, Windows, and macOS. In this Nmap tutorial, we will be using the Linux version of Nmap, more specifically, Debian-based Linux. Let us start with the installation itself. Nmap is available in two versions, a command line version and a GUI version. We will look at the command line version first, as this will be the one you will be using the most for any security-related work.
Note: If you want to use Nmap on Windows without the need to install bare-metal Linux or a virtual machine utilizing the power of WSL 2, we have an entire tutorial series covering how to do that.
For this tutorial, we are using the 192.168.56.0/24 subnet in a VirtualBox Host-Only network.
Table of Contents
- What is Nmap and how it works
- 1 – Installing Nmap on Linux
- 2 – Use Nmap with caution
- 3 – How to run a Basic Nmap Scan
- Conclusion
👀 This Tutorial has some related Articles!
👉 Part 1 – Nmap Basics
👉 Part 2 – Nmap Host Discovery
👉 Part 3 – Advanced Nmap Commands
👉 Part 4 – Nmap NSE Scripts
👉 Part 5 – Nmap on Windows
What is Nmap and how it works
Nmap is a tool that can be used to explore networks and identify hosts, services, and security issues. Nmap uses a variety of scanning techniques to determine what hosts are available on the network, what services they offer, what operating systems they are running, what type of packet filters/firewalls are in use, and more.
Nmap is a scanning tool that can be used to find open, vulnerable ports on systems. This can be useful for finding systems that may be susceptible to attack. Nmap can also be used to perform denial of service attacks.
Nmap is a powerful and mighty tool that can be used for positive or negative purposes. It’s critical to know how it works in order to make the most of it and use it responsibly.
1 – Installing Nmap on Linux
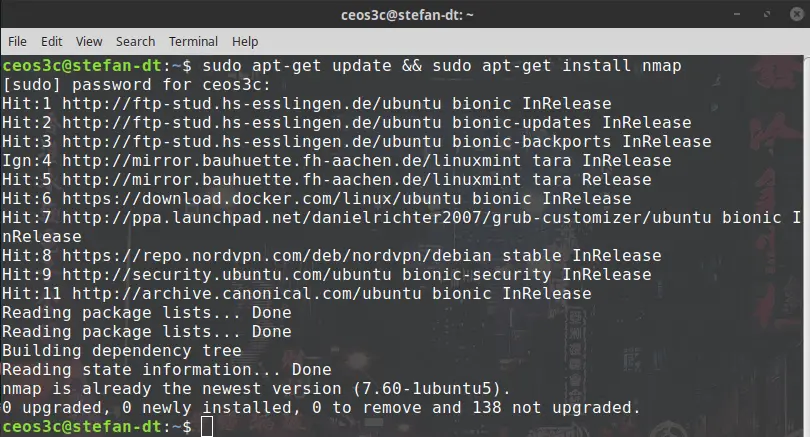
You don’t need to run a security distribution to use Nmap. You can install it on any Debian-based system with the following command.
sudo apt-get update && sudo apt-get install nmapCode language: JavaScript (javascript)2 – Use Nmap with caution
This is an extra point because this is important. Take this into consideration when using Nmap, and use Nmap at your own risk. If you get in trouble, I can’t be held responsible.
If you scan networks that you don’t have permission to, you can get in trouble, and lawful consequences might occur. Only use Nmap within your laboratory or with the consent of the receiving party.
3 – How to run a Basic Nmap Scan
Now we will go over a couple of basic scanning techniques. Be aware that a firewall in the network can possibly return false scan results because they detect your scan.
Scanning a single target
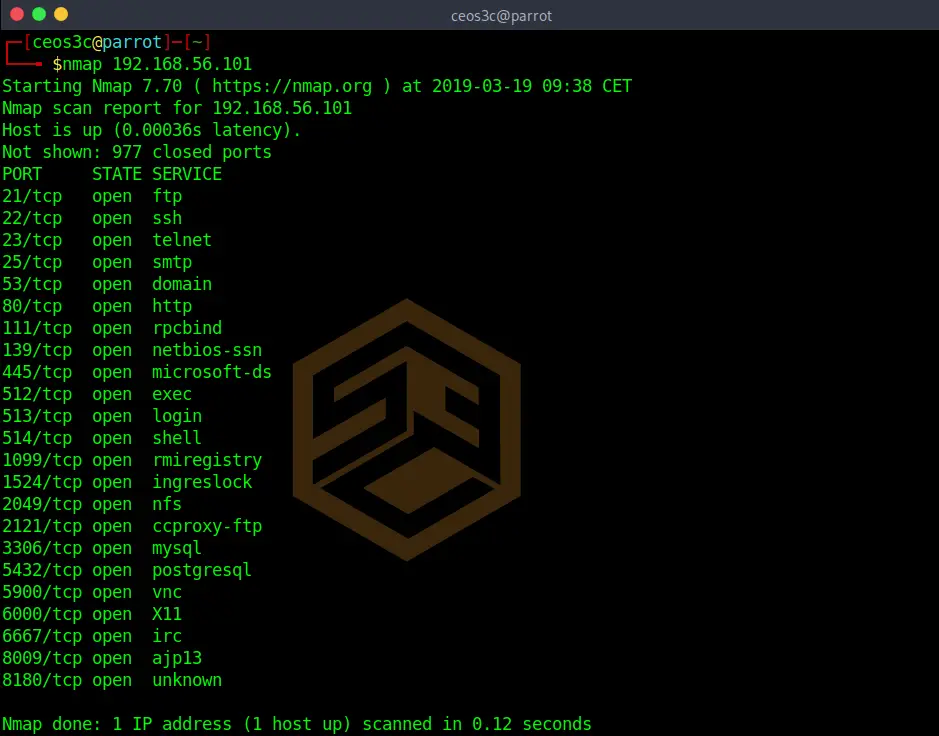
nmap 192.168.56.101Code language: CSS (css)This default Nmap scan will check against the 1000 most used TCP / IP ports.
You see three rows in the results. PORT, STATE, and SERVICE. The PORT row obviously shows you the port number and the protocol. The STATE row shows you if the port is open or closed, and the SERVICE row shows you which service is associated with the port.
This default scan is mostly used to get a first overview of a client.
Scanning multiple targets
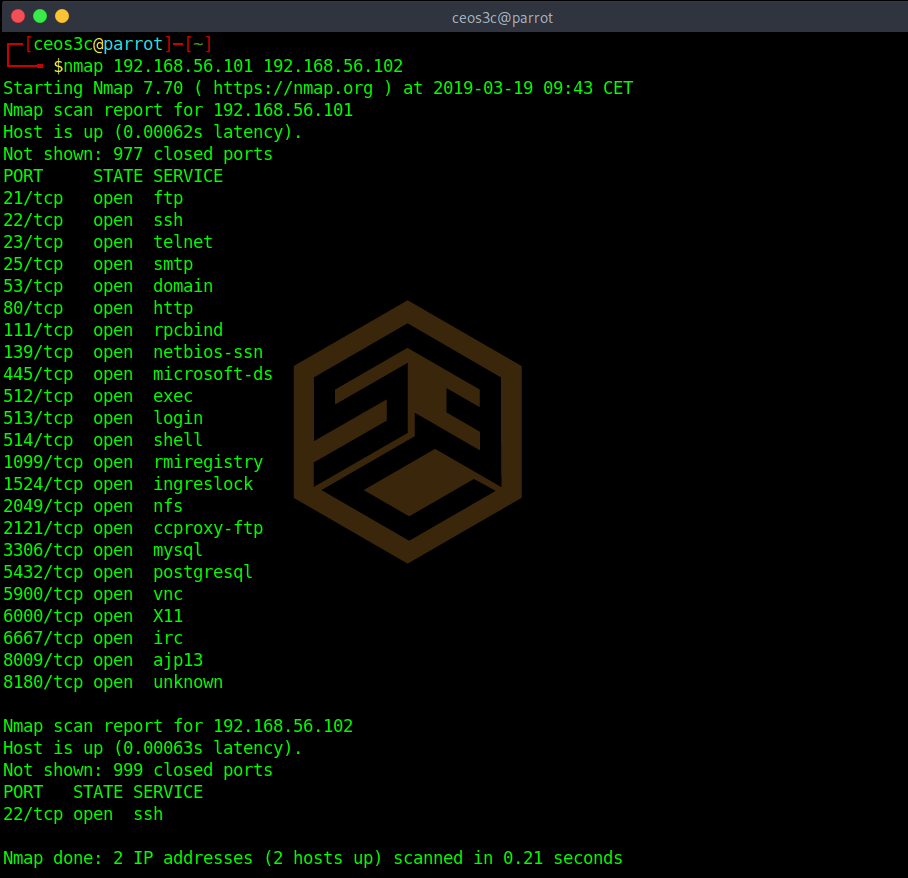
You can also go ahead and scan for multiple targets at the same time.
You can extend this list as long as you want. This command is seldom used tho, though it can be replaced by the more efficient command below.
Scanning an IP address range
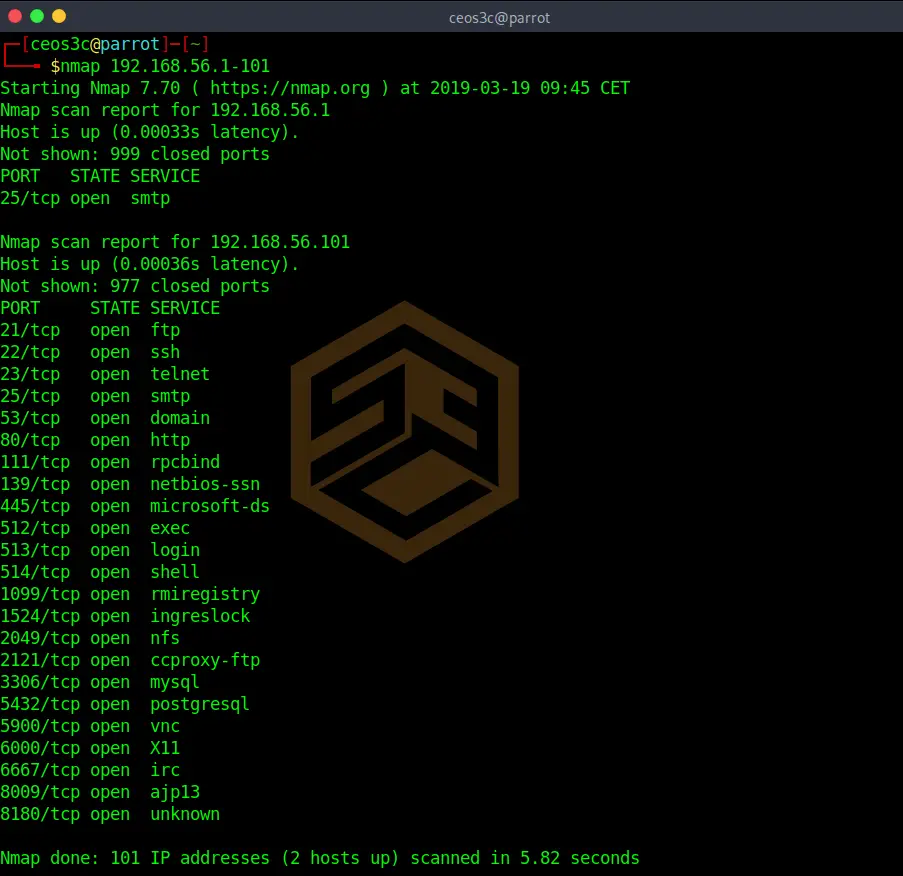
To scan a whole range of IP addresses, use the following.
nmap 192.168.56.1-101Code language: CSS (css)This automatically scans for all online hosts in this IP range.
Scanning an entire subnet
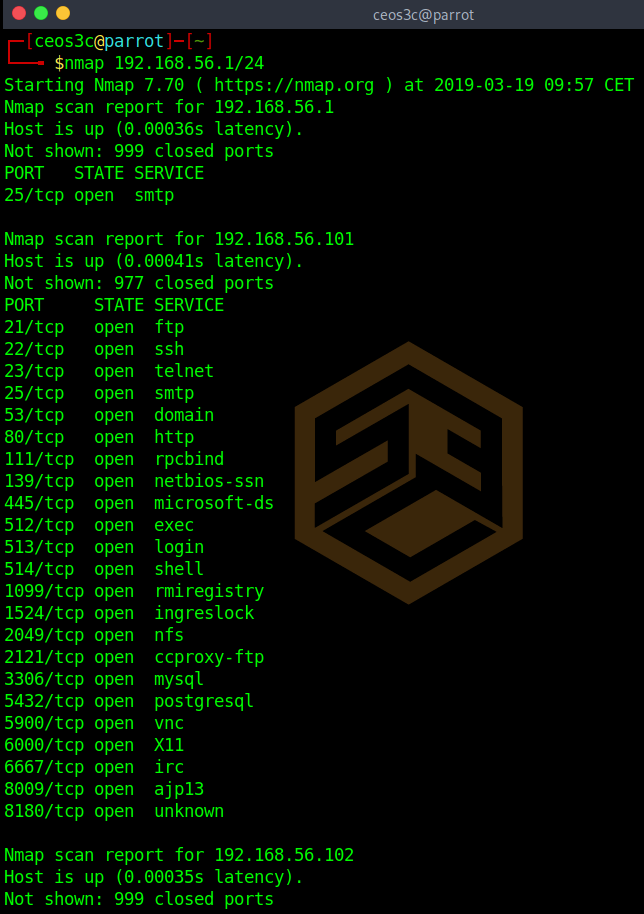
This command is widely used. It allows you to scan a whole subnet using CIDR notation.
nmap 192.168.56.1/24Scanning a target list
Now we can take this a step further and also use lists to put our targets into.
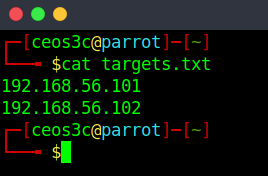
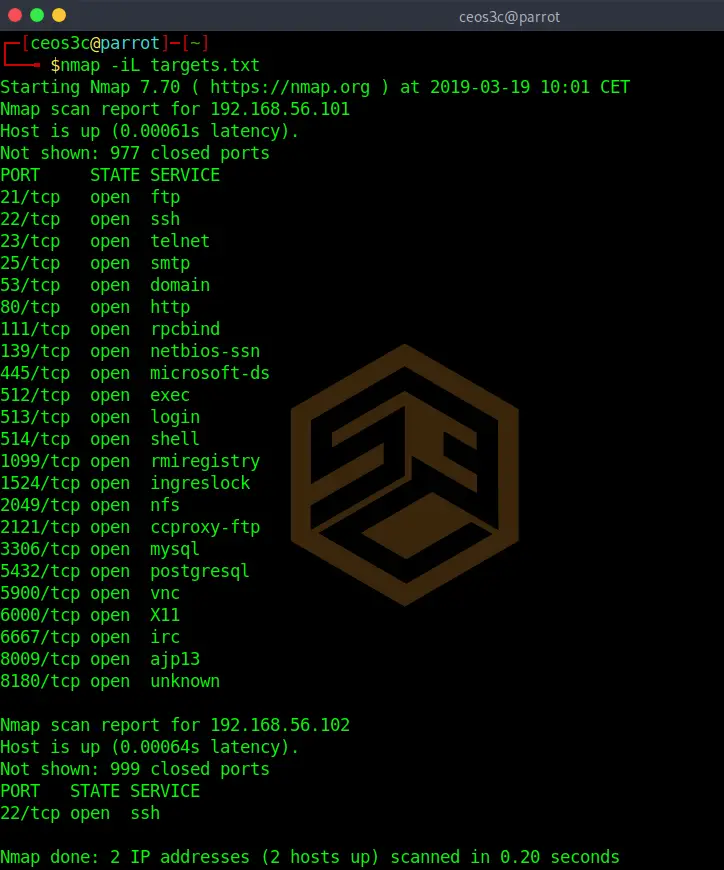
Our targets.txt includes two hosts, one per line. If we run the following command, Nmap runs the default scan against those targets in the list.
nmap -iL targets.txtCode language: CSS (css)Excluding targets
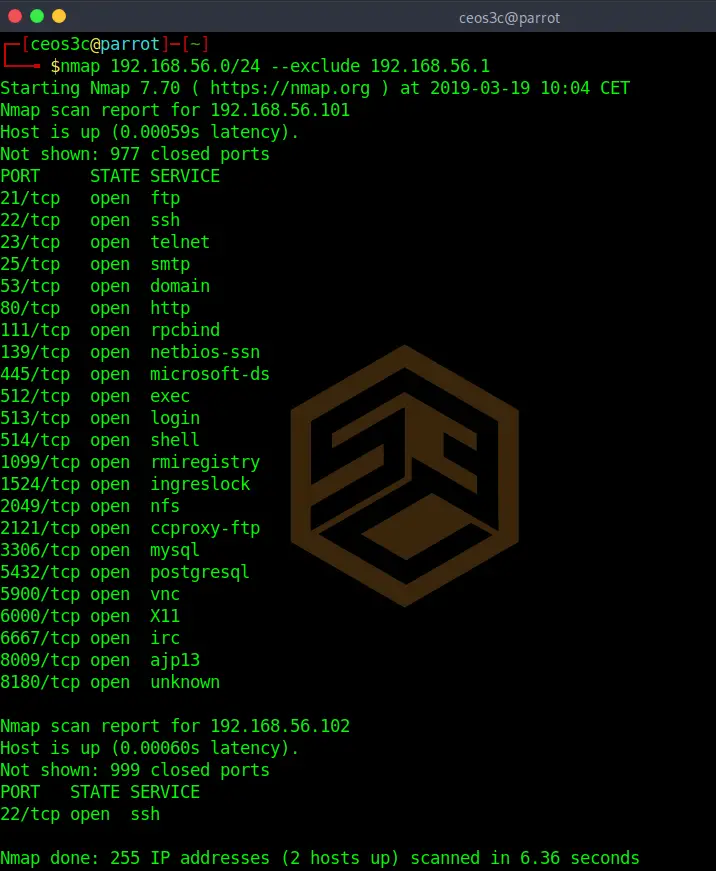
It is also possible to exclude targets from a scan. If you know for example that 192.168.56.1 is the router and you don’t want to run your scan against it, use the following.
nmap 192.168.56.0/24 --exclude 192.168.56.1You can also exclude a whole range of IP addresses by using 192.168.56.1-100 for example.
Aggressive scan
Be careful with this, as it is easily detectable. This scan uses a variety of scan options included in a single parameter: -A
nmap 192.168.56.101 -ACode language: CSS (css)┌─[ceos3c@parrot]─[~]
└──╼ $nmap 192.168.56.101 -A
Starting Nmap 7.70 ( https://nmap.org ) at 2019-03-19 10:07 CET
Nmap scan report for 192.168.56.101
Host is up (0.00028s latency).
Not shown: 977 closed ports
PORT STATE SERVICE VERSION
21/tcp open ftp vsftpd 2.3.4
|_ftp-anon: Anonymous FTP login allowed (FTP code 230)
| ftp-syst:
| STAT:
| FTP server status:
| Connected to 192.168.56.102
| Logged in as ftp
| TYPE: ASCII
| No session bandwidth limit
| Session timeout in seconds is 300
| Control connection is plain text
| Data connections will be plain text
| vsFTPd 2.3.4 - secure, fast, stable
|_End of status
22/tcp open ssh OpenSSH 4.7p1 Debian 8ubuntu1 (protocol 2.0)
| ssh-hostkey:
| 1024 60:0f:cf:e1:c0:5f:6a:74:d6:90:24:fa:c4:d5:6c:cd (DSA)
|_ 2048 56:56:24:0f:21:1d:de:a7:2b:ae:61:b1:24:3d:e8:f3 (RSA)
23/tcp open telnet Linux telnetd
25/tcp open smtp Postfix smtpd
|_smtp-commands: metasploitable.localdomain, PIPELINING, SIZE 10240000, VRFY, ETRN, STARTTLS, ENHANCEDSTATUSCODES, 8BITMIME, DSN,
|_ssl-date: 2019-03-19T09:07:32+00:00; 0s from scanner time.
| sslv2:
| SSLv2 supported
| ciphers:
| SSL2_RC2_128_CBC_EXPORT40_WITH_MD5
| SSL2_RC2_128_CBC_WITH_MD5
| SSL2_RC4_128_EXPORT40_WITH_MD5
| SSL2_RC4_128_WITH_MD5
| SSL2_DES_192_EDE3_CBC_WITH_MD5
|_ SSL2_DES_64_CBC_WITH_MD5
53/tcp open domain ISC BIND 9.4.2
| dns-nsid:
|_ bind.version: 9.4.2
80/tcp open http Apache httpd 2.2.8 ((Ubuntu) DAV/2)
|_http-server-header: Apache/2.2.8 (Ubuntu) DAV/2
|_http-title: Metasploitable2 - Linux
111/tcp open rpcbind 2 (RPC #100000)
| rpcinfo:
| program version port/proto service
| 100000 2 111/tcp rpcbind
| 100000 2 111/udp rpcbind
| 100003 2,3,4 2049/tcp nfs
| 100003 2,3,4 2049/udp nfs
| 100005 1,2,3 34454/tcp mountd
| 100005 1,2,3 40696/udp mountd
| 100021 1,3,4 38073/tcp nlockmgr
| 100021 1,3,4 41376/udp nlockmgr
| 100024 1 33524/udp status
|_ 100024 1 57858/tcp status
139/tcp open netbios-ssn Samba smbd 3.X - 4.X (workgroup: WORKGROUP)
445/tcp open netbios-ssn Samba smbd 3.0.20-Debian (workgroup: WORKGROUP)
512/tcp open exec netkit-rsh rexecd
513/tcp open login OpenBSD or Solaris rlogind
514/tcp open shell Netkit rshd
1099/tcp open java-rmi Java RMI Registry
1524/tcp open bindshell Metasploitable root shell
2049/tcp open nfs 2-4 (RPC #100003)
2121/tcp open ftp ProFTPD 1.3.1
3306/tcp open mysql MySQL 5.0.51a-3ubuntu5
| mysql-info:
| Protocol: 10
| Version: 5.0.51a-3ubuntu5
| Thread ID: 15
| Capabilities flags: 43564
| Some Capabilities: ConnectWithDatabase, Support41Auth, LongColumnFlag, SupportsTransactions, Speaks41ProtocolNew, SwitchToSSLAfterHandshake, SupportsCompression
| Status: Autocommit
|_ Salt: *>:IAI-A>Vth+9~1u}5,
5432/tcp open postgresql PostgreSQL DB 8.3.0 - 8.3.7
|_ssl-date: 2019-03-19T09:07:32+00:00; 0s from scanner time.
5900/tcp open vnc VNC (protocol 3.3)
| vnc-info:
| Protocol version: 3.3
| Security types:
|_ VNC Authentication (2)
6000/tcp open X11 (access denied)
6667/tcp open irc UnrealIRCd
8009/tcp open ajp13 Apache Jserv (Protocol v1.3)
|_ajp-methods: Failed to get a valid response for the OPTION request
8180/tcp open http Apache Tomcat/Coyote JSP engine 1.1
|_http-favicon: Apache Tomcat
|_http-server-header: Apache-Coyote/1.1
|_http-title: Apache Tomcat/5.5
Service Info: Hosts: metasploitable.localdomain, localhost, irc.Metasploitable.LAN; OSs: Unix, Linux; CPE: cpe:/o:linux:linux_kernel
Host script results:
|_clock-skew: mean: 1h19m59s, deviation: 2h18m33s, median: 0s
|_nbstat: NetBIOS name: METASPLOITABLE, NetBIOS user: <unknown>, NetBIOS MAC: <unknown> (unknown)
| smb-os-discovery:
| OS: Unix (Samba 3.0.20-Debian)
| NetBIOS computer name:
| Workgroup: WORKGROUP\x00
|_ System time: 2019-03-19T05:07:30-04:00
|_smb2-time: Protocol negotiation failed (SMB2)
Service detection performed. Please report any incorrect results at https://nmap.org/submit/ .
Nmap done: 1 IP address (1 host up) scanned in 26.47 seconds
Code language: PHP (php)As you can see, this returns a hell lot of information.
Conclusion
This should be enough to get you started. I recommend building a lab and testing out those basic commands. See what information you are able to gather and how to process it. Run scans against different targets and against different OS.
👀 This Tutorial has some related Articles!
👉 Part 1 – Nmap Basics
👉 Part 2 – Nmap Host Discovery
👉 Part 3 – Advanced Nmap Commands
👉 Part 4 – Nmap NSE Scripts
👉 Part 5 – Nmap on Windows


Thank you for your passion in teaching beginners like me. Contents are easy to follow for non-technical person and is a first step in learning.
Joseph, you are very welcome 🙂