There are endless reasons on why you would want to securely wipe a Hard Drive. Some of them might be, you want to sell your old computer and don’t want your data to be recoverable, or you work for a company that requires certain standards before handing out a new device to a new employee, over of course, you don’t want your favorite Britney Spears songs being discovered by a third party.
Gladly, it is very straight-forward and easy to Securely Wipe a Hard Drive. I’ll show you through the process, step by step.
What you need
Downloading Rufus and creating a bootable USB drive
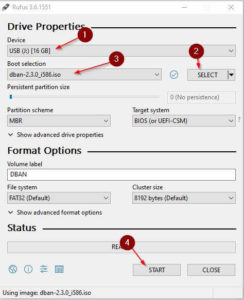
To be able to run DBAN, we need to create a bootable USB drive. That is very easy. First, download the DBAN.iso file. After that, go ahead and download and start Rufus.
Once you have Rufus started, make sure to select the correct USB drive. Be aware that ALL DATA on the USB drive will be deleted!
Next, click on SELECT and choose the dban.iso file from your downloads folder. Click START once you have all set up.
The process should be done rather quickly. Once you are done with this, remove the USB drive from your PC and plug it in the laptop/computer where you want the hard drive to be wiped.
Booting from a USB drive
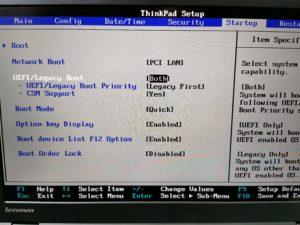
To be able to boot to DBAN, you need to make sure your BIOS is set on Legacy Boot Mode (or Legacy and UEFI with Legacy first). You need to enter your computer’s BIOS setup for this. This process will be slightly different on each manufacturer, I, for example, use a Thinkpad for this demonstration. I need to press the Enter button right after switching the computer on.
The best way to find out how you can access your model’s bios is by simply googling: “MyComputerModel enter BIOS”.
Once you are there, navigate to Startup and either select only Legacy or Legacy & UEFI like in the screenshot below.
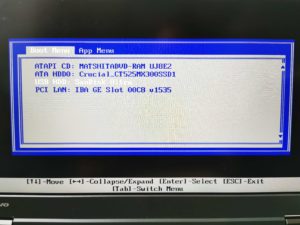
Next, navigate to Restart and select Save Changes and Exit or something along those lines. When the computer restarts, smash that like button (Damn you, Peter McKinnon!), I mean, smash that boot Menu button. You can find out which button it is, again, by googling: “MyComputerModel enter boot menu”.
Once you are in the boot menu, select your USB flash drive to boot from it.
How to Securely Wipe a Hard Drive with DBAN
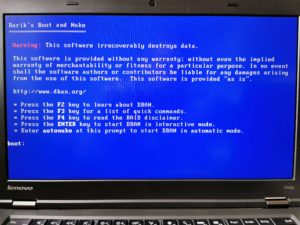
If you followed each step correctly, you should now see Darik’s Boot and Nuke main menu.
From here, you have a couple of options. For one, you could just type autonuke and hit enter, this will use an automatic algorithm to wipe your hard drive. Be careful tho, I highly discourage you from doing this if you have multiple hard drives in your computer next to the one you want to wipe.
The safer method is just hitting enter to get into the interactive mode.
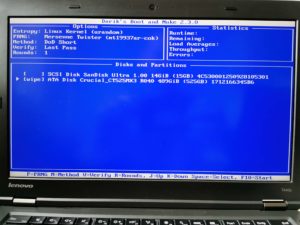
Once you are there, you have to select the hard drive you want to wipe. Make sure to choose the correct one and hit the space button.
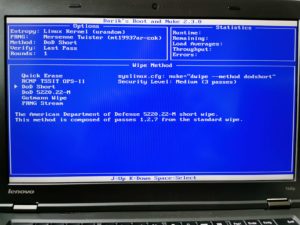
You could just hit F10 to start the process now, leaving everything as default and you are fine. The default options are great for everyone. However, if you want more control over which algorithm is being used for the deletion, you can adjust that by pressing the M key.
You have to google your way through each algorithm if you want to understand what they do. Leaving it on default, as mentioned, is perfectly fine for most users. In the main menu, you are also able to choose different values for verification, how many rounds the algorithm will go, etc. Those are all advanced options that need further reading. I will only cover the basic functionality here.
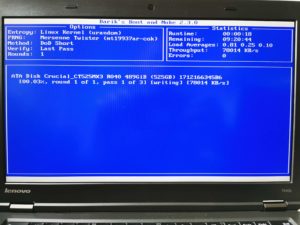
Once you have everything set up, hit F10 to start with wiping your hard drive. Take note, this can take a very long time depending on the hard drive size.
It can take several hours.
Conclusion
The process of securely wiping your hard drive takes a bit of effort but is definitely worth the hassle. You don’t want somebody to be able to recover your personal data when you are selling your old device.

HI,
Is it usefull to do this on a SSD drive like you do ?
I heard that, the SSD drive don’t keep data like the HARDDRIVE does, so it looks like useless , on a SSD drive however, and it is dangerous for it .
Thanks for your answer.