I am excited to give you this new tutorial on Synology NAS to Glacier Backup – The Ultimate Guide. Read on!In the previous tutorials we were playing around with creating our first share, integrating our NAS into the Domain and now, to round the whole thing up, we will cover backing up our files to Amazon’s incredible cheap Glacier.
I’m doing this in my business environment, but I have to honestly say, I am so excited about how easy and cheap this is, that I will also implement this kind of Backup into my professional Photography environment at home. So far I just backed all my images up to an external Hard Drive ( Next to my Raid Z1 NAS), but this is really so dirt cheap that I will automate the whole process into Glacier.
Enough talk, let’s get our hands dirty.
Installing the Glacier Backup App on your Synology NAS
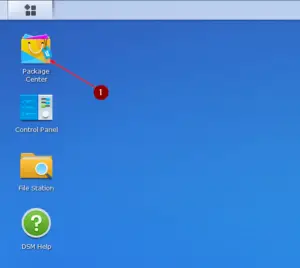
First, you need to log in to your Synology NAS and click on Package Manager which you find under Control Panel or on your Desktop.
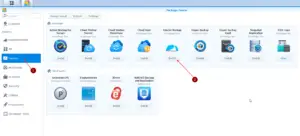
Navigate to Backup and Install Glacier Backup from Synology Inc. Or find it by typing Glacier into the Search bar on the upper left corner.
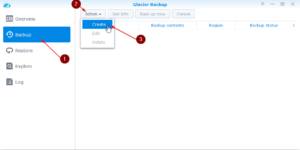
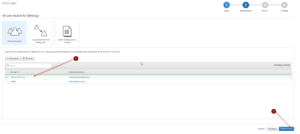
After the installation is finished, Open Glacier Backup, click on Backup, Click on Action and hit Create.
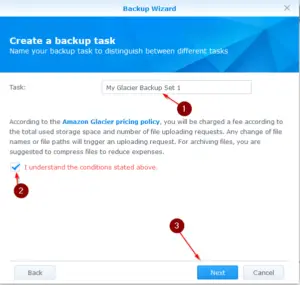
Give your Task a descriptive Name and Agree on the Conditions above. Hit Next.
Creating an IAM User for our Synology NAS
Now you need to head over to Amazon AWS and log into your Management Console.
Once that is done, Navigate to Services / IAM, click on Users and click on Add User.
We do not want to use our Admin Account with permissions to everything for our Synology NAS but want to create a new one who has only full access to Amazon Glacier .
.
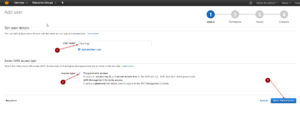
Give your User a Name (Synology is just fine) and as Access Type check Programmatic Access because we do need an Access Key ID and Secret Access Key.
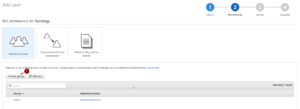
Click on Create Group.
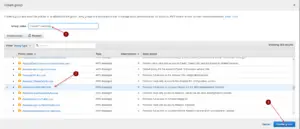
Now scroll down until you find AmazonGlacierFullAccess and tick that point. Click Create Group next.
Check GlacierFullAccess for our User and click on Next: Review.
Double check if everything went right and hit Create User.
Now NOTE down your Access Key ID and your Secret Access Key. This will be the only time this information will be shown to you. If you don’t have it written down somewhere, you need to create a new access key later.
Click on Close
Back to our Synology NAS and finalizing the Backup
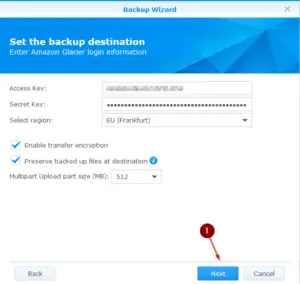
Now head back to your Synology NAS and enter the Access Key and Secret Key you just created for your Synology User. Select the correct Region.
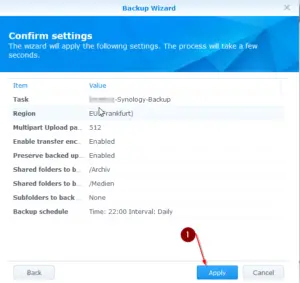
Check Enable transfer encryption if you want and choose how big each Upload Part should be. I’ll stay with 512MB as this is a good size for my internet connection.
If you have a very slow internet connection you might want to decrease it.
Click Next.
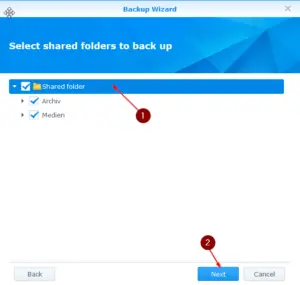
Now select what you want to Back Up. If you want to Back Up everything, just tick Shared Folder. Click on Next.
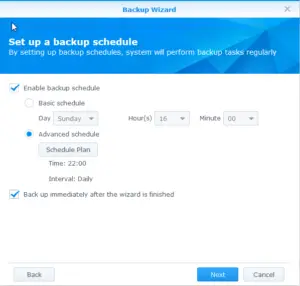
Next, you have to select a Schedule. This backup will run fully once and incremental after. That means, it first shovels everything you selected onto Glacier. After this first huge backup, it will then just add files that are new or delete files that were deleted. It’s called incremental. You can look that up if you want.
I went for Advanced Schedule because I want the backup to run every day at 22:00. You can adjust this however you want.
Check Back up immediately after the wizard finished if you want to start the backup process right away.
Review your settings and check if everything is to your liking. Click Apply.
Finalizing and checking the Status of your Backups
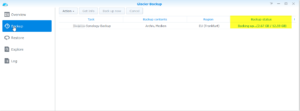
To check the progress of the Upload you can open Glacier Backup on your Synology NAS and click on Backup. On the right-hand side, you will see Backup Status which shows you how much is already uploaded and how much is left.
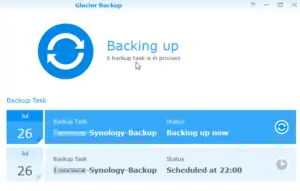
On Overview, you can also see that it’s backing up right now.
That’s it. Within a few minutes, you set up a complete Backup Schedule from your Synology NAS to Amazon’s Glacier.
Final Words
I really love how easy this is. It completely takes out my interaction with the whole backup process. I just need to check everything is still running once in a while. I am surprised at how easy to use this App is, considering the whole AWS Behemoth is fairly complicated.
Props to Synology for making it so easy.
I hope that helps. If it does, consider becoming a Patron so I will be able to produce more of the good stuff 🙂
Grab your DS 716+ II and your Hard Drives from the links below to help me keep them Articles coming!



Which of the three versions of Glacier storage is being used? Also, AWS recommends compressing files for storage to save cost. How does one do that?
Hey, thanks for sharing this tutorial.
I’m wondering if there’s an option to do this but encrypt the files before sending them so that the Synology knows the indexes (i.e., what file is in what archive) but Amazon only has blobs of data.
I’m considering buying a Synology and was concerned about the backup option. This sounds great but I would like to know if there’s a way to back the data up before.
Thanks again!
The problem with the Glacier Backup app is that the process often inexplicably slows to a crawl and any incremental backups start getting behind. Starting and stopping the task sometimes helps but it can be a ptoblem.
Also, you can’t select a different path on a restore it forces the same source path so if you want to restore some subset I find it easier to restore to a DIFFERENT Synology and then grab the files.
It’s unnecessarily complicated.
A year later: Now that there is AWS S3 Glacier DEEP archive for $1/TB/Mo, I need it.
I have set up a AWS account with keys, installed Glacier Backup on my Synology DS216J, and have even uploaded a file to Deep Glacier using this process: https://www.youtube.com/watch?v=YLn5V47DpAU
But I am concerned with PUT fees for 400,000 files from my Synology. (2TB of data)
Your thoughts?
Is there a way to have the backup automatically remove data past a certain date on the Synology to free up space while keeping it in the cloud as backup for later reference if needed?
Make sure your location is correct in AWS, and Glacier. This is one of the things that can get you in trouble.
Thanks for all this! I have been running Glacier Backup to AWS from a Synology NAS for years, and now that NAS died. Could you describe how I connect Glacier Backup from a new Synology to the existing AWS repo so I can restore to the new NAS and continue backup from it as well? I don’t have the current AWS Access or Secret key, and don’t want to ‘break’ anything… Thanks!
I couldn’t see where you set a password or encryption key for encrypting the files before they are sent to Amazon.
Hi, thanks for the tutorial.
One question regarding the restoring of files: There is the option “overwrite files with the same name”. I am not quite sure what happens when I activate it: 1. the file is skipped or 2. the file is still restored, but with something life file (1).pdf if the original was file.pdf. The first would be useful (safe download time), the second would be a mess. I want to restore 850 GB – it would be a mess if I get duplicates of many files.
Second question: is there any way of getting higher bandwidth for download? I don’t get more than around 1 MB/s on average. Takes weeks for my data. I would be willing to pay for higher bandwidth, but I don’t find an option on AWS on how to do that.
Thanks from Germany!
What happens if Synology goes away how can I restore the files to my computer? Asking just in case.
Do you have an updated guide. I followed your steps exactly and get Testing connection failed on my Synology.
Hi JM,
no. The Steps should stay the same. Are you sure you didn’t miss something?
Something I’ve had trouble wrapping my head around is the fact that glacier backup archives are immutable, but that the NAS will do incremental backups???
Does that mean additional smaller archives each additional backup? (presuming new files)
If I ever edit a file that was backed up, how is the newer and older version of the file handled within glacier?
I’ve otherwise done regular S3 backups prob at a slightly higher cost.
HI there, I actually need to restore from a glacier backup. Do you have a tutorial on that?
Hi there,
not really, but it is very easy to do:
1. Login to your NAS
2. Open Glacier Backup
3. Click on Explore
4. Choose Folder or File you want to be restored (It can take some time to display because of how Glacier is designed)
5. Click on Restore
6. Click on Queue on the Top, select the File and click on Start.
7. See the Restore Status on the right side
This can take up to several hours depending on how you setup your Glacier.
I hope that helps.
Hey, thanks for the info on the user creation profile, really helpfull and easy to setup.
I really hope that never need to delete the vault… i saw a lot of drawbacks towards this task,
Much love from Brazil
Good tuto my friend. I have just createed my second backup (the first was somehow a mistake) and now I want to delete this old first backup but it looks like almost impossible to delete these data. ¿How can I see where my files are stored?
Thanks!
Haha, yeah that’s not that easy. You need to delete it over the Glacier CLI. Amazon as a guide on it somewhere. Just google “delete files AWS Glacier”
Does it require full glacier access? Have you tried to limit it to specific glacier vault?
that was so easy to be true..I contacted amazon to get help doing it and they suggested I do it with cloudberry where I have to pay tons of money for something synology does for free. Thanks I hope it really works!
Lol. Yea, it works perfectly. Super easy to set up too.
Nice article thanks!
Just out of curiosity, do you still use this backup solution?
If so, how much data did you store in Glacier so far and how much does it cost you?
Hi there, yes, it works like a charm. Completely automated. Now I have around 350GB up there and pay ~1.85$ USD a Month. Pretty reasonable I think.